Panasonic KXFB421 Operating Instructions - Page 29
Initial Programming
 |
View all Panasonic KXFB421 manuals
Add to My Manuals
Save this manual to your list of manuals |
Page 29 highlights
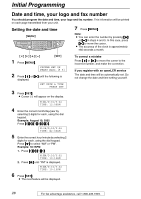
Setting your logo The logo can be your company, division or personal name. {HANDSET MUTE} (Insert) {MENU} FLASH} {SET} (Hyphen) {STOP} (Delete) 1 Press {MENU}. SYSTEM SET UP PRESS NAVI.[( )] 2 Press {} until the following is displayed. YOUR LOGO PRESS SET 3 Press {SET}. LOGO= 4 Enter your logo, up to 30 characters, using the dial keypad. See page 30 for details. Example: "Bill" 1. Press {2} 2 times. L Cursor (|) will appear on the display. LOGO=|B 2. Press {4} 6 times. LOGO=B|i 3. Press {5} 6 times. LOGO=Bi|l 4. Press {>} to move the cursor to the next space and press {5} 6 times. LOGO=Bil|l 5 Press {SET}. L The next feature will be displayed. Initial Programming 6 Press {MENU}. Note: L You can enter your logo by pressing {+} or {-} in step 4. In this case, press {>} to move the cursor (see page 30 for details). To change capital or lower-case letters Pressing the {#} key will change to capital or lower-case alternately. 1. Press {2} 2 times. LOGO=|B 2. Press {4} 3 times. LOGO=B|I 3. Press {#}. LOGO=B|i 4. Press {5} 3 times. LOGO=Bi|l To correct a mistake Press {} to move the cursor to the incorrect character, and make the correction. To delete a character Press {} to move the cursor to the character you want to delete and press {STOP}. To insert a character 1. Press {} to move the cursor to the position to the right of where you want to insert the character. 2. Press {HANDSET MUTE} to insert a space and enter the character. For fax advantage assistance, call 1-800-435-7329. 29
-
 1
1 -
2
-
3
-
4
-
5
-
6
-
7
-
8
-
9
-
10
-
11
-
12
-
13
-
14
-
15
-
16
-
17
-
18
-
19
-
20
-
21
-
22
-
23
-
 24
24 -
 25
25 -
 26
26 -
 27
27 -
 28
28 -
 29
29 -
 30
30 -
 31
31 -
 32
32 -
 33
33 -
 34
34 -
35
-
36
-
37
-
38
-
39
-
40
-
41
-
42
-
43
-
44
-
45
-
46
-
47
-
48
-
49
-
50
-
51
-
52
-
53
-
54
-
55
-
56
-
57
-
58
-
59
-
60
-
61
-
62
-
63
-
64
-
65
-
66
-
67
-
68
-
69
-
70
-
71
-
72
-
73
-
74
-
75
-
76
-
77
-
78
-
79
-
80
-
81
-
82
-
83
-
84
-
85
-
86
-
87
-
88
-
89
-
90
-
91
-
92
 |
 |
