Panasonic PT-D4000U Operating Instructions - Page 30
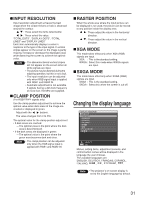
How to use ADVANCED MENU
 |
UPC - 791871111529
View all Panasonic PT-D4000U manuals
Add to My Manuals
Save this manual to your list of manuals |
Page 30 highlights
Adjusting the position Note • If the picture size is compressed or enlarged by using the 16:9 aspect ratio when the projector is used for profitable purpose or in the presence of an audience (for example, in a coffee shop or at a hotel etc.), it may infringe the rights of the copyright owner of the original picture. • If a picture with the standard (4:3) aspect ratio is projected at a wide aspect ratio, parts of the picture may run over the screen bounds or the overall picture may be distorted. To view the picture at its original aspect ratio, choose the standard 4:3 aspect ratio. ZOOM This enables the enlargement ratio to be changed and the resulting enlarged image displayed. : The enlargement ratio in the horizontal direction is changed. : The enlargement ratio in the vertical direction is changed. CLOCK PHASE (For RGB/YPBPR signals only) Clock phase adjustment allows the user to minimize visible noise with the or button. Note • When projecting signals whose dot clock frequency is 150 MHz or higher, the noise may not disappear even when the clock phase is adjusted. • Clock phase adjustment is not available for digital signals. KEYSTONE KEYSTONE : Keystone distortion can be corrected only along either horizontal bound of the picture. button: button: 30 Note • Keystone distortion can be corrected to ±30 ° of the angle of tilt for the projector. However, the greater the correction amount, the more the picture quality will deteriorate, and the harder it will become to achieve a good level of focus. To obtain the best picture quality, set up the projector and screen in such a way that the amount of keystone correction required is as minimal as possible. • The picture size will also change when correction of keystone distortion is carried out. LINEARITY : After you are finished with keystone adjustment, adjust vertical linearity with the or button. Linearity is not adjustable if no correction was made to keystone distortion. How to use ADVANCED MENU ADVANCED MENU DIGITAL CINEMA REALITY BLANKING INPUT RESOLUTION CLAMP POSITION RASTER POSITION XGA MODE SXGA MODE AUTO 1 XGA SXGA MENU SELECT CHANGE DIGITAL CINEMA REALITY Increase the vertical resolution when the S-Video/ Video signal input or 480i, 576i, 1080/60i or 1080/50i signal input is applied. AUTO : Performs automatic detection and cinema processing. (factory default) OFF : Unforced cinema processing 25p FIXED: Forced cinema processing (2:2 pulldown) is performed when a PAL and SECAM, or 576i or 1080/50i signal is input. 30p FIXED: Forced cinema processing (2:2 pulldown) is performed when a NTSC, 480i or 1080/60i signal is input. Note • In "DIGITAL CINEMA REALITY", the image quality will be deteriorated if "30p FIXED" or "25p FIXED" is selected when the signal is not a 2:2 pulldown signal. (The vertical resolution will be deteriorated.) BLANKING You can perform fine adjustments for blanking if noise appears at the ends of the screen or the image protrudes out of the screen during image projection using a video deck and so on. : Select the UPPER, LOWER, LEFT or RIGHT adjustment. : Adjust the blanking width. For upper adjustment For lower adjustment For left adjustment For right adjustment
-
 1
1 -
2
-
3
-
4
-
5
-
6
-
7
-
8
-
9
-
10
-
11
-
12
-
13
-
14
-
15
-
16
-
17
-
18
-
19
-
20
-
21
-
22
-
23
-
24
-
 25
25 -
 26
26 -
 27
27 -
 28
28 -
 29
29 -
 30
30 -
 31
31 -
 32
32 -
 33
33 -
 34
34 -
 35
35 -
36
-
37
-
38
-
39
-
40
-
41
-
42
-
43
-
44
-
45
-
46
-
47
-
48
-
49
-
50
-
51
-
52
-
53
-
54
-
55
-
56
-
57
-
58
-
59
-
60
-
61
-
62
-
63
-
64
-
65
-
66
-
67
-
68
 |
 |