Panasonic PT-D4000U Operating Instructions - Page 36
Displaying the internal test pattern
 |
UPC - 791871111529
View all Panasonic PT-D4000U manuals
Add to My Manuals
Save this manual to your list of manuals |
Page 36 highlights
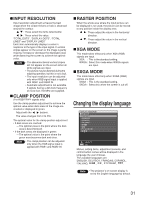
OPTION2 settings SYSTEM INFORMATION The projector's system information can be viewed. SYSTEM INFORMATION MAIN VERSION NETWORK VERSION PROJECTOR RUNTIME LAMP1 LAMP2 LAMP1 ON LAMP2 ON RETURN 1.00.00 1.00 300h 100h 100h 20 20 AUTO POWER OFF The projector can be automatically set to the standby mode if no signals are input for the set duration. DISABLE: This is the standard setting. This function is set to OFF. 45MIN. - 90MIN.: The duration can be set in 15-minute increments from 45 to 90 minutes. DATE AND TIME This lets you set the time zone and the current date and time for the projector's internal clock. TIME ZONE : Set the time zone of your country. ADJUST CLOCK : Set the current date and time. LOCAL DATE/LOCAL TIME : Date and time set in above are displayed. PASSWORD This function is used by a service person. Input the password with the numeric buttons (0 to 9) of the remote control and press the ENTER button to confirm the entry. Displaying the internal test pattern The projector has eight types of internal test patterns to check the condition of the set. To display test patterns, follow the steps below. Press the TEST PATTERN button on the remote control. Or select "TEST PATTERN" in the MAIN MENU and search through the various types of test patterns by using buttons. Note • Results of adjustment on the image, picture quality, position, size and other factors will not be reflected in test patterns. Be sure to display the input signal before performing various kinds of setting. Cycle of displayed internal test patterns MENU screen + Entry screen All white Focus All black Color bars Flag 36 Window (inversion) Black on white ground Window White on black ground 16:9 frame
-
 1
1 -
2
-
3
-
4
-
5
-
6
-
7
-
8
-
9
-
10
-
11
-
12
-
13
-
14
-
15
-
16
-
17
-
18
-
19
-
20
-
21
-
22
-
23
-
24
-
25
-
26
-
27
-
28
-
29
-
30
-
 31
31 -
 32
32 -
 33
33 -
 34
34 -
 35
35 -
 36
36 -
 37
37 -
 38
38 -
 39
39 -
 40
40 -
 41
41 -
42
-
43
-
44
-
45
-
46
-
47
-
48
-
49
-
50
-
51
-
52
-
53
-
54
-
55
-
56
-
57
-
58
-
59
-
60
-
61
-
62
-
63
-
64
-
65
-
66
-
67
-
68
 |
 |
