Panasonic PT-D4000U Operating Instructions - Page 34
OPTION2 settings
 |
UPC - 791871111529
View all Panasonic PT-D4000U manuals
Add to My Manuals
Save this manual to your list of manuals |
Page 34 highlights
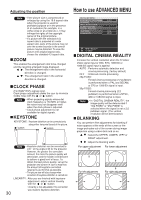
OPTION2 settings OPTION2 PROJECTOR ID INSTALLATION ALTITUDE DIRECTION LAMP SELECT LAMP RELAY RS-232C SYSTEM INFORMATION AUTO POWER OFF DATE AND TIME PASSWORD ALL FRONT-FLOOR LOW HORIZONTAL DUAL OFF DISABLE MENU SELECT CHANGE PROJECTOR ID The projector has an ID number setting function that helps the user to control two or more projectors either simultaneously or separately with a single remote control. The ID number is set to "ALL" by default. Hence the ID number need not be set when only one projector is used. 1 - 64 : The ID number is set in this range. Note • The ID number can be set to "ALL", or selected from "1" to "64". • If the projectors are given ID numbers, their remote controls must be assigned the same ID numbers, respectively. • If the ID number of a projector is set to "ALL", it can be controlled by the remote control or the PC with any ID number. If multiple projectors are used and some of them have their IDs set to "ALL", they cannot be controlled separately from the projectors with other ID numbers. For details on remote control ID setting, see page 15. INSTALLATION Switch this setting according to the projector installation method. FRONT-FLOOR FRONT-CEILING REAR-FLOOR REAR-CEILING ALTITUDE The fan can be controlled in accordance with the operating conditions. LOW : This is the standard setting. HIGH : This is selected when using the projector at an altitude of over 1 400 m (4 593.2'). DIRECTION The fan can be controlled in accordance with the direction in which the images are to be projected. HORIZONTAL: This is the standard setting. VERTICAL : This is selected when projecting images at a significant angle toward the vertical (more than 30 degrees from the horizontal). V H 30° 30° 30° H 30° V H: HORIZONTAL V: VERTICAL Attention • Select the correct "DIRECTION" setting in accordance with the direction in which the images are to be projected. Using the projector at the wrong "DIRECTION" setting will shorten the service life of the lamps. 34
-
 1
1 -
2
-
3
-
4
-
5
-
6
-
7
-
8
-
9
-
10
-
11
-
12
-
13
-
14
-
15
-
16
-
17
-
18
-
19
-
20
-
21
-
22
-
23
-
24
-
25
-
26
-
27
-
28
-
 29
29 -
 30
30 -
 31
31 -
 32
32 -
 33
33 -
 34
34 -
 35
35 -
 36
36 -
 37
37 -
 38
38 -
 39
39 -
40
-
41
-
42
-
43
-
44
-
45
-
46
-
47
-
48
-
49
-
50
-
51
-
52
-
53
-
54
-
55
-
56
-
57
-
58
-
59
-
60
-
61
-
62
-
63
-
64
-
65
-
66
-
67
-
68
 |
 |
