Pioneer DV-45A Owner's Manual - Page 12
Connecting Up, Rear panel - manual
 |
View all Pioneer DV-45A manuals
Add to My Manuals
Save this manual to your list of manuals |
Page 12 highlights
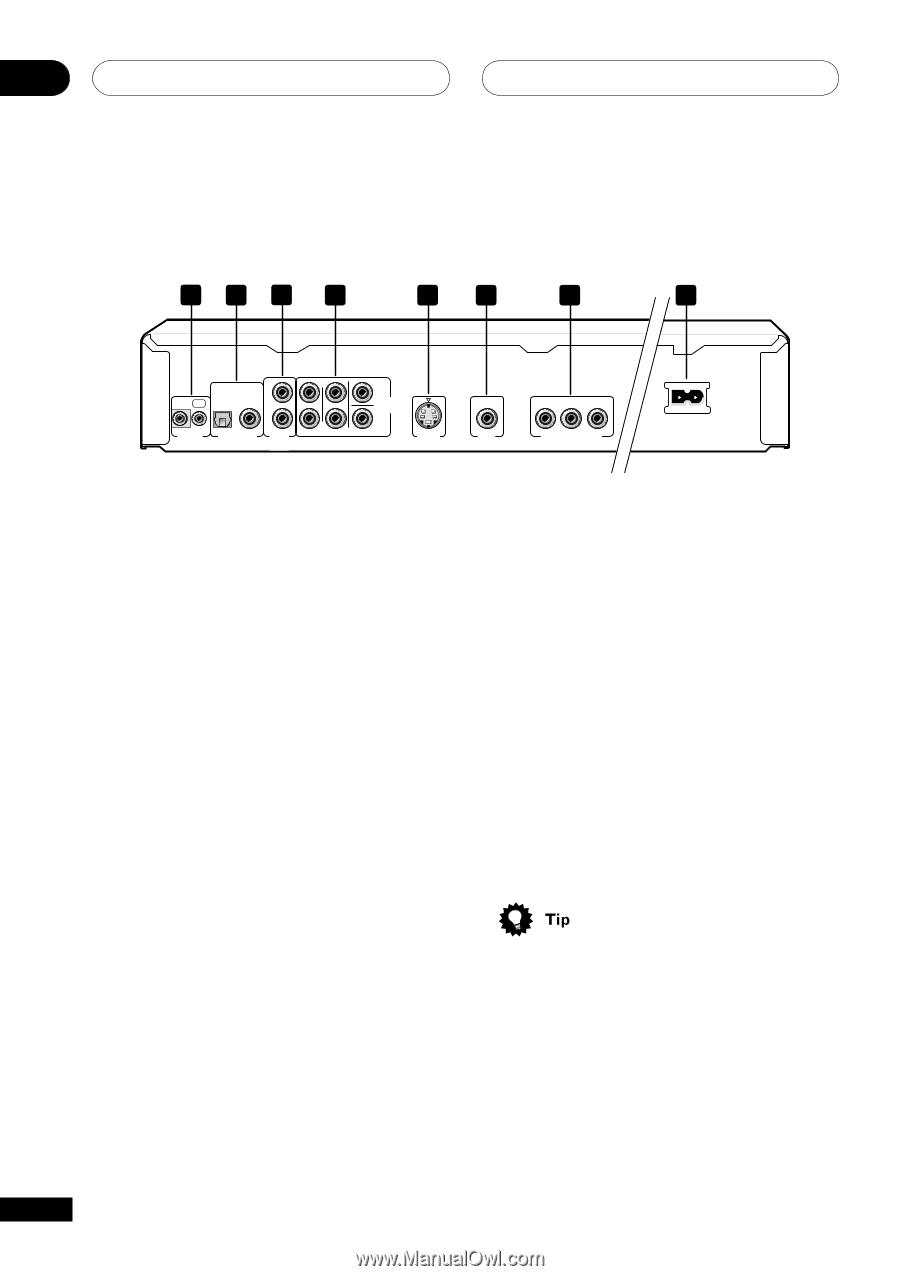
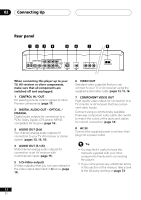
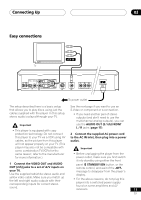
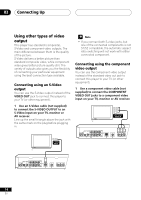
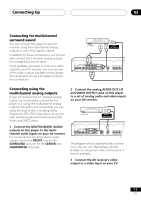
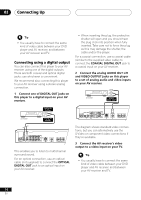
02 Connecting Up Rear panel 123 4 5 6 7 8 OPTICAL COAXIAL L IN OUT R CONTROL DIGITAL AUDIO OUT AUDIO OUT (2ch) L R FRONT SURROUND CENTER AUDIO OUT (5.1ch) SUB WOOFER S-VIDEO OUT VIDEO OUT Y PB PR COMPONENT VIDEO OUT When connecting this player up to your TV, AV receiver or other components, make sure that all components are switched off and unplugged. 1 CONTROL IN / OUT For passing remote control signals to other Pioneer components (page 17). 2 DIGITAL AUDIO OUT - OPTICAL / COAXIAL Digital audio outputs for connection to a PCM, Dolby Digital, DTS and/or MPEGcompatible AV receiver (page 16). 3 AUDIO OUT (2ch) Two channel analog audio outputs for connection to your TV, AV receiver or stereo system (pages 13, 15, 16). 4 AUDIO OUT (5.1ch) Multichannel analog audio outputs for connection to an AV receiver with multichannel inputs (page 15). 5 S (S-Video output) S-Video output(s) that you can use instead of the video output described in 6 below (page 14). 6 VIDEO OUT Standard video output(s) that you can connect to your TV or AV receiver using the supplied audio/video cable (pages 13, 15, 16). 7 COMPONENT VIDEO OUT High quality video output for connection to a TV, monitor or AV receiver that has component video inputs. Connect using a commercially available three-way component video cable. Be careful to match the colors of the jacks and cables for correct connection (page 14). 8 AC IN Connect the supplied power cord here, then plug into a power outlet. • You may find it useful to have the manuals supplied with your other components handy when connecting this player. • If you come across any unfamiliar terms in this section of the manual, take a look at the Glossary starting on page 73. 12 En
-
 1
1 -
2
-
3
-
4
-
5
-
6
-
 7
7 -
 8
8 -
 9
9 -
 10
10 -
 11
11 -
 12
12 -
 13
13 -
 14
14 -
 15
15 -
 16
16 -
 17
17 -
18
-
19
-
20
-
21
-
22
-
23
-
24
-
25
-
26
-
27
-
28
-
29
-
30
-
31
-
32
-
33
-
34
-
35
-
36
-
37
-
38
-
39
-
40
-
41
-
42
-
43
-
44
-
45
-
46
-
47
-
48
-
49
-
50
-
51
-
52
-
53
-
54
-
55
-
56
-
57
-
58
-
59
-
60
-
61
-
62
-
63
-
64
-
65
-
66
-
67
-
68
-
69
-
70
-
71
-
72
-
73
-
74
-
75
-
76
-
77
-
78
-
79
-
80
 |
 |