Pioneer DV-45A Owner's Manual - Page 16
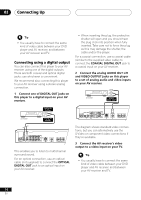
Connecting using a digital output
 |
View all Pioneer DV-45A manuals
Add to My Manuals
Save this manual to your list of manuals |
Page 16 highlights
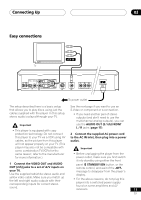
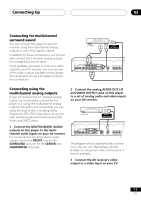
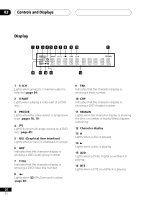
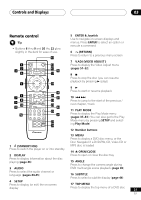
02 Connecting Up • You usually have to connect the same kind of video cable between your DVD player and AV receiver, and between your AV receiver and TV. Connecting using a digital output You can also connect this player to your AV receiver using one of the digital outputs. There are both coaxial and optical digital jacks; use whichever is convenient. We recommend also connecting this player to your AV receiver using a stereo analog connection. 1 Connect one of DIGITAL OUT jacks on this player to a digital input on your AV receiver. • When inserting the plug, the protective shutter will open and you should hear the plug click into position when fully inserted. Take care not to force the plug as this may damage the shutter, the cable and/or the player. For a coaxial connection, use a coaxial cable (similar to the supplied video cable) to connect the COAXIAL DIGITAL OUT jack to a coaxial input on your AV receiver. 2 Connect the analog AUDIO OUT L/R and VIDEO OUTPUT jacks on this player to a set of analog audio and video inputs on your AV receiver. This enables you to listen to multichannel surround sound. For an optical connection, use an optical cable (not supplied) to connect the OPTICAL DIGITAL OUT jack to an optical input on your AV receiver. The diagram shows standard video connections, but you can alternatively use the S-Video or component video connections if they're available. 3 Connect the AV receiver's video output to a video input on your TV. • You usually have to connect the same kind of video cable between your DVD player and AV receiver, and between your AV receiver and TV. 16 En
-
 1
1 -
2
-
3
-
4
-
5
-
6
-
7
-
8
-
9
-
10
-
 11
11 -
 12
12 -
 13
13 -
 14
14 -
 15
15 -
 16
16 -
 17
17 -
 18
18 -
 19
19 -
 20
20 -
 21
21 -
22
-
23
-
24
-
25
-
26
-
27
-
28
-
29
-
30
-
31
-
32
-
33
-
34
-
35
-
36
-
37
-
38
-
39
-
40
-
41
-
42
-
43
-
44
-
45
-
46
-
47
-
48
-
49
-
50
-
51
-
52
-
53
-
54
-
55
-
56
-
57
-
58
-
59
-
60
-
61
-
62
-
63
-
64
-
65
-
66
-
67
-
68
-
69
-
70
-
71
-
72
-
73
-
74
-
75
-
76
-
77
-
78
-
79
-
80
 |
 |
