Ricoh C410DN Hardware Guide - Page 95
Glossy Paper, Coated Paper
 |
UPC - 026649025341
View all Ricoh C410DN manuals
Add to My Manuals
Save this manual to your list of manuals |
Page 95 highlights
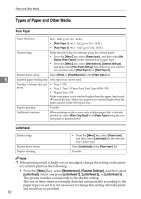
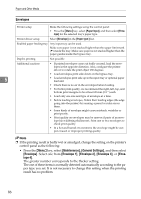
Paper Recommendations Glossy Paper Printer setup Printer driver setup Duplex Printing • Press the {Menu} key, select [Paper Input] , and then select [Glossy Paper] for the selected tray's paper type. Select [Glossy] in the [Paper type:] list. Possible Note ❒ If the printing result is badly wet or smudged, change the setting on the printer's control panel as the following: • Press the {Menu} key, select [Maintenance], [General Settings], and then select [Glossy Paper]. Select one from [Glossy Paper 1], [Glossy Paper 2], [Glossy Paper 3], or [Glossy Paper 4]. The greater number corresponds to the thicker setting. The one of these items is normally detected automatically according to the paper type you set. It is not necessary to change this setting when the print- 5 ing result has no problem. Coated Paper Printer setup Printer driver setup Duplex Printing • Press the {Menu} key, select [Paper Input] , and then select [Coated Paper] for the selected tray's paper type. Select [Coated paper] in the [Paper type:] list. Not possible Note ❒ If the printing result is badly wet or smudged, change the setting on the printer's control panel as the following: • Press the {Menu} key, select [Maintenance], [General Settings], and then select [Coated Paper]. Select one from [Coated Paper 1], [Coated Paper 2], [Coated Paper 3], or [Coated Paper 4]. The greater number corresponds to the thicker setting. The one of these items is normally detected automatically according to the paper type you set. It is not necessary to change this setting when the printing result has no problem. 83
-
 1
1 -
2
-
3
-
4
-
5
-
6
-
7
-
8
-
9
-
10
-
11
-
12
-
13
-
14
-
15
-
16
-
17
-
18
-
19
-
20
-
21
-
22
-
23
-
24
-
25
-
26
-
27
-
28
-
29
-
30
-
31
-
32
-
33
-
34
-
35
-
36
-
37
-
38
-
39
-
40
-
41
-
42
-
43
-
44
-
45
-
46
-
47
-
48
-
49
-
50
-
51
-
52
-
53
-
54
-
55
-
56
-
57
-
58
-
59
-
60
-
61
-
62
-
63
-
64
-
65
-
66
-
67
-
68
-
69
-
70
-
71
-
72
-
73
-
74
-
75
-
76
-
77
-
78
-
79
-
80
-
81
-
82
-
83
-
84
-
85
-
86
-
87
-
88
-
89
-
 90
90 -
 91
91 -
 92
92 -
 93
93 -
 94
94 -
 95
95 -
 96
96 -
 97
97 -
 98
98 -
 99
99 -
 100
100 -
101
-
102
-
103
-
104
-
105
-
106
-
107
-
108
-
109
-
110
-
111
-
112
-
113
-
114
-
115
-
116
-
117
-
118
-
119
-
120
-
121
-
122
-
123
-
124
-
125
-
126
-
127
-
128
-
129
-
130
-
131
-
132
-
133
-
134
-
135
-
136
-
137
-
138
-
139
-
140
-
141
-
142
-
143
-
144
-
145
-
146
-
147
-
148
-
149
-
150
-
151
-
152
-
153
-
154
-
155
-
156
-
157
-
158
-
159
-
160
-
161
-
162
-
163
-
164
-
165
-
166
-
167
-
168
-
169
-
170
-
171
-
172
-
173
-
174
-
175
-
176
-
177
-
178
-
179
-
180
-
181
-
182
-
183
-
184
-
185
-
186
-
187
-
188
-
189
-
190
-
191
-
192
-
193
-
194
-
195
-
196
-
197
-
198
-
199
-
200
-
201
-
202
-
203
-
204
 |
 |
