Samsung CLP 610ND SyncThru 5.0 Device Map Plug-in Guide (ENGLISH) - Page 14
Registering floor layout images, Arranging devices on the map
 |
UPC - 635753720587
View all Samsung CLP 610ND manuals
Add to My Manuals
Save this manual to your list of manuals |
Page 14 highlights
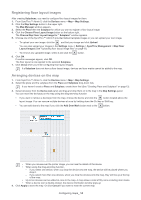
Registering floor layout images After creating Subplaces, you need to configure floor layout images for them. 1. From SyncThru™ Admin 5, click the Devices menu > Map > Map Settings. 2. Click the Map Settings button in the upper right. The Map Manager window appears. 3. Select the Place then the Subplace for which you want to register a floor layout image. 4. Click the Choose Floor Layout Image button on the bottom right. The Choose Map Floor Layout Image for " Subplace" window appears. 5. Choose one of the SyncThru™ Admin 5 provided default template images or you can upload your own image. • To upload your own image, click the and find your image and click Upload. You can also upload your images in the Settings menu > Settings > SyncThru Management > Map Floor Layout Images (See "Uploading floor layout image files" on page 19). • To remove any uploaded image, select it and click the button. 6. Click OK. If confirm messages appear, click OK. The floor layout is now applied to the selected Subplace. 7. Click Close when you finish configuring floor layout images. If a Subplace does not have a floor layout image, devices and door marks cannot be added to the map. Arranging devices on the map 1. From SyncThru™ Admin 5, click the Devices menu > Map > Map Settings. 2. Select the place and the subplace from the Place and Subplace drop-down lists. If you haven't create a Place and Subplace, create them first (See "Creating Place and Subplace" on page 13). 3. Select device(s) from the Device List panel and drag and drop them on to the map in the Map Settings panel. You can move the device(s) on the map using the drag-and-drop function. • If you want to remove a device(s) from the map, choose the device and click the button located above the layout image. You can remove multiple devices at once by holding down the Ctrl key or Shift key. • You can add doors to the map if you click the Add Door Mark button next to the button. • When you mouse-over the printer image, you can see the details of the device. • When using the drag-and-drop function, - if you select one device, when you drop the device onto the map, the device will be placed where you drop it. - if you select more than one devices, when you drop the devices onto the map, they will line up at the top of the map. • Up to ten devices can be added at once to the map. A map allows a total of fifty icons including door marks. • When a device icon is double-clicked, the device information window pops-up 4. Click Apply to save the map. Or click Cancel if you want to reset the current map. Configuring maps_ 14
-
 1
1 -
2
-
3
-
4
-
5
-
6
-
7
-
8
-
 9
9 -
 10
10 -
 11
11 -
 12
12 -
 13
13 -
 14
14 -
 15
15 -
 16
16 -
 17
17 -
 18
18 -
 19
19 -
20
-
21
-
22
-
23
-
24
-
25
-
26
-
27
-
28
-
29
-
30
-
31
-
32
-
33
-
34
-
35
-
36
-
37
-
38
-
39
 |
 |
