Samsung CLP 610ND SyncThru 5.0 Device Map Plug-in Guide (ENGLISH) - Page 17
Printing the map - firmware upgrade
 |
UPC - 635753720587
View all Samsung CLP 610ND manuals
Add to My Manuals
Save this manual to your list of manuals |
Page 17 highlights
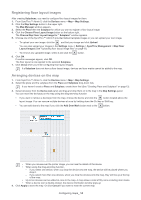
Printing the map 6. You can also print the maps you created in SyncThru™ Admin 5. If there are devices with critical errors, you may need to go to the device to check the status. In this case, you can print the related map and easily go to the device. For example, if you see a device with errors from the Device List, you can get the location information with the Map button on the Device Information panel. When the page automatically moves to the Map Settings panel, you can see the Print button on the right side. After checking the specified map, click the Print button. A new window appears with only the map, which you can now print. This chapter includes: • Printing the map Printing the map 1. From SyncThru™ Admin 5, click the Devices menu > Group/List. Or from the Devices menu, you could go to one of the History tab menus: Configuration History, Firmware Upgrade History or File Storage History. 2. From the Devices List, select the device you want to find. You can select multiple devices at once by using the Ctrl key or Shift key. 3. You can see the Map button in the Device information panel on the right. Click the Map button. The Search On Map window appears. 4. Select the checkbox of the Place/Subplace you want to see. Click OK. The page automatically moves to Map Settings panel and you can see the related map for the selected device. 5. Click the Print button on the upper right. The print preview window will appear; you can now print the map. Printing the map_ 17
-
 1
1 -
2
-
3
-
4
-
5
-
6
-
7
-
8
-
9
-
10
-
11
-
 12
12 -
 13
13 -
 14
14 -
 15
15 -
 16
16 -
 17
17 -
 18
18 -
 19
19 -
 20
20 -
 21
21 -
 22
22 -
23
-
24
-
25
-
26
-
27
-
28
-
29
-
30
-
31
-
32
-
33
-
34
-
35
-
36
-
37
-
38
-
39
 |
 |
