Samsung HG46NB890XF Installation Guide Ver.1.0 (English) - Page 41
Turns the Video Mute On/Off.
 |
View all Samsung HG46NB890XF manuals
Add to My Manuals
Save this manual to your list of manuals |
Page 41 highlights
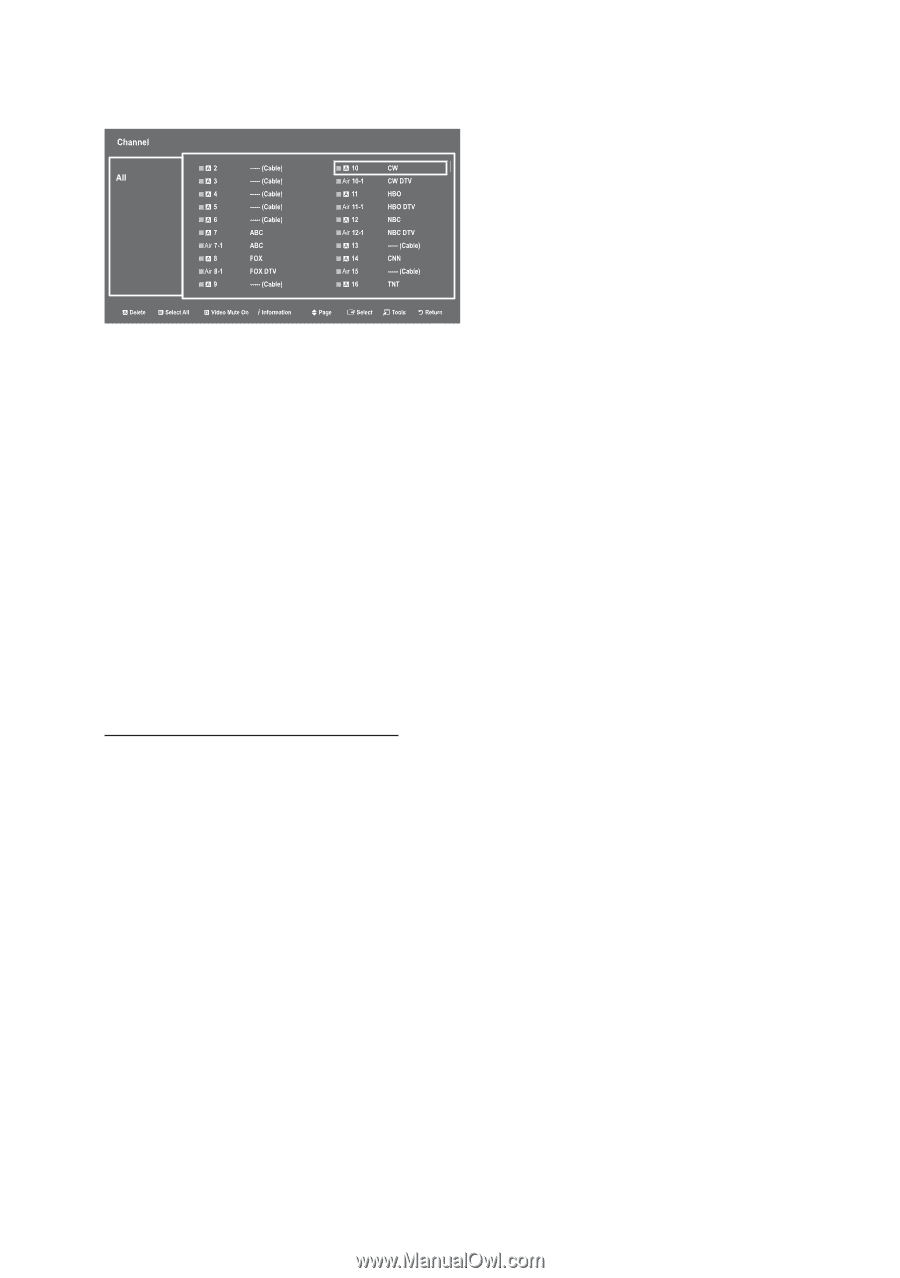
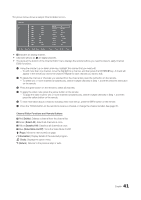
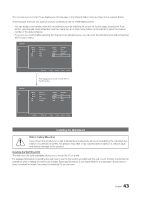
The picture below shows a sample Channel Editor screen. yy a Indicates an analog channel. yy Channels without an a are digital channels. yy The guide at the bottom of the Channel Editor menu displays the remote buttons you need to press to apply Channel Editor functions. 1 Using the remote's up or down arrow key, highlight the channel that you want edit. -- To edit more than one channel, move the highlight to a channel, and then press the ENTERE key. A check will appear in the check box next to the channel. Repeat for each channel you want to edit. 2 To delete the channel or channels you selected from the channel list, press the red button on the remote. -- To delete two or more channels simultaneously, selecte multiple channels in Step 1, and then press the red button on the remote. 3 Press the green button on the remote to select all channels. 4 To apply the video mute, press the yellow button on the remote. -- To apply the video mute to two or more channels simultaneously, selecte multiple channels in Step 1, and then press the yellow button on the remote. 5 To view information about a channel, including video mute set up, press the INFO button on the remote. 6 Press the TOOLS button on the remote to rename a channel or change the channel number. See page 35. Channel Editor Functions and Remote Buttons a Red (Delete): Deletes a channel from the channel list. b Green (Select All): Selects all channels at once. { Yellow (Deselect All): Deselects all channels at once. } Blue (Video Mute On/Off): Turns the Video Mute On/Off. U (Page): Moves to next or previous page. ` (Information): Display details of the selected program. T (Tools): Displays the option menu. R (Return): Returns to the previous step or exits. 41 English
-
 1
1 -
2
-
3
-
4
-
5
-
6
-
7
-
8
-
9
-
10
-
11
-
12
-
13
-
14
-
15
-
16
-
17
-
18
-
19
-
20
-
21
-
22
-
23
-
24
-
25
-
26
-
27
-
28
-
29
-
30
-
31
-
32
-
33
-
34
-
35
-
 36
36 -
 37
37 -
 38
38 -
 39
39 -
 40
40 -
 41
41 -
 42
42 -
 43
43 -
 44
44 -
 45
45 -
 46
46 -
47
-
48
-
49
-
50
-
51
-
52
 |
 |