Samsung MultiXpress SL-K2200 User Guide - Page 96
Scanning from network connected machine
 |
View all Samsung MultiXpress SL-K2200 manuals
Add to My Manuals
Save this manual to your list of manuals |
Page 96 highlights
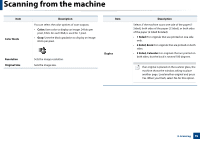
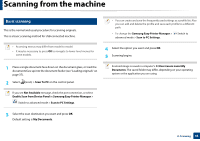
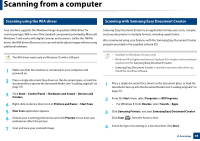
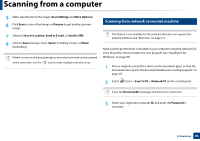
Scanning from a computer 5 Make adjustments to the image (Scan Settings and More Options). 6 Click Scan to scan a final image or Prescan to get another preview image. 7 Select to Save to Location, Send to E-mail, or Send to SNS. 8 Click on Save (Saving a Scan), Send ( E-mailing a Scan), or Share (Uploading). If there is room on the document glass, more than one item can be scanned at the same time. Use the tool to make multiple selection areas. 7 Scanning from network connected machine This feature is not available for the machine that does not support the network interface (see "Rear view" on page 17). Make sure the printer driver is installed on your computer using the software CD, since the printer driver includes the scan program (see "Installation for Windows" on page 45). 1 Place a single document face down on the document glass, or load the documents face up into the document feeder (see "Loading originals" on page 37). 2 Select (Scan) > Scan To PC > Network PC on the control panel. If you see Not Available message, check the port connection. 3 Select your registered computer ID, and enter the Password if necessary. 8. Scanning 96
-
 1
1 -
2
-
3
-
4
-
5
-
6
-
7
-
8
-
9
-
10
-
11
-
12
-
13
-
14
-
15
-
16
-
17
-
18
-
19
-
20
-
21
-
22
-
23
-
24
-
25
-
26
-
27
-
28
-
29
-
30
-
31
-
32
-
33
-
34
-
35
-
36
-
37
-
38
-
39
-
40
-
41
-
42
-
43
-
44
-
45
-
46
-
47
-
48
-
49
-
50
-
51
-
52
-
53
-
54
-
55
-
56
-
57
-
58
-
59
-
60
-
61
-
62
-
63
-
64
-
65
-
66
-
67
-
68
-
69
-
70
-
71
-
72
-
73
-
74
-
75
-
76
-
77
-
78
-
79
-
80
-
81
-
82
-
83
-
84
-
85
-
86
-
87
-
88
-
89
-
90
-
 91
91 -
 92
92 -
 93
93 -
 94
94 -
 95
95 -
 96
96 -
 97
97 -
 98
98 -
 99
99 -
 100
100 -
 101
101 -
102
-
103
-
104
-
105
-
106
-
107
-
108
-
109
-
110
-
111
-
112
-
113
-
114
-
115
-
116
-
117
-
118
-
119
-
120
-
121
-
122
-
123
-
124
-
125
-
126
-
127
-
128
-
129
-
130
-
131
-
132
-
133
-
134
-
135
-
136
-
137
-
138
-
139
-
140
-
141
-
142
-
143
-
144
-
145
-
146
-
147
-
148
-
149
-
150
-
151
-
152
-
153
-
154
-
155
-
156
-
157
-
158
-
159
-
160
-
161
-
162
-
163
-
164
-
165
-
166
-
167
-
168
-
169
-
170
-
171
-
172
-
173
-
174
-
175
-
176
-
177
-
178
-
179
-
180
-
181
-
182
-
183
-
184
-
185
-
186
-
187
-
188
-
189
-
190
-
191
-
192
-
193
-
194
-
195
-
196
-
197
-
198
-
199
-
200
-
201
-
202
-
203
-
204
-
205
-
206
 |
 |
