Samsung MultiXpress SL-K2200 User Guide - Page 99
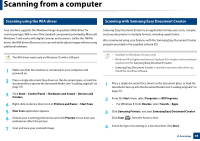
Scanning from Samsung Printer Experience
 |
View all Samsung MultiXpress SL-K2200 manuals
Add to My Manuals
Save this manual to your list of manuals |
Page 99 highlights
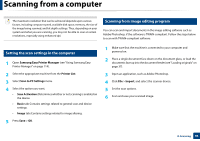
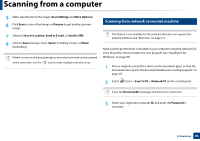
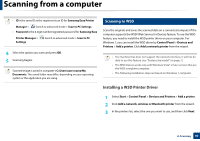
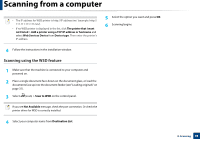
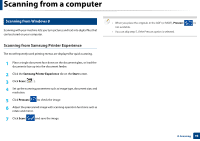
Scanning from a computer 9 Scanning from Windows 8 Scanning with your machine lets you turn pictures and text into digital files that can be stored on your computer. Scanning from Samsung Printer Experience The most frequently used printing menus are displayed for quick scanning. 1 Place a single document face down on the document glass, or load the documents face up into the document feeder. 2 Click the Samsung Printer Experience tile on the Start screen. 3 Click Scan ( ). 4 Set up the scanning parameters such as image type, document size, and resolution. 5 Click Prescan ( )to check the image. 6 Adjust the prescanned image with scanning operation functions such as rotate and mirror. 7 Click Scan ( )and save the image. • When you place the originals in the ADF (or RADF), Prescan ( ) is not available. • You can skip step 5, if the Prescan option is selected. 8. Scanning 99
-
 1
1 -
2
-
3
-
4
-
5
-
6
-
7
-
8
-
9
-
10
-
11
-
12
-
13
-
14
-
15
-
16
-
17
-
18
-
19
-
20
-
21
-
22
-
23
-
24
-
25
-
26
-
27
-
28
-
29
-
30
-
31
-
32
-
33
-
34
-
35
-
36
-
37
-
38
-
39
-
40
-
41
-
42
-
43
-
44
-
45
-
46
-
47
-
48
-
49
-
50
-
51
-
52
-
53
-
54
-
55
-
56
-
57
-
58
-
59
-
60
-
61
-
62
-
63
-
64
-
65
-
66
-
67
-
68
-
69
-
70
-
71
-
72
-
73
-
74
-
75
-
76
-
77
-
78
-
79
-
80
-
81
-
82
-
83
-
84
-
85
-
86
-
87
-
88
-
89
-
90
-
91
-
92
-
93
-
 94
94 -
 95
95 -
 96
96 -
 97
97 -
 98
98 -
 99
99 -
 100
100 -
 101
101 -
 102
102 -
 103
103 -
 104
104 -
105
-
106
-
107
-
108
-
109
-
110
-
111
-
112
-
113
-
114
-
115
-
116
-
117
-
118
-
119
-
120
-
121
-
122
-
123
-
124
-
125
-
126
-
127
-
128
-
129
-
130
-
131
-
132
-
133
-
134
-
135
-
136
-
137
-
138
-
139
-
140
-
141
-
142
-
143
-
144
-
145
-
146
-
147
-
148
-
149
-
150
-
151
-
152
-
153
-
154
-
155
-
156
-
157
-
158
-
159
-
160
-
161
-
162
-
163
-
164
-
165
-
166
-
167
-
168
-
169
-
170
-
171
-
172
-
173
-
174
-
175
-
176
-
177
-
178
-
179
-
180
-
181
-
182
-
183
-
184
-
185
-
186
-
187
-
188
-
189
-
190
-
191
-
192
-
193
-
194
-
195
-
196
-
197
-
198
-
199
-
200
-
201
-
202
-
203
-
204
-
205
-
206
 |
 |
