Samsung WB200F User Manual Ver.1.0 (English) - Page 123
Sending photos or videos via email, box, enter your email address, and then select
 |
View all Samsung WB200F manuals
Add to My Manuals
Save this manual to your list of manuals |
Page 123 highlights
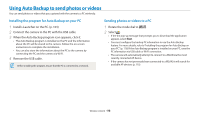
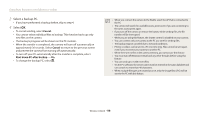
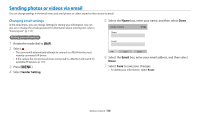
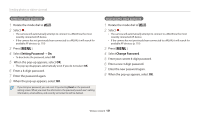
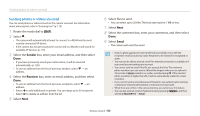
Sending photos or videos via email Sending photos or videos via email You can send photos or videos stored on the camera via email. For information about entering text, refer to "Entering text". (p. 113) 1 Rotate the mode dial to . 2 Select . • The camera will automatically attempt to connect to a WLAN via the most recently connected AP device. • If the camera has not previously been connected to a WLAN, it will search for available AP devices. (p. 110) 3 Select the Sender box, enter your email address, and then select Done. • If you have previously saved your information, it will be inserted automatically. (p. 120) • To use an address from the list of previous senders, select → an address. 4 Select the Receiver box, enter an email address, and then select Done. • To use an address from the list of previous recipients, select → an address. • Select to add additional recipients. You can input up to 30 recipients. • Select to delete an address from the list. 5 Select Next. 6 Select files to send. • You can select up to 20 files. The total size must be 7 MB or less. 7 Select Next. 8 Select the comment box, enter your comments, and then select Done. 9 Select Send. • The camera will send the email. • Even if a photo appears to have transferred successfully, errors with the recipient's email account may cause the photo to be rejected or recognized as spam. • You may not be able to send an email if no network connection is available or if your email account settings are incorrect. • You cannot send an email if the file size exceeds the limit. The maximum photo resolution you can send is 2M and the longest video you can upload is 30 seconds at resolution or a video recorded using . If the selected photo resolution is higher than 2M, it will be automatically resized to a lower resolution. • If you cannot send an email because of firewall or user authentication settings, contact your network administrator or network service provider. • When there are no files in the camera memory, you cannot use this feature. • You can also send an email in Playback mode by pressing [ selecting Share(Wi-Fi) → Email. ], and then Wireless network 122
-
 1
1 -
2
-
3
-
4
-
5
-
6
-
7
-
8
-
9
-
10
-
11
-
12
-
13
-
14
-
15
-
16
-
17
-
18
-
19
-
20
-
21
-
22
-
23
-
24
-
25
-
26
-
27
-
28
-
29
-
30
-
31
-
32
-
33
-
34
-
35
-
36
-
37
-
38
-
39
-
40
-
41
-
42
-
43
-
44
-
45
-
46
-
47
-
48
-
49
-
50
-
51
-
52
-
53
-
54
-
55
-
56
-
57
-
58
-
59
-
60
-
61
-
62
-
63
-
64
-
65
-
66
-
67
-
68
-
69
-
70
-
71
-
72
-
73
-
74
-
75
-
76
-
77
-
78
-
79
-
80
-
81
-
82
-
83
-
84
-
85
-
86
-
87
-
88
-
89
-
90
-
91
-
92
-
93
-
94
-
95
-
96
-
97
-
98
-
99
-
100
-
101
-
102
-
103
-
104
-
105
-
106
-
107
-
108
-
109
-
110
-
111
-
112
-
113
-
114
-
115
-
116
-
117
-
 118
118 -
 119
119 -
 120
120 -
 121
121 -
 122
122 -
 123
123 -
 124
124 -
 125
125 -
 126
126 -
 127
127 -
 128
128 -
129
-
130
-
131
-
132
-
133
-
134
-
135
-
136
-
137
-
138
-
139
-
140
-
141
-
142
-
143
-
144
-
145
-
146
-
147
-
148
-
149
-
150
-
151
-
152
-
153
-
154
-
155
-
156
-
157
-
158
-
159
-
160
-
161
-
162
-
163
-
164
 |
 |