Sanyo VPC E1 Instruction Manual, VPC-E1000 - Page 36
Video Mode, Setting the Panorama Mode
 |
UPC - 086483067532
View all Sanyo VPC E1 manuals
Add to My Manuals
Save this manual to your list of manuals |
Page 36 highlights
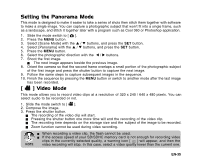
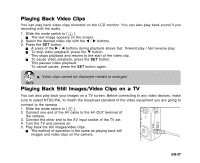
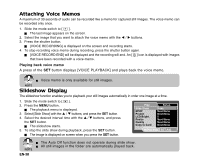
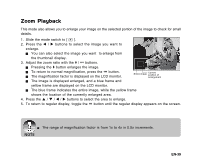
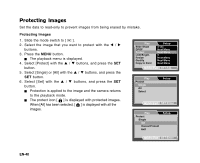
Setting the Panorama Mode This mode is designed to make it easier to take a series of shots then stitch them together with software to make a single image. You can capture a photographic subject that won't fit into a single frame, such as a landscape, and stitch it together later with a program such as Cool 360 or Photoshop application. 1. Slide the mode switch to [ ]. 2. Press the MENU button. 3. Select [Scene Mode] with the S / T buttons, and press the SET button. 4. Select [Panorama] with the S / T buttons, and press the SET button. 5. Press the MENU button. 6. Select the photographic direction with the W / X buttons. 7. Shoot the first image. The next image appears beside the previous image. 8. Orient the camera so that the second frame overlaps a small portion of the photographic subject of the first image and press the shutter button to capture the next image. 9. Follow the same steps to capture subsequent images in the sequence. 10. Finish the sequence by pressing the MENU button or switch to another mode after the last image has been recorded. [ ] Video Mode This mode allows you to record video clips at a resolution of 320 x 240 / 640 x 480 pixels. You can select audio to be recorded or not. 1. Slide the mode switch to [ ]. 2. Compose the image. 3. Press the shutter button. The recording of the video clip will start. Pressing the shutter button one more time will end the recording of the video clip. The recording time depends on the storage size and the subject of the image to be recorded. Zoom function cannot be used during video recording. When recording a video clip, the flash cannot be used. If the access speed of your SD/SDHC memory card is not enough for recording video clips in the currently selected quality, a warning icon [ ] will appear, and then the video recording will stop. In this case, select a video quality lower than the current one. EN-35
-
 1
1 -
2
-
3
-
4
-
5
-
6
-
7
-
8
-
9
-
10
-
11
-
12
-
13
-
14
-
15
-
16
-
17
-
18
-
19
-
20
-
21
-
22
-
23
-
24
-
25
-
26
-
27
-
28
-
29
-
30
-
 31
31 -
 32
32 -
 33
33 -
 34
34 -
 35
35 -
 36
36 -
 37
37 -
 38
38 -
 39
39 -
 40
40 -
 41
41 -
42
-
43
-
44
-
45
-
46
-
47
-
48
-
49
-
50
-
51
-
52
-
53
-
54
-
55
-
56
-
57
-
58
-
59
-
60
-
61
-
62
-
63
-
64
-
65
-
66
-
67
 |
 |