Seiko SSC669 Owner Manual
Seiko SSC669 Manual
 |
View all Seiko SSC669 manuals
Add to My Manuals
Save this manual to your list of manuals |
Seiko SSC669 manual content summary:
- Seiko SSC669 | Owner Manual - Page 1
Cal. V175 INSTRUCTIONS BEDIENUNGSANLEITUNG INSTRUCTIONS ISTRUZIONI INSTRUCCIONES INSTRUÇÕES (P. 4) (S. 37) (P. 71) (P. 106) (P. 141) (P. 175) (P. 209) (243 ) - Seiko SSC669 | Owner Manual - Page 2
Diver's Watch Cal. V175. For the best results, please read the instructions in this booklet carefully before using the watch. Please keep this manual handy for ready reference. Wir gratulieren Ihnen zum Kauf der SEIKO Solar-Taucheruhr Kal. V175. Lesen Sie diese Bedienungsanleitung vor der Verwendung - Seiko SSC669 | Owner Manual - Page 3
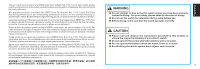
mark aligns with the minute hand; • the time and calendar are appropriately set. If there are any malfunctions, we recommend that you contact an AUTHORIZED SEIKO CUSTOMER SERVICE CENTER. WHILE DIVING l Do not operate the crown and the buttons when the watch is wet or in water. l Take care not to hit - Seiko SSC669 | Owner Manual - Page 4
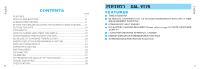
POWER SUPPLY 22 IMPROPER FUNCTION 23 ROTATING BEZEL 24 TACHYMETER 25 TELEMETER 27 TO PRESERVE THE QUALITY OF YOUR WATCH 29 troubLeshooting 32 SPECIFICATIONS 36 6 CAL. V175 FEATURES n TIME/CALENDAR n 60-MINUTE STOPWATCH in 1/ 5-second increments WITH Split time measurement FUNCTION n POWERED - Seiko SSC669 | Owner Manual - Page 5
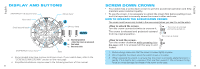
(after the crown is released) b: First click c: Second click Date • Some models may have a screw-lock-type crown. If your watch does, refer to the page. • Simplified illustrations may be used in the following sections of this manual. 8 English SCREW DOWN CROWN • Your watch has a screw down - Seiko SSC669 | Owner Manual - Page 6
English SECURITY LOCK BUTTON OPERATION SECURITY LOCK OF PUSH-BUTTONS A & B A Locking Unlocking Locking B Unlocking Unlocking the push-buttons - Turn Security Lock Buttons counterclockwise until you no longer feel the threads turning. - The buttons can be pushed in. Locking the push-buttons - - Seiko SSC669 | Owner Manual - Page 7
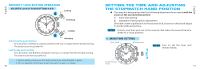
English 1. When the stopwatch is or has been measuring, if the crown is pulled out to the second click, it will automatically reset the STOPWATCH hands to "0." 2. The 24-hour hand moves correspondingly with the hour hand. 3. It is recommended that the hands be set to the time a few minutes ahead of - Seiko SSC669 | Owner Manual - Page 8
English SETTING THE DATE l Before setting the date, be sure to set the main time. CROWN Unlock. t Pull out to the first click. t Turn clockwise until the desired date appears. t Date Push back into the normal position. t Screw all the way in until it is locked. 1. It is necessary to adjust - Seiko SSC669 | Owner Manual - Page 9
English While the STOPWATCH hands are moving 1. Press Button A to stop the stopwatch. 2. Press Button B to reset the stopwatch. While the STOPWATCH hands are stopped One of the following stopwatch operations has been made. Reset the stopwatch accordingly. [When the - Seiko SSC669 | Owner Manual - Page 10
English HOW TO CHARGE AND START THE WATCH u When you start the watch or when the energy in the rechargeable battery is reduced to an extremely low level, charge it sufficiently by exposing the watch to light. 1 Expose the watch to sunlight or strong artificial light. When the watch has stopped - Seiko SSC669 | Owner Manual - Page 11
GUIDELINE OF CHARGING TIME/ACCURACY English V175 u The watch operates while charging electricity by Environment/Lightsource (lux) A (minutes) B (hours) C (hours) converting light received on the dial to electrical energy. It cannot properly operate unless the remaining energy General offices/ - Seiko SSC669 | Owner Manual - Page 12
set the time and adjust the STOPWATCH hands to the "0" position. Refer to "SETTING THE TIME AND ADJUSTING THE STOPWATCH HAND POSITION" section of this manual. 23 - Seiko SSC669 | Owner Manual - Page 13
" on rotating bezel 30 minutes have elapsed. Bezel rotation may become slightly stiffer underwater. This is not a malfunction. 24 English TACHYMETER (for models with tachymeter scale on the dial) To measure the hourly average speed of a vehicle 1 Use the stopwatch to determine how many seconds - Seiko SSC669 | Owner Manual - Page 14
job = 180 jobs/hour Ex. 2: If 15 jobs are completed in 20 seconds: "180" (tachymeter scale figure) x 15 jobs = 2700 jobs/hour 26 TELEMETER (for models with telemeter scale on the dial) l The telemeter can provide a rough indication of the distance to the source of light and sound. l The telemeter - Seiko SSC669 | Owner Manual - Page 15
and equipment. If you find that your diver's watch is malfunctioning, do not attempt to repair it but immediately send it to SEIKO CUSTOMER SERVICE CENTER. n TEMPERATURES The key components in mechanical watches are made of metals, which expand or contract depending on temperatures due to metal - Seiko SSC669 | Owner Manual - Page 16
) [Distance to the watch: 1 m]: 1,000 lux [Distance to the watch: 3 m]: 500 lux (average room luminance) [Distance to the watch: 4 m]: 250 lux * "LUMIBRITE" is a trademark of SEIKO HOLDINGS CORPORATION. 31 - Seiko SSC669 | Owner Manual - Page 17
troubLeshooting Troubles watch was exposed to strong vibrations. Solutions If you often encounter this problem even though you wear the watch everyday, the watch may not OF CHARGING TIME/ACCURACY." Reset the watch by following the instructions in "IMPROPER FUNCTION." Return the watch to a normal - Seiko SSC669 | Owner Manual - Page 18
English English Troubles Possible causes Solutions Adjust the STOPWATCH hands to the "0" position by following the instructions in "SETTING THE TIME AND ADJUSTING STOPWATCH HAND POSITION" Contact the of any other problem, please contact the retailer from whom the watch was purchased. 34 35 - Seiko SSC669 | Owner Manual - Page 19
English SPECIFICATIONS 1 Frequency of crystal oscillator 32,768 Hz (Hz = Hertz ... Cycles per second) 2 Loss/gain (monthly rate 15 seconds at normal temperature range (5 °C to 35 °C/ 41 °F to 95 °F) 3 Operational temperature range 10 °C to 60 °C/ 14 °F to 140 °F 4 Driving system Step motor 3 - Seiko SSC669 | Owner Manual - Page 20
DEUTSCH WARNUNG l Tauchen Sie nur mit dieser Uhr, wenn Sie über eine ausreichende Ausbildung zum Tauchen verfügen. Beachten Sie zu Ihrer eigenen Sicherheit die Richtlinien für Tauchen. l Verwenden Sie die Uhr nicht zum Sättigungstauchen mit Heliumgas. l Vergewissern Sie sich vor dem Tauchen, dass - Seiko SSC669 | Owner Manual - Page 21
ist, • die Uhrzeit und der Kalender richtig eingestellt sind. Falls Sie eine Fehlfunktion feststellen, empfehlen wir Ihnen, sich an eine autorisierte SEIKO-KUNDENDIENSTSTELLE zu wenden. BEIM TAUCHEN l Betätigen Sie die Krone nicht, wenn die Uhr nass ist oder sich im Wasser befindet. l Achten - Seiko SSC669 | Owner Manual - Page 22
Deutsch INHALT Seite Merkmale...41 ANZEIGE UND TASTEN 42 VERSCHRAUBBARE KRONE 43 EINSTELLEN DER UHRZEIT UND 45 DER STOPPUHR-ZEIGERPOSITION 45 EINSTELLEN DES DATUMS 48 STOPPUHR...49 SO LADEN UND STARTEN SIE DIE UHR 52 ÜBERLADUNGS-SCHUTZFUNKTION 53 RICHTWERTE FÜR DIE LADEZEIT/GENAUIGKEIT 54 - Seiko SSC669 | Owner Manual - Page 23
A 24-Stunden-Zeiger a b KRONE c STOPPUHR-Minutenzeiger B Datum a: Normalposition (nachdem die Krone gelöst wurde) b: 1. Einrastposition c: 2. Einrastposition • Einige Modelle verfügen über eine verschraubbare Krone. Wenn Ihre Uhr über eine verschraubbare Krone verfügt, siehe unter - Seiko SSC669 | Owner Manual - Page 24
VERWENDUNG DER SICHERHEITSSPERRTASTE SICHERHEITSSPERRE DER DRUCKTASTEN A UND B A Sperren Entsperren Deutsch Sperren Sperren der Drucktasten B Entsperren - Die Sicherheitssperrtaste im Uhrzeigersinn drehen, bis kein Drehen des Gewindes mehr gefühlt wird. - Die Taste lässt sich nicht drücken. - Seiko SSC669 | Owner Manual - Page 25
Deutsch 1. Wenn die Stoppuhr läuft oder eine Messung durchgeführt hat, werden die STOPPUHR-Zeiger beim Herausziehen der Krone zur 2. Einrastposition automatisch auf "0" zurückgestellt. 2. Der 24-Stunden-Zeiger bewegt sich entsprechend dem Stundenzeiger. 3. Es wird empfohlen, dass Sie die Zeiger auf - Seiko SSC669 | Owner Manual - Page 26
Deutsch EINSTELLEN DES DATUMS l Vor dem Einstellen des Datums muss die Uhrzeit eingestellt werden. KRONE Entsperren. t Zur 1. Einrastposition herausziehen. t Im Uhrzeigersinn drehen, bis das gewünschte Datum erscheint. t Datum Zurück in die Normalposition drücken. t So weit einschrauben, - Seiko SSC669 | Owner Manual - Page 27
Deutsch Wenn die STOPPUHR-Zeiger laufen 1. Drücken Sie die Taste A, um die Stoppuhr zu stoppen. 2. Drücken Sie die Taste B, um die Stoppuhr zurückzustellen. Wenn die STOPPUHR-Zeiger gestoppt sind Einer der folgenden Stoppuhr-Vorgänge wurde ausgeführt. Gehen Sie wie - Seiko SSC669 | Owner Manual - Page 28
Deutsch SO LADEN UND STARTEN SIE DIE UHR u Wenn Sie die Uhr in Betrieb nehmen oder wenn die Energie in der aufladbaren Batterie auf ein extrem niedriges Niveau abgesunken ist, laden Sie die Batterie ausreichend auf, indem Sie die Uhr ins Licht bringen. 1 Bringen Sie die Uhr ins Sonnenlicht oder ins - Seiko SSC669 | Owner Manual - Page 29
Deutsch RICHTWERTE FÜR DIE LADEZEIT/GENAUIGKEIT Umgebung/Lichtquelle (lux) Allgemeine Räume/Leuchtstoffröhren (700) 30 W 20 cm/Leuchtstoffröhren (3000) Bewölktes Wetter/Sonnenlicht (10 0 0 0 ) A (Minuten) 150 33 9 V175 B (Stunden) 60 13 3.5 C (Stunden) - 110 30 u Die Uhr arbeitet, indem sie - Seiko SSC669 | Owner Manual - Page 30
Deutsch HINWEISE ZUR ENERGIEVERSORGUNG ● Im Unterschied zu herkömmlichen Silberoxid-Batterien ist die in dieser Uhr verwendete Batterie aufladbar. Da die Zyklen von Auf- und Entladen vielfach wiederholt werden können, ist die aufladbare Batterie lange verwendbar, was sie von anderen, nur einmal - Seiko SSC669 | Owner Manual - Page 31
des Drehrings kann unter Wasser geringfügig schwergängiger sein. Dies ist keine Störung. 58 GESCHWINDIGKEITSMESSER (für Modelle mit Geschwindigkeitsmesserskala auf dem Ziffernblatt) Messen der stündlichen Durchschnittsgeschwindigkeit eines Fahrzeugs Deutsch 1 Messen Sie mit der Stoppuhr - Seiko SSC669 | Owner Manual - Page 32
hrt werden: „180" (Wert auf Geschwindigkeitsmesserskala) x 15 Vorgänge = 2700 Vorgänge pro Stunde 60 ENTFERNUNGSMESSER (für Modelle mit Entfernungsmesserskala auf dem Ziffernblatt) l Der Entfernungsmesser liefert eine ungefähre Entfernungsangabe zur Lichtund Schallquelle. l Der Entfernungsmesser - Seiko SSC669 | Owner Manual - Page 33
VERWENDUNG DES ENTFERNUNGSMESSERS Vergewissern Sie sich zunächst, dass die Stoppuhr zurückgesetzt wurde. START (Blitz) 1 Drücken Sie die Taste A , sobald Sie das Licht sehen, um die Stoppuhr zu starten. Deutsch STOP (Donner) 2 Wenn Sie den Schall hören, drücken Sie die Taste A, um die Stoppuhr - Seiko SSC669 | Owner Manual - Page 34
-Neonlampe, 40 Watt) [Abstand zur Uhr: 1 m]: 1000 Lux [Abstand zur Uhr: 3 m]: 500 Lux (durchschnittliche Raumbeleuchtung) [Abstand zur Uhr: 4 m]: 250 Lux * "LUMIBRITE" ist ein Warenzeichen von SEIKO HOLDINGS CORPORATION. 65 - Seiko SSC669 | Owner Manual - Page 35
Gegenstand gestoßen oder haben sie bei aktiver sportlicher Betätigung getragen. Die Uhr wurde starken Vibrationen ausgesetzt. Lösungen Falls dieses Problem häufiger auftritt, obwohl Sie die Uhr täglich tragen, ist die Uhr möglicherweise während des Tragens nicht genügend Licht ausgesetzt. Sie - Seiko SSC669 | Owner Manual - Page 36
Deutsch Deutsch Störung Die STOPPUHR-Zeiger gehen nicht auf die Position "0" zurück, wenn die Stoppuhr zurückgesetzt wird. Die Innenseite des Glasdeckels ist beschlagen. Das Datum ändert sich während des Tages. Mögliche Ursachen Durch äußere Einflüsse oder durch das Zurücksetzen der internen IC - Seiko SSC669 | Owner Manual - Page 37
Deutsch TECHNISCHE DATEN 1 Frequenz des Kristalloszillators 32.768 Hz (Hz = Hertz = Schwingungen pro Sekunde) 2 Vor- oder Nachgehen der Uhr (monatlich 15 Sekunden im normalen Temperaturbereich (5 °C - 35 °C/ 41 °F - 95 °F) 3 Betriebstemperatur 10 °C - 60 °C/14 °F - 140 °F 4 Antriebssystem - Seiko SSC669 | Owner Manual - Page 38
saturation utilisant de l'hélium. l Avant la plongée, assurez-vous que la montre fonctionne normalement. PRÉCAUTION l Veuillez lire et respecter les instructions décrites dans cette brochure pour garantir un bon fonctionnement de cette montre de plongée. l N'actionnez pas la couronne pendant que la - Seiko SSC669 | Owner Manual - Page 39
le calendrier ont été correctement ajustés. En présence d'un quelconque fonctionnement anormal, il est conseillé de contacter un CENTRE DE SERVICE CLIENTÈLE AGRÉÉ PAR SEIKO. PENDANT LA PLONGÉE ● N'actionnez pas la couronne pendant que la montre est mouillée ou dans l'eau. ● Veillez à ne pas cogner - Seiko SSC669 | Owner Manual - Page 40
REMARQUES SUR L'ALIMENTATION 90 FONCTIONNEMENT INCORRECT 91 CADRAN ROTATIF 92 TACHYMÈTRE 93 TÉLÉMÈTRE 95 POUR PRESERVER LA QUALITE DE LA MONTRE 97 GUIDE DE DéPANNAGE 100 FICHE TECHNIQUE 104 74 CAL. V175 CARACTÉRISTIQUES n TEMPS / CALENDRIER n CHRONOMÈTRE DE 60 MINUTES EN UNITÉS DE 1/ 5e DE - Seiko SSC669 | Owner Manual - Page 41
AFFICHAGE ET BOUTONS Aiguille 1/5e seconde du CHRONOMÈTRE Aiguille des minutes Aiguille des heures Petite trotteuse A Aiguille 24 heures Français COURONNE a b c a: Position normale (après libération de la couronne) B b: Premier déclic c: Second déclic Aiguille des minutes du CHRONOMÈTRE - Seiko SSC669 | Owner Manual - Page 42
FONCTIONNEMENT DU BOUTON DE VERROUILLAGE DE SÉCURITÉ VERROUILLAGE DE SÉCURITÉ DES BOUTONS-POUSSOIRS A et B A Blocage Déblocage Blocage Français Blocage des boutons-poussoirs B Déblocage - Tournez les boutons de verrouillage de sécurité dans le sens horaire jusqu'à ce que la rotation du - Seiko SSC669 | Owner Manual - Page 43
Français 1. Si la couronne est retirée au second déclic alors que le chronomètre est ou était en service, les aiguilles du CHRONOMÈTRE seront automatiquement ramenées à "0". 2. L'aiguille 24 heures est synchronisée avec l'aiguille des heures. 3. Il est conseillé d'amener les aiguilles à quelques - Seiko SSC669 | Owner Manual - Page 44
RÉGLAGE DE LA DATE l Prenez soin d'ajuster l'heure principale avant d'ajuster la date. COURONNE Dévissez. t Retirez-la au premier déclic. t Tournez dans le sens horaire jusqu'à ce que la date souhaitée apparaisse. t Date Repoussez-la à sa position normale. t Vissez à fond jusqu'à ce qu - Seiko SSC669 | Owner Manual - Page 45
Pendant le déplacement des aiguilles du CHRONOMÈTRE 1. Appuyez sur le bouton A pour arrêter le chronomètre. 2. Appuyez sur le bouton B pour réinitialiser le chronomètre. Pendant l'arrêt des aiguilles du CHRONOMÈTRE Une des opérations de chronométrage suivantes a - Seiko SSC669 | Owner Manual - Page 46
Français RECHARGE ET MISE EN MARCHE DE LA MONTRE u Lorsque vous commencez à utiliser la montre ou si sa pile rechargeable est extrêmement déchargée, exposez la montre à une lumière pour la recharger. 1. Exposez la montre à la lumière du soleil ou à une forte lumière artificielle. Si la montre avait - Seiko SSC669 | Owner Manual - Page 47
INDICATION SUR LA DURÉE DE RECHARGE/PRÉCISION Environnement / Source de lumière (lux) Bureau ordinaire / Lampe fluorescente (700) 30 W / 20 cm / Lampe fluorescente (3000) Temps nuageux / Lumière solaire (10000) V175 A B (minutes) (heures) 150 60 33 13 9 3.5 u La montre fonctionne en - Seiko SSC669 | Owner Manual - Page 48
Français REMARQUES SUR L'ALIMENTATION ● La pile utilisée dans cette montre est d'un type rechargeable, différent des piles ordinaires à oxyde d'argent. A la différence des autres piles jetables, telles que les piles à anode sèche ou les piles-boutons, cette pile rechargeable peut être utilisée - Seiko SSC669 | Owner Manual - Page 49
CADRAN ROTATIF Le cadran rotatif permet d'afficher une durée écoulée, allant jusqu'à 60 minutes. En le programmant avant une plongée, on peut ainsi savoir combien de temps on a passé sous l'eau. l Pour éviter une rotation accidentelle, le cadran est ainsi conçu que sa rotation devient plus dure - Seiko SSC669 | Owner Manual - Page 50
Pour mesurer la cadence horaire d'une tâche 1 Utilisez le chronomètre pour Ex. 1 mesurer la durée requise pour terminer une tâche. 2 L'échelle de tachymètre indiquée par l'aiguille de 1/5e de seconde du CHRONOMÈTRE donne le nombre moyen de tâches accomplies par heure. Aiguille 1/5e seconde du - Seiko SSC669 | Owner Manual - Page 51
atomiseur, Confiez ce travail à un CONCES- détergents, adhésifs ou peintures, SIONNAIRE ou un CENTRE DE car le boîtier ou le bracelet pour- SERVICE SEIKO AUTORISE raient en être décolorés, détériorés pour être sûr que le boîtier, la ou endommagés. couronne, le joint et le verre soient en - Seiko SSC669 | Owner Manual - Page 52
lux [Distance à la montre: 3 m]: 500 lux (luminosité moyenne d'une pièce) [Distance à la montre: 4 m]: 250 lux Français * "LUMIBRITE" est une marque de fabrique de SEIKO HOLDINGS CORPORATION. 99 - Seiko SSC669 | Owner Manual - Page 53
GUIDE DE DéPANNAGE Panne Causes possibles La montre cesse de fonctionner. L'énergie de consultant "INDICATION SUR LA DURÉE DE RECHARGE/PRÉCISION". Réinitialisez la montre en suivant les instructions sous "FONCTIONNEMENT INCORRECT". Ramenez la montre à une température normale, de telle sorte qu' - Seiko SSC669 | Owner Manual - Page 54
glée en cycle de 12 heures et elle avance ou retarde. Solutions Ajustez les aiguilles du CHRONOMÈTRE à la position "0" en vous reportant aux instructions sous "RÉGLAGE DE L'HEURE ET DE LA POSITION DES AIGUILLES DU CHRONOMÈTRE". Contactez le détaillant chez qui la montre a été achetée. Réinitialisez - Seiko SSC669 | Owner Manual - Page 55
Français FICHE TECHNIQUE 1 Fréquence de l'oscillateur au quartz 32.768 Hz (Hertz = Cycles par seconde) 2 Gain/perte (moyenne mensuelle 15 secondes dans la plage normale de tempé- rature (de 5 °C à 35 °C) (de 41 °F à 95 °F) 3 Plage de température d'utilisation De -10 °C à 60 °C/ De 14 °F à 140 °F - Seiko SSC669 | Owner Manual - Page 56
funzioni come dovuto. AVVERTENZE l Per garantire un corretto funzionamento di questo orologio per subacquei, leggere attentamente le istruzioni di questo manuale, ed attenersi scrupolosamente alle stesse. l Non agire mai sulla corona ad orologio bagnato, o in acqua. l Non utilizzare i tasti con - Seiko SSC669 | Owner Manual - Page 57
; • l'ora e il calendario siano stati correttamente predisposti. In caso di eventuali disfunzioni si consiglia di rivolgersi ad un CENTRO DI SERVIZIO SEIKO AUTORIZZATO. DURANTE L'IMMERSIONE ● Non agire mai sulla corona ad orologio bagnato, o in acqua. ● Evitare che l'orologio possa urtare oggetti - Seiko SSC669 | Owner Manual - Page 58
di cui si è in possesso dispone della corona con chiusura ad avvitamento vedere il paragrafo seguente "CORONA AD AVVITAMENTO." • Le illustrazioni delle seguenti sezioni del manuale sono state semplificate a scopo esplicativo. 111 - Seiko SSC669 | Owner Manual - Page 59
CORONA AD AVVITAMENTO • L'orologio dispone di una corona con chiusura a vite, destinata a prevenire errori operativi ed a mantenere le caratteristiche di impermeabilità dell'orologio. • Per poter usare la corona è necessario anzitutto svitarla per poterla estrarre, ed è importante riavvitarla - Seiko SSC669 | Owner Manual - Page 60
PREDISPOSIZIONE DELL'ORA E REGOLAZIONE DELLA POSIZIONE DELLE LANCETTE DEL CRONOMETRO l L'orologio è stato studiato in modo che le seguenti operazioni vengano tutte eseguite con la corona nella posizione estratta sino al secondo scatto: 1) predisposizione dell'ora principale 2) regolazione della - Seiko SSC669 | Owner Manual - Page 61
2. REGOLAZIONE DELLA POSIZIONE DELLE LANCETTE DEL CRONOMETRO Lancetta dei quinti di secondo del CRONOMETRO I Se le lancette del CRONOMETRO non si trovano sulla posizione iniziale "0", ricondurvele agendo come segue. Sbloccare corona e tasti. A A Premerlo per 2 secondi. t La lancetta dei minuti - Seiko SSC669 | Owner Manual - Page 62
CRONOMETRO l Il cronometro può misurare sino a 60 minuti, in unità di quinti di secondo.Quando la misurazione raggiunge i 60 minuti il cronometro si arresta automaticamente. l Si può effettuare la misurazione dei tempi parziali. A Lancetta dei quinti di secondo del CRONOMETRO Lancetta dei minuti - Seiko SSC669 | Owner Manual - Page 63
Misurazione normale A t A t B AVVIO ARRESTO AZZERAMENTO Misurazione del tempo trascorso, in accumulazione A t A t A t A t B AVVIO ARRESTO RIPRESA ARRESTO AZZERAMENTO * La ripresa e l'arresto del cronometro possono essere effettuati ripetutamente, sempre agendo sul tasto A. - Seiko SSC669 | Owner Manual - Page 64
Italiano AVVERTENZE Avvertenze per la ricarica ● Per la ricarica dell'orologio, non porlo troppo vicino a fotoflash, spot, luci incandescenti, o altre simili sorgenti luminose, che potrebbero causare un notevole aumento della temperatura dell'orologio stesso, con conseguenti possibili danni alle - Seiko SSC669 | Owner Manual - Page 65
Italiano • Se l'orologio è fermo, o la lancetta dei secondi si sposta a scatti di 2 secondi per volta caricare l'orologio esponendolo alla luce. • Il periodo di tempo necessario per la ricarica varia in relazione al calibro dell'orologio. Vedere il calibro del proprio orologio, inciso sul retro - Seiko SSC669 | Owner Manual - Page 66
Italiano NOTE SULLA FONTE DI ENERGIA ● La batteria di cui fa uso questo orologio è una batteria ricaricabile, diversa dalle normali batterie all'ossido di argento. A differenza delle altre batterie a consumo, quali quelle a secco, o quelle a bottone, questa batteria ricaricabile può essere usata - Seiko SSC669 | Owner Manual - Page 67
CALOTTA ROTANTE La calotta rotante consente di misurare il trascorrere del tempo, sino a 60 minuti. Predisponendola opportunamente prima di iniziare l'immersione si può conoscere il tempo trascorso in acqua. l Per prevenire movimenti accidentali, la calotta rotante è studiata in modo da renderne - Seiko SSC669 | Owner Manual - Page 68
Misurazione della frequenza oraria di una certa operazione 1 Usare il cronometro per misurare il tempo necessario a completare un certo lavoro. 2 La cifra della scala del tachimetro su cui punta la lancetta dei quinti di secondo del CRONOMETRO dà il numero medio orario di lavori effettuati. Es. 1 - Seiko SSC669 | Owner Manual - Page 69
o deteriorarsi, o subire altri danni. Si raccomanda di far controllare l'orologio una volta ogni 2 o 3 anni. Farlo verificare da un RIVENDITORE AUTORIZZATO SEIKO o da un CENTRO DI ASSISTENZA, per controllare che la cassa, la corona, la guarnizione ed il sigillo del cristallo siano intatti. 133 - Seiko SSC669 | Owner Manual - Page 70
dell'orologio: 1 m]: 1.000 lux [Distanza dell'orologio: 3 m]: 500 lux (luminosità media di una stanza) [Distanza dell'orologio: 4 m]: 250 lux * "LUMIBRITE" un marchio di fabbrica della SEIKO HOLDINGS CORPORATION. Italiano 135 - Seiko SSC669 | Owner Manual - Page 71
DIAGNOSTICA Problema L'orologio si ferma. Possibili cause L'energia disponibile è esaurita. La piccola lancetta dei secondi si L'energia ancora disponibile è estremamente sposta a scatti di 2 secondi per volta. scarsa. L'orologio, fermo, è stato ricaricato per un periodo di tempo superiore a - Seiko SSC669 | Owner Manual - Page 72
Problema Le lancette del CRONOMETRO non ritornano alla posizione iniziale "0" pur procedendo ad azzerare il cronometro. La superficie interna del vetro è appannata. La data cambia nel corso della giornata. Possibili cause Per cause esterne, o perché il circuito integrato è stato riazzerato, la - Seiko SSC669 | Owner Manual - Page 73
DATI TECNICI 1 Frequenza del cristallo oscillatore 32.768 Hz (Hz = Hertz, Cicli al secondo) 2 Deviazione (media mensile 15 secondi alla normale gamma delle temperature di funzionamento (da 5 a 35º C) 3 Gamma delle temperature utili per il funzionamento da -10 a 60º C 4 Sistema di movimento 3 - Seiko SSC669 | Owner Manual - Page 74
ESNPGALÑISOHL AVISO l No trate de bucear usando este reloj a menos que usted esté bien entrenado para buceo. Para su seguridad, no se olvide de cumplir los reglamentos del buceo. l No use el reloj para el buceo de saturación usando gas helio. l Antes del buceo, asegúrese de que su reloj esté - Seiko SSC669 | Owner Manual - Page 75
minuto; • la hora y el calendario están fijados adecuadamente. Si algo funciona mal, le recomendamos que consulte a un CENTRO DE SERVICIO AL CLIENTE AUTORIZADODE SEIKO. MIENTRAS BUCEA l No opere la corona cuando el reloj está húmedo o en el agua. l Tenga cuidado de no golpear el reloj contra objetos - Seiko SSC669 | Owner Manual - Page 76
Español ÍNDICE Página CARACTERÍSTICAS 145 INDICACIÓN Y BOTONES 146 CORONA DE ROSCA 147 FIJACIÓN DE HORA Y AJUSTE DE POSICIÓN DE LAS MANECILLAS DEL CRONÓMETRO.....149 FIJACIÓN DE LA FECHA 152 CRONÓMETRO 153 CÓMO CARGAR Y ACTIVAR EL RELOJ 156 FUNCIÓN DE PREVENCIÓN DE SOBRECARGA 157 PAUTA DEL - Seiko SSC669 | Owner Manual - Page 77
roscado. Si su reloj tiene una corona del tipo roscado, refiérase a "CORONA DE ROSCA". Las ilustraciones en las subsiguientes secciones de este manual pueden estar simplificadas para facilitar la explicación. Español CORONA DE ROSCA • Su reloj cuenta con una corona de rosca para evitar operaci - Seiko SSC669 | Owner Manual - Page 78
Español OPERACIÓN DE BOTÓN DE BLOQUEO DE SEGURIDAD BLOQUEO DE SEGURIDAD CON LOS BOTONES DE PRESIÓN A y B A Bloqueo Desbloqueo Bloqueo B Desbloqueo Bloqueo de los botones de presión - Gire los botones de bloqueo de seguridad a la derecha hasta que ya no sienta que giran las roscas. - Los - Seiko SSC669 | Owner Manual - Page 79
Español 1. Cuando el cronómetro está o ha estado midiendo, al extraer la corona a la segunda posición, las manecillas del CRONÓMETRO se repondrán automáticamente a "0". 2. La manecilla de 24 horas se mueve en correspondencia con la manecilla de hora. 3. Se recomienda fijar las manecillas a unos - Seiko SSC669 | Owner Manual - Page 80
Español FIJACIÓN DE LA FECHA l Antes de fijar la fecha, no se olvide de fijar la hora principal. Fecha CORONA Desbloquee. t Extraiga a la primera posición. t Gire a la derecha hasta que aparezca la fecha deseada. t Presione a la posición normal. t Atornille completamente hasta que quede bloqueada - Seiko SSC669 | Owner Manual - Page 81
Español Durante el movimiento de las manecillas del CRONÓMETRO 1. Presione el botón A para detener el cronómetro. 2. Presione el botón B para reponer el cronómetro. Durante la parada de las manecillas del CRONÓMETRO Se ha ejecutado una de las siguientes operaciones del - Seiko SSC669 | Owner Manual - Page 82
Español CÓMO CARGAR Y ACTIVAR EL RELOJ u Cuando usted active el reloj o cuando la energía de la pila recargable se reduzca a un nivel extremadamente bajo, cárguela suficientemente exponiendo el reloj a la luz. 1. Exponga el reloj a la luz solar o a una luz potente artificial. Cuando el reloj está - Seiko SSC669 | Owner Manual - Page 83
Español PAUTA DEL TIEMPO DE CARGA / EXACTITUD Ambiente / Fuente luminosa (lux) Oficinas generales / Luz fluorescente (700) 30W20cm / Luz fluorescente (3000) Tiempo nublado / Luz del sol (10 0 0 0 ) A (minutos) 150 33 9 V175 B (horas) 60 13 3,5 C (horas) - 110 30 u El reloj funciona mientras - Seiko SSC669 | Owner Manual - Page 84
las manecillas del CRONÓMETRO a la posición "0". Refiérase a la sección "FIJACIÓN DE HORA Y AJUSTE DE POSICIÓN DE LAS MANECILLAS DEL CRONÓMETRO" de este manual. 161 - Seiko SSC669 | Owner Manual - Page 85
Español ANILLO GIRATORIO Con el bisel rotatorio se puede indicar el tiempo transcurrido hasta 60 minutos. Ajustándolo antes de empezar el buceo, se puede saber cuánto tiempo se está bajo el agua. l Para evitar giro accidental, el bisel rotatorio está diseñado de modo que su giro sea más duro en el - Seiko SSC669 | Owner Manual - Page 86
Español Para medir la razón por hora de operación 1 Use el cronómetro para medir el tiempo requerido para completar 1 trabajo. Ej. 1 Manecilla de 1/5 de segundo del CRONÓMETRO: 20 segundos 2 La escala taquimétrica indicada por la manecilla de 1/5 de segundo del CRONÓMETRO muestra el número - Seiko SSC669 | Owner Manual - Page 87
da cuenta que su reloj de buceo funciona mal, nunca intente repararlo, sino envíelo inmediatamente a un CENTRO DE SERVICIO AL CLIENTE DE SEIKO. n TEMPERATURAS Los componentes principales de los relojes mecánicos son de metales, los cuales se expanden o contraen según la temperatura. Esto ejerce un - Seiko SSC669 | Owner Manual - Page 88
al reloj: 1 m]: 1.000 luz [Distancia al reloj: 3 m]: 500 luz (alumbrado medio en habitación) [Distancia al reloj: 4 m]: 250 luz * " LUMIBRITE " es una marca de fábrica de SEIKO HOLDINGS CORPORATION. 169 - Seiko SSC669 | Owner Manual - Page 89
Español LOCALIZACION DE AVERÍAS Averías Causas posibles El reloj se detiene. Se ha agotado la energía. La manecilla pequeña de segundo se mueve a intervalos de dos segundos. La energía está por agotarse. El reloj detenido ha sido cargado durante más tiempo que el requerido para la carga - Seiko SSC669 | Owner Manual - Page 90
Español Español Averías Causas posibles Las manecillas del CRONÓMETRO no regresan a la posición "0" al reponerse el cronómetro. Están afectadas por las fuentes externas, o por haberse restablecido el circuito integrado interno, las manecillas del cronómetro han quedado desalineadas. La - Seiko SSC669 | Owner Manual - Page 91
Español ESPECIFICACIONES 1 Frecuencia de oscilador de cristal 32.768 Hz (Hz = Hercios ... Ciclos por segundo) 2 Adelanto / atraso (por mes 15 segundos a temperaturas normales 5ºC a 35ºC / 41ºF a 95ºF 3 Rango de temperatura operacional 10ºC a 60ºC / 14ºF a 140ºF 4 Sistema impulsor Motor paso - Seiko SSC669 | Owner Manual - Page 92
PORTUGUÊS AVISO l Não tente mergulhar usando este relógio a menos que tenha recebido treinamento específico para mergulhar. Para sua segurança pessoal, cumpra as regras de mergulhar. l Não use o relógio em mergulhos de saturação usando gás hélio. l Antes de mergulhar, certifique-se de que o relógio - Seiko SSC669 | Owner Manual - Page 93
coincide com o ponteiro dos minutos; • a hora e o calendário estão devidamente acertados. Se houver alguma avaria, recomendamos que se dirija a um CENTRO SEIKO AUTORIZADO DE ASSISTÊNCIA AO CLIENTE . DURANTE O MERGULHO l Não opere a coroa quando o relógio estiver molhado ou dentro da água. l Tenha - Seiko SSC669 | Owner Manual - Page 94
Português ÍNDICE Página CARACTERÍSTICAS 179 MOSTRADOR E BOTÕES 180 COROA DE ROSCA 181 ACERTO DA HORA E AJUSTAMENTO DA POSIÇÃO DOS PONTEIROS DO CRONÓMETRO 183 ACERTO DO DIA DO MÊS 186 CRONÓMETRO 187 COMO CARREGAR E PÔR A FUNCIONAR O RELÓGIO 190 FUNÇÃO PREVENTIVA DE SOBRECARGA 191 LINHA - Seiko SSC669 | Owner Manual - Page 95
tipo bloqueio a rosca. Se o seu relógio tiver, consulte a secção "COROA DE ROSCA" na página seguinte. • As ilustrações das secções seguintes deste manual podem ter sido simplificadas por razões explicativas. 180 COROA DE ROSCA Português • O seu relógio possui uma coroa de rosca para evitar opera - Seiko SSC669 | Owner Manual - Page 96
OPERAÇÃO DO BOTÃO DE BLOQUEIO DE SEGURANÇA BLOQUEIO DE SEGURANÇA DOS BOTÕES DE APERTO A e B A Bloquear Desbloquear Português Bloquear B Desbloquear Para bloquear os botões de aperto - Rode os Botões de Bloqueio de Segurança para a direita até deixar de sentir o girar das roscas. - Os - Seiko SSC669 | Owner Manual - Page 97
Português 1. Quando o cronómetro está ou esteve a medir, se se puxar a coroa para o segundo clique, os ponteiros do CRONÓMETRO serão automaticamente repostos a "0". 2. O ponteiro de 24 horas move-se em conformidade com o ponteiro das horas. 3. É aconselhável acertar os ponteiros numa hora com - Seiko SSC669 | Owner Manual - Page 98
Português ACERTO DO DIA DO MÊS l Antes de acertar o dia do mês, acerte a hora principal. COROA Dia do mês Desengate. t Puxe para o primeiro clique. t Rode no sentido horário até aparecer o dia do mês que deseja. t Empurre para repô-la na posição normal. t Atarraxe completamente para dentro até - Seiko SSC669 | Owner Manual - Page 99
Português Enquanto os ponteiros do CRONÓMETRO estão a mover-se 1. Pressione o botão A para parar o cronómetro. 2. Pressione o botão B para repor o cronómetro a zero. Enquanto os ponteiros do CRONÓMETRO estão parados Foi realizada uma das seguintes operações do cronó - Seiko SSC669 | Owner Manual - Page 100
Português COMO CARREGAR E PÔR A FUNCIONAR O RELÓGIO u Quando se pôe a funcionar o relógio ou quando a energia na pilha recarregável atinge um nível extremamente baixo, carregue-o suficientemente expondo o relógio à luz. 1. Exponha o relógio à luz solar ou a uma luz artificial poderosa. Quando o rel - Seiko SSC669 | Owner Manual - Page 101
LINHA DIRECTRIZ DO TEMPO DE CARGA/PRECISÃO Português Ambiente/Fonte luminosa (lux) Escritórios em geral/Luz fluorescente (700) 30W20cm/ Luz fluorescente (3000) A (minutos) 150 33 V175 B (horas) 60 13 Tempo nevoado/Luz solar (10000) 9 3,5 C (horas) - 110 30 Bom tempo/Luz solar (100000) 2 - Seiko SSC669 | Owner Manual - Page 102
ógio será inicializado. Antes de começar a usar o relógio, é necessário regular a hora e ajustar os ponteiros do CRONÓMETRO na posição 0. Consulte a secção deste manual "ACERTO DA HORA E AJUSTAMENTO DA POSIÇÃO DOS PONTEIROS DO CRONÓMETRO". 195 - Seiko SSC669 | Owner Manual - Page 103
Português BISEL ROTATIVO O bisel rotativo pode indicar o tempo decorrido até 60 minutos. Acertando-o antes de mergulhar, pode-se saber quantos minutos se está debaixo da água. l Para evitar rotação acidental, o bisel rotativo está projectado de modo a que a rotação se torne mais difícil na água. - Seiko SSC669 | Owner Manual - Page 104
Português Para medir o ritmo horário de operações 1 Utilize o cronómetro para medir o tempo requerido para completar 1 trabalho. Ex. 1 2 A escala do taquímetro indicada pelo ponteiro de 1/5 de segundo fornece o número médio de trabalhos realizados por hora. Ponteiro de 1/5 de segundo do CRONÓ - Seiko SSC669 | Owner Manual - Page 105
Por consequinte, se notar que o seu relógio do mergulhador está a funcionar mal, não tente consertá-lo mas envie-o imeditamente para um CENTRO SEIKO DE ASSISTÊNCIA AO CLIENTE. n TEMPERATURAS Os componentes básicos nos relógios mecânicos são feitos de metais, que expandem ou contraem dependendo das - Seiko SSC669 | Owner Manual - Page 106
áncia até ao relógio: 3 m]: 500 lux (luminância da sala média) [Distância até ao relógio: 4 m]: 250 lux * "LUMIBRITE" uma marca comercial da SEIKO HOLDINGS CORPORATION. 203 - Seiko SSC669 | Owner Manual - Page 107
LOCALIZAÇÃO E CORRECÇÃO DE AVARIAS Avaria Causas possíveis Português O relógio para de funcionar. A energia foi esgotada. O ponteiro pequeno dos segundos move-se a intervalos de 2 segundos O relógio parado foi carregado mais tempo do que o requerido para a carga completa, mas o ponteiro dos - Seiko SSC669 | Owner Manual - Page 108
Português Português Avaria Os ponteiros do CRONÓMETRO não retornam para a posição "0" quando o cronómetro é reinicializado. A superfície interna do vidro está embaciada. O dia do mês muda durante o dia. Causas possíveis Afectadas por fontes externas, ou porque o CI interno foi reinicializado, as - Seiko SSC669 | Owner Manual - Page 109
Português ESPECIFICAÇÕES 1 Frequência do oscilador do cristal 32.768 Hz (Hz = Hertz ... Ciclos por segundo) 2 Atraso/avanço (média mensal 15 segundos numa temperatura normal (5 ºC a 35 ºC/ 41 ºF a 95 ºF) 3 Gama de temperaturas operacionais 10 ºC a 60 ºC/ 14 ºF a 140 ºF 4 Sistema propulsor - Seiko SSC669 | Owner Manual - Page 110
V175 - Seiko SSC669 | Owner Manual - Page 111
- Seiko SSC669 | Owner Manual - Page 112
- Seiko SSC669 | Owner Manual - Page 113
CAL. V175 - Seiko SSC669 | Owner Manual - Page 114
- Seiko SSC669 | Owner Manual - Page 115
- Seiko SSC669 | Owner Manual - Page 116
- Seiko SSC669 | Owner Manual - Page 117
- Seiko SSC669 | Owner Manual - Page 118
* * - Seiko SSC669 | Owner Manual - Page 119
- Seiko SSC669 | Owner Manual - Page 120
V175 - Seiko SSC669 | Owner Manual - Page 121
- Seiko SSC669 | Owner Manual - Page 122
- Seiko SSC669 | Owner Manual - Page 123
- Seiko SSC669 | Owner Manual - Page 124
NS - Seiko SSC669 | Owner Manual - Page 125
(LumiBriteTM) "LumiBrite" * - Seiko SSC669 | Owner Manual - Page 126
- Seiko SSC669 | Owner Manual - Page 127
- Seiko SSC669 | Owner Manual - Page 128
-
 1
1 -
 2
2 -
 3
3 -
 4
4 -
 5
5 -
 6
6 -
 7
7 -
8
-
9
-
10
-
11
-
12
-
13
-
14
-
15
-
16
-
17
-
18
-
19
-
20
-
21
-
22
-
23
-
24
-
25
-
26
-
27
-
28
-
29
-
30
-
31
-
32
-
33
-
34
-
35
-
36
-
37
-
38
-
39
-
40
-
41
-
42
-
43
-
44
-
45
-
46
-
47
-
48
-
49
-
50
-
51
-
52
-
53
-
54
-
55
-
56
-
57
-
58
-
59
-
60
-
61
-
62
-
63
-
64
-
65
-
66
-
67
-
68
-
69
-
70
-
71
-
72
-
73
-
74
-
75
-
76
-
77
-
78
-
79
-
80
-
81
-
82
-
83
-
84
-
85
-
86
-
87
-
88
-
89
-
90
-
91
-
92
-
93
-
94
-
95
-
96
-
97
-
98
-
99
-
100
-
101
-
102
-
103
-
104
-
105
-
106
-
107
-
108
-
109
-
110
-
111
-
112
-
113
-
114
-
115
-
116
-
117
-
118
-
119
-
120
-
121
-
122
-
123
-
124
-
125
-
126
-
127
-
128
 |
 |
Cal. V175
INSTRUCTIONS
(P.
4)
BEDIENUNGSANLEITUNG
(S.
37)
INSTRUCTIONS
(P.
71)
ISTRUZIONI
(P. 106)
INSTRUCCIONES
(P. 141)
INSTRUÇÕES
(P. 175)
ИНСТРУКЦИИ
(P.
209)
(243
)