Sharp MX-M1100 Software Setup Guide - Page 28
Installing The Printer Status, Monitor
 |
View all Sharp MX-M1100 manuals
Add to My Manuals
Save this manual to your list of manuals |
Page 28 highlights
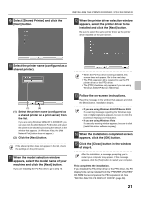
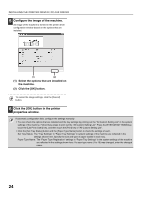
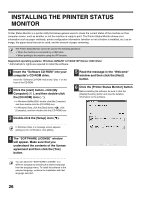
INSTALLING THE PRINTER STATUS MONITOR Printer Status Monitor is a printer utility that allows general users to check the current status of the machine on their computer screen, such as whether or not the machine is ready to print. The Printer Status Monitor shows error information such as paper misfeeds, printer configuration information (whether or not a finisher is installed, etc.) as an image, the paper sizes that can be used, and the amount of paper remaining. The Printer Status Monitor cannot be used in the following situations: • When the machine is connected by a USB cable. • When printing to the machine using the IPP function. Supported operating systems: Windows 98/Me/NT 4.0*/2000*/XP*/Server 2003*/Vista* * Administrator's rights are required to install the software. 1 Insert the "Software CD-ROM" into your computer's CD-ROM drive. Insert the "Software CD-ROM" that shows "Disc 1" on the front of the CD-ROM. 2 Click the [start] button, click [My Computer] ( ), and then double-click the [CD-ROM] icon ( ). • In Windows 98/Me/2000, double-click [My Computer] and then double-click the [CD-ROM] icon. • In Windows Vista, click the [Start] button ( ), click [Computer], and then double-click the [CD-ROM] icon. 5 Read the message in the "Welcome" window and then click the [Next] button. 6 Click the [Printer Status Monitor] button. Before installing the software, be sure to click the [Display Readme] button and view the detailed information on the software. 3 Double-click the [Setup] icon ( ). In Windows Vista, if a message screen appears asking you for confirmation, click [Allow]. 4 The "SOFTWARE LICENSE" window will appear. Make sure that you understand the contents of the license agreement and then click the [Yes] button. You can show the "SOFTWARE LICENSE" in a different language by selecting the desired language from the language menu. To install the software in the selected language, continue the installation with that language selected. 26
-
 1
1 -
2
-
3
-
4
-
5
-
6
-
7
-
8
-
9
-
10
-
11
-
12
-
13
-
14
-
15
-
16
-
17
-
18
-
19
-
20
-
21
-
22
-
 23
23 -
 24
24 -
 25
25 -
 26
26 -
 27
27 -
 28
28 -
 29
29 -
 30
30 -
 31
31 -
 32
32 -
 33
33 -
34
-
35
-
36
-
37
-
38
-
39
-
40
-
41
-
42
-
43
-
44
 |
 |
