Singer 3333 FASHION MATE Instruction Manual and Troubleshooting Guide - Page 26
Changing the Presser Foot
 |
View all Singer 3333 FASHION MATE manuals
Add to My Manuals
Save this manual to your list of manuals |
Page 26 highlights
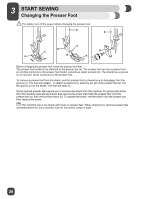
23 START SEWING Changing the Presser Foot ⚠ For safety, turn off the power before changing the presser foot. Before changing the presser foot, raise the presser foot lifter. The presser foot holder (b) is attached to the presser bar (a). The presser foot (e) has a presser foot pin (d) that connects to the presser foot holder, sometimes called a shank (b). The shank has a groove (c) on its front, which connects it to the presser foot. To remove a presser foot from the shank, pull the presser foot (e) toward you to disengage from the groove (c). The foot will release. To attach a presser foot, slide the pin (d) of the presser foot (e) into the groove (c) on the shank. The foot will snap on. Some optional presser feet require you to remove the shank from the machine. To remove the shank from the machine (see above) loosen and remove the screw that holds the presser foot onto the presser bar (a), then remove the shank (b). To replace the shank, set the shank onto the presser bar, then replace the screw. ¤ This machine has a low shank with snap-on presser feet. When shopping for optional presser feet and attachments for your machine, look for low-shank, snap-on style. 26
-
 1
1 -
2
-
3
-
4
-
5
-
6
-
7
-
8
-
9
-
10
-
11
-
12
-
13
-
14
-
15
-
16
-
17
-
18
-
19
-
20
-
 21
21 -
 22
22 -
 23
23 -
 24
24 -
 25
25 -
 26
26 -
 27
27 -
 28
28 -
 29
29 -
 30
30 -
 31
31 -
32
-
33
-
34
-
35
-
36
-
37
-
38
-
39
-
40
-
41
-
42
-
43
-
44
-
45
-
46
-
47
-
48
-
49
-
50
-
51
-
52
-
53
-
54
-
55
-
56
-
57
-
58
-
59
-
60
-
61
-
62
-
63
-
64
-
65
-
66
-
67
-
68
-
69
-
70
-
71
-
72
-
73
-
74
-
75
-
76
-
77
-
78
-
79
-
80
-
81
-
82
-
83
-
84
-
85
-
86
-
87
-
88
-
89
-
90
-
91
-
92
-
93
-
94
-
95
-
96
-
97
-
98
-
99
-
100
-
101
-
102
 |
 |
