Singer One Instruction Manual 8 - Page 10
Setting, Machine, Preparacion, Maquina, Preparation
 |
View all Singer One manuals
Add to My Manuals
Save this manual to your list of manuals |
Page 10 highlights
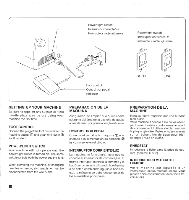
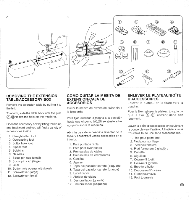
Power/light switch Interruptor corriente/luz Interrupteur moteur/lumiere Power/light switch Interruptor corriente/luz Interrupteur moteur/lumiere OF :A& si o j 1° 4 O ON (OFF) (ON) Foot control Control por pedal Rheostat SETTING UP YOUR MACHINE Be sure to wipe off any surplus oil from needle plate area before using your machine the first time. FOOT CONTROL e Connect the plug of the foot control into the machine socket 0 and your wall outlet as illustrated. POWER/LIGHT SWITCH Your machine will not operate until the power/light switch is turned on. The same switch controls both the power and the light. When servicing the machine, or changing needles or lamps, etc., machine must be disconnected from the wall outlet. PREPARACION DE LA MAQUINA Asegurarse de limpiar cualquier aceite sobrante del area de la plancha de aguja, antes de usar, por primera vez, la maquina. CONTROL POR PEDAL Conecte el pedal a la maquina 0 y el enchufe a la alimentacien de corriente 0 tal como se ve en el dibujo. INTERRUPTOR CORRIENTE/LUZ La maquina no funcionara hasta que se conecte el interrupter de corriente/luz. El mismo interruptor controla la corriente y la luz. Cuando se esta utilizando la maquina, o se estan cambiando agujas o bobillas, etc., la maquina se debe desconectar de los suministros principales. PREPARATION DE LA MACHINE Installez votre machine sur une surface bien plane. Votre machine a coudre a ete huilee a fond par l'usine. II est donc indispensable, avant de commencer a ('utiliser, de bien essuyer la plaque glissiere. Faites ensuite un essai sur un echantillon de tissu pour bien eponger l'huile en exces. RHEOSTAT Introduisez la fiche dans la prise de courant. (comme illustre). INTERRUPTEUR MOTEUR ET LUMIERE Votre machine est equipee d'un interrupteur unique moteur/lumiere. Vous piquez donc constamment avec votre travail eclaire. 8
-
 1
1 -
2
-
3
-
4
-
 5
5 -
 6
6 -
 7
7 -
 8
8 -
 9
9 -
 10
10 -
 11
11 -
 12
12 -
 13
13 -
 14
14 -
 15
15 -
16
-
17
-
18
-
19
-
20
-
21
-
22
-
23
-
24
-
25
-
26
-
27
-
28
-
29
-
30
-
31
-
32
-
33
-
34
-
35
-
36
-
37
-
38
-
39
-
40
-
41
-
42
-
43
-
44
 |
 |
