Singer One Instruction Manual 8 - Page 9
recommended
 |
View all Singer One manuals
Add to My Manuals
Save this manual to your list of manuals |
Page 9 highlights
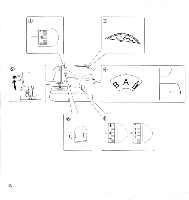
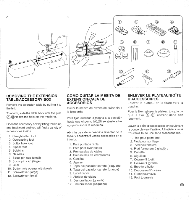
1. CONTROL TOP THREAD TENSION Decrease or increase the tension of the top thread by using this control. The higher the number, the tighter the tension. 2. PRESSER FOOT LEVER There are three positions for your presser foot. 1. Lower the presser foot to sew. 2. Raise the lever to the middle position to insert or remove fabric. 3. Lift it to its highest position to change the presser foot or to remove thick fabric. 3. STITCH WIDTH/NEEDLE POSITION CONTROL The width of all the stitches produced on this machine can be made narrower or wider by adjusting the stitch width control. When sewing straight stitching, you can select one of two needle positions - left or middle - with the same control dial. 4. STITCH SELECTOR AND INDICATOR 1. To select a stitch, be sure needle is out of fabric at its highest position. 2. Then turn the selector until the required stitch is indicated on the indicator panel . 5. STITCH LENGTH/SUPER (STRETCH) STITCH CONTROL Stitch length can be selected easily according to thickness and type of fabric. Super (stretch) stitch patterns can be selected by turning the same dial to mark where fine adjustment can be made. 6. REVERSE STITCH LEVER It is recommended to begin and end seams with several stitches in reverse for reinforcement. As long as you are pressing down this lever while sewing, the machine will continue to feed the fabric backwards. 1. CONTROLADOR DE LA TENSION DEL HILO SUPERIOR Aumentar o disminuir la tension del hilo superior usando este controlador. Mayor es el nOmero, mas apretada es la tension. 2. PALANCA PIE PRENSATELAS Su prensatelas tiene tres posiciones. 1. Bajar el prensatelas para coser. 2. Levantar la palanca a la posicion media para insertar o mover la tela. 3. Levantar a la posicion mas alta para cambiar el prensatelas o para mover el material grueso. 3. SELECTOR ANCHO PUNTADA En esta maquina puede regularse el ancho de puntada ajustando el "selector ancho puntada". 4. SELECTOR E INDICADOR DE PUNTADAS 1. Para seleccionar una puntada asegurarse que la aguja esta fuera del tejido y en su posicion mas alta. 2. Entonces girar el selector hasta que el indicador aparezca en la puntada requerida. 5. CONTROL LARGO DE PUNTADA V PUNTADA SUPER (ELASTICA) El largo de puntada puede ser seleccionado facilmente de acuerdo con el tipo de material y su grosor. El grupo de puntadas super (elasticas) pueden ser seleccionadas girando el mismo dial hasta la marca en donde se podra hacer un ajuste mas fino. 6. PALANCA DE LA PUNTADA DE RETROCESO Al empezar o finalizar las costuras se recomienda realizar diversas puntadas con el retroceso para el refuerzo de la costura. Mientras se este presionando hacia abajo esta palanca durante la costura, la maquina seguira transportando hacia atras el tejido. 1. REGLAGE DE LA TENSION DU FIL SUPERIEUR Augmenter ou diminuer la tension superieure en utilisant cette molette. Plus le chiffre est grand, plus la tension est serree. 2. LEVIER DU PIED PRESSEUR II y a 3 positions: 1. Abaisser le levier pour coudre. 2. Soulever le levier en position moyenne pour inserer ou enlever le tissu. 3. Soulever le levier a sa position la plus haute, pour changer le pied presseur ou enlever les tissus epais. 3. LARGEUR DE POINT La largeur de tous les programmes de cette machine peut etre diminuee ou augmentee en reglant ce levier comma indique. 4. SELECTEUR ET INDICATEUR DE POINT 1. Pour selectionner un point, veiller a ce que l'aiguille se trouve au-dessus du tissu a sa position la plus haute. 2. Tourner ensuite le selecteur jusqu'a ce que le point voulu soit indique. 5. COMMANDE DE LONGUEUR DE POINT/POINT SUPER (EXTENSI BLE) II est possible de selectionner facilement la longueur de point en fonction de l'epaisseur et du type du tissu utilise. Le groupe des points super (extensibles) pout etre selectionne en tournant la memo commande jusqu'au repere auquel le reglage fin peut etre effectue. 6. LEVIER DE POINT ARRIERE II est recommande de commencer ou de terminer les coutures avec plusieurs points arriere afin d'en ameliorer la solidite. Lorsqu'on maintient ce levier abaisse en cours de couture, la machine continuera entrainer le tissu vers l'arriere.
-
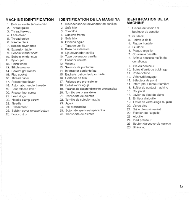
 1
1 -
2
-
3
-
 4
4 -
 5
5 -
 6
6 -
 7
7 -
 8
8 -
 9
9 -
 10
10 -
 11
11 -
 12
12 -
 13
13 -
 14
14 -
15
-
16
-
17
-
18
-
19
-
20
-
21
-
22
-
23
-
24
-
25
-
26
-
27
-
28
-
29
-
30
-
31
-
32
-
33
-
34
-
35
-
36
-
37
-
38
-
39
-
40
-
41
-
42
-
43
-
44
 |
 |
