Singer One Instruction Manual 8 - Page 15
Using, Automatic, Needle, Threader, Empleo, Enhebrador, Aguja, Utilisation, L'enfileur, D'aiguille
 |
View all Singer One manuals
Add to My Manuals
Save this manual to your list of manuals |
Page 15 highlights
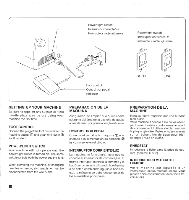
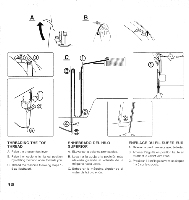
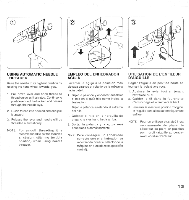
O 1 USING AUTOMATIC NEEDLE THREADER Raise the needle to its highest position by rotating the hand wheel towards you. 1. Pull down lever and hook thread to thread guide as illustrated. Continue to push lever until the hooked end passes through the needle eye. 2. Guide thread into hooked end and pull it upward. 3. Release the lever and needle will be threaded automatically. NOTE: For smooth threading it is recommended to set the machine at straight stitching (middle position) when using needle threader. EMPLEO DEL ENHEBRADOR AGUJA Levantar la aguja a la posicion mas elevada girando el volante de la maquina hacia uated. 1. Bajar la palanca y enhebrar enhebrar el hilo en el gufa hilo como indica la ilustraci0n. Bajar la palanca sujetando el extremo del hilo. 2. Colocar el hilo en la horquilla de enganche y estirarlo hacia arriba. 3. Soltar la palanca y la aguja sera enhebrada automaticamente. Nota: Para conseguir un enhebrado correcto con el enhebrador, se recomienda poner el selector de la maquina en puntada recta (posici0n central). UTILISATION DE L'ENFILEUR D'AIGUILLE Regler l'aiguille en position haute en toumant le volant vers vous. 1. Abaisser le levier tout en tenant l'extremite du fil. 2. Guider le fil dans la fourchette d'accrochage et le tirer vers le haut. 3. Ramener le levier a sa position d'origine, et l'aiguille sera alors automatiquement enfilee. NOTE: Pour un enfllage plus aise it est recommande de placer le selecteur de point en position point droit (aiguille au centre) avant d'utiliser renfileur. 13
-
 1
1 -
2
-
3
-
4
-
5
-
6
-
7
-
8
-
9
-
 10
10 -
 11
11 -
 12
12 -
 13
13 -
 14
14 -
 15
15 -
 16
16 -
 17
17 -
 18
18 -
 19
19 -
 20
20 -
21
-
22
-
23
-
24
-
25
-
26
-
27
-
28
-
29
-
30
-
31
-
32
-
33
-
34
-
35
-
36
-
37
-
38
-
39
-
40
-
41
-
42
-
43
-
44
 |
 |
