Singer S10 I STUDIO Instruction Manual
Singer S10 I STUDIO Manual
 |
View all Singer S10 I STUDIO manuals
Add to My Manuals
Save this manual to your list of manuals |
Singer S10 I STUDIO manual content summary:
- Singer S10 I STUDIO | Instruction Manual - Page 1
INSTRUCTION MANUAL S10 Singer and Studio are trademarks of The Singer Company Limited S.à.r.l. or its Affiliates. ©2014 The Singer Company Limited S.à.r.l. or its Affiliates. All rights reserved. - Singer S10 I STUDIO | Instruction Manual - Page 2
the presser foot, and the like. 15. Always unplug this sewing machine from the electrical outlet when removing covers, lubricating, or when making any other adjustments mentioned in this owner's manual. SAVE THESE INSTRUCTIONS For Europe only: This appliance can be used by children aged - Singer S10 I STUDIO | Instruction Manual - Page 3
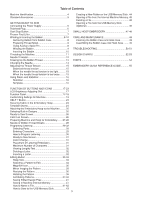
49 Cleaning the Bobbin Case and Hook Area 49 Assembling the Bobbin Case into Hook Area......... 49. TROUBLESHOOTING 50-51 DESIGN CHARTS 52-53 FONTS 54 Embroidery Quick Reference Guide 55 FUNCTION OF BUTTONS AND ICONS 17-23 LCD Brightness Adjusting Dial 17 Function Panel 17-18 Customizing - Singer S10 I STUDIO | Instruction Manual - Page 4
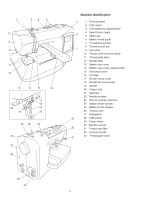
14 15 16 17 18 22 19 21 20 25 24 23 26 27 28 Machine Identification 3 2 1 33 32 31 1 Function panel 2 LCD screen 3 LCD brightness adjusting dial 4 Spool holder (large) 5 Spool cap 6 Bobbin thread guide 7 Thread take-up lever 8 Thread tension dial 9 Face plate 10 Thread cutter & thread - Singer S10 I STUDIO | Instruction Manual - Page 5
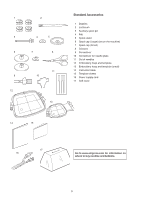
pin 4 Felt 5 Spool stand 6 Spool cap (Large) (set on the machine) 7 Spool cap (Small) 8 Scissors 9 Screwdriver 10 Screwdriver for needle plate 11 Set of needles 12 Embroidery hoop and template 13 Embroidery hoop and template (small) 14 Instruction book 15 Template sheets 16 Power supply cord 17 Soft - Singer S10 I STUDIO | Instruction Manual - Page 6
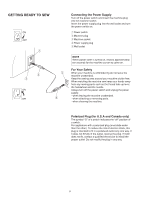
on, it takes approximately ten seconds for the machine screen to come on. For Your Safety When your machine is embroidering do not leave the machine unattended. Keep the sewing area around your machine clutter free. When watching the machine sew keep your hands away from any moving parts such - Singer S10 I STUDIO | Instruction Manual - Page 7
Start/Stop button Press this button to start or to stop the machine. q Start/stop button q Lower the Presser Foot. w NOTE If position for easy removal of the presser foot or to install the embroidery hoop. The presser foot lever will not remain in a locking position q when holding at highest position - Singer S10 I STUDIO | Instruction Manual - Page 8
thread. w Small spool cap Using Auxillary Spool Pin Use the auxiliary spool pin when you need to wind the bobbin without unthreading the machine while working on an embroidery. Insert the auxiliary spool pin into the spool stand and then into the hole. Place the felt on the auxiliary spool pin and - Singer S10 I STUDIO | Instruction Manual - Page 9
purposes, the motor will stop automatically after running for two minutes after bobbin has been filled. CAUTION Use only SINGER® Class 15 bobbins in your machine. Using improperly sized bobbins or pre-wound bobbins may cause stitching problems. Improper bobbins can damage your bobbin case and - Singer S10 I STUDIO | Instruction Manual - Page 10
so that it turns in a counter clockwise direction. q Thread w w Bobbin case * The bobbin case cover has a helpful picture for reference when threading. Step x Guide the thread into the notch on the front of the bobbin case. Draw the thread to the left, sliding it between the tension spring - Singer S10 I STUDIO | Instruction Manual - Page 11
. e Slit r Eye of the take-up lever Step v Pull the thread towards the lower thread guide. Step b Slip the thread in the needle bar thread guide from the left. t Needle bar thread guide Thread the needle from manually front to back or use the built-in needle threader. NOTE Refer to page 12 for - Singer S10 I STUDIO | Instruction Manual - Page 12
Step x w Draw the thread down around the threader guide and under the hook. e Threader guide e c w Step c Release the threader knob slowly SINGER® recommends SINGER® Style 2000 (woven) and 2001(knit) chromium needles for your machine. Need help selecting the right needle? Embroidery - Singer S10 I STUDIO | Instruction Manual - Page 13
the needle thread up to bring a loop of the bobbin thread above the needle plate. Step c Pass the needle thread through the hole in the embroidery foot and draw it up to the thread cutter and holder. e Hole r Thread cutter and holder e 13 - Singer S10 I STUDIO | Instruction Manual - Page 14
or bent needles can harm your machine and fabric. SINGER® recommends SINGER® Style 2000 (woven) and 2001(knit) chromium needles for your machine. The proper needle style and size will help ensure embroidery success. Need help selecting the right needle? Embroidery tips on compatibility of thread - Singer S10 I STUDIO | Instruction Manual - Page 15
on your design always check these steps first. • Re-thread the machine on top. Be sure that the embroidery thread is feeding evenly and correctly off the spool. • Check that the embroidery thread hasn't come out of thread guides. • Check that the bobbin is correctly threaded. q When the needle - Singer S10 I STUDIO | Instruction Manual - Page 16
being embroidered. This can result in problems such as shrinkage and puckering of the fabric around the embroidery area. • Stretch fabrics may stretch fabric on which you are embroidering. Always follow the manufacturer's instructions on how to use and apply the stabilizer correctly. Generally, the - Singer S10 I STUDIO | Instruction Manual - Page 17
or border designs. e Internal memory button Press this button to open the pattern file folders designed to store edited designs in the machines internal memory. r USB memory button Press this button to open the pattern files you have transferred from the computer to the USB - Singer S10 I STUDIO | Instruction Manual - Page 18
illustrated instructions of the following four basic operations: • Changing needle • Inserting the bobbin • Threading the machine • Trace Button Press this button to trace the location of embroidery pattern without stitching in the hoop. !6 Carriage Return Button - Singer S10 I STUDIO | Instruction Manual - Page 19
window without changing the setting. Set 1. Maximum speed The maximum sewing speed can be set from 400 to 650 spm. The default setting is 650 inch/mm 3 inch mm Set 3. Inch/millimeter You can set your machine's measuring unit to either inches or millimeters. The default unit setting is - Singer S10 I STUDIO | Instruction Manual - Page 20
to use. The color number of the selected brand will be shown on the embroidery screen. Format q 5 w Format Memory? 5 z Key Position 6 Adjustment the machine, be sure to allow plenty of time for the process. Do not turn the machine off or remove the USB memory stick until the machine prompts - Singer S10 I STUDIO | Instruction Manual - Page 21
c 6 Press OK key v 6 Press key b 6 Press mark n 6 Press key Step c Press the OK √ button. Step v Press the USB memory stick button. Step b Press the cross mark with your finger. Step n Press the trace button. m Key Position 6 Adjustment END Step m Press the OK √ button - Singer S10 I STUDIO | Instruction Manual - Page 22
9. Default setting When you press the YES icon, all settings except language setting will return to default (the same settings as when you purchased the machine). 22 - Singer S10 I STUDIO | Instruction Manual - Page 23
to view the help topics for basic operations. Step z Press the help button. q Help button q x Changing Inserting needles the bobbin w Threading Winding the machine the bobbin Step x Select from 4 helpful topics. w Help topics Step c Press the page forward button to change the page - Singer S10 I STUDIO | Instruction Manual - Page 24
u m w e t r y t Securing Fabric in the Embroidery Hoop Step z Choose the proper placement of design on fabric. Fabric w Center lines e Stabilizer Template Sheets Use the template sheets included with machine to mark precise center lines for the built in designs. Position template sheet - Singer S10 I STUDIO | Instruction Manual - Page 25
Embroidery Hoop to the Machine e zx c w w q v w r Step z Raise the presser foot. When hooping bulky fabrics remember the presser foot lifter can be raised even higher to help get the hoop under the foot. Step x Place the prepared hoop on the machine Hoop from Machine Step b - Singer S10 I STUDIO | Instruction Manual - Page 26
z w e x Selecting Built-in Designs Step z Your SINGER® Studio™ S10 embroidery machine provides you with 55 ready-to-sew built-in designs. Press the button to view 4 designs at a time. q To view the next page of designs press the page forward button. q Built-in - Singer S10 I STUDIO | Instruction Manual - Page 27
Preparing Machine and Hoop for Embroidery z 11 min 3 Colors Step z Select thread colors needed. Thread machine with first color. 75x74mm 140x140 Step x Adjust the hoop with the hoop positioning x buttons q so that the needle will drop right above the center of - Singer S10 I STUDIO | Instruction Manual - Page 28
the presser foot and press the start/stop button. The machine will sew the first color section and stop automatically when it has finished. Step the stitch back button w or stitch forward button r to move the embroidery hoop to where the thread broke or quit stitching e. Press the stitch - Singer S10 I STUDIO | Instruction Manual - Page 29
z x w e AB CDE t PQ RST r A C y Programming Lettering Selecting Fonts There are 3 styles of fonts and 18 border designs. q Press the lettering button q. The font selection window will open w. q Lettering button w Font selection window Press one of the following icons to select the desired - Singer S10 I STUDIO | Instruction Manual - Page 30
: To save a lettering combination you would need to save in this editing screen at this point. To save your letter combination of "Green" in the machine internal memory, press the file save button. The screen will say M-001. Select OK √ and the save is complete. See page 41 Step 1 and Step - Singer S10 I STUDIO | Instruction Manual - Page 31
size t Hoop size y Justification icon u Color change icon Color Change You can sew a multi-colored lettering embroidery by changing the thread color of each letter if you press the color change icon before sewing. The machine will stop automatically when each letter has been sewn. Select OK √ and - Singer S10 I STUDIO | Instruction Manual - Page 32
FG KL CDE H I J MNO y PQ UV RST WXY Z. SIZE MC Viewing Lengthy Text If the lettering is too long to display on the ready to sew screen, press the page forward button to show the hidden characters. Example: Letters programmed from A to K in S (small) font. The screen shows letters A to I. Press - Singer S10 I STUDIO | Instruction Manual - Page 33
design to a file. These files can be in the internal memory of the machine or on the USB memory stick. q Edit Button Press the edit button q and q Edit button w Editing window The "+" mark indicates the center of the embroidery hoop. e Center mark w 140x140 e q 140x140 140x140 50x50 w Hoop Size - Singer S10 I STUDIO | Instruction Manual - Page 34
pattern image. * To move the pattern, press the positioning arrow button. e Positioning arrow button * Press the center button to place the embroidery in the center of the hoop. r Center button * To delete the pattern, press the delete button. t Delete button t e i y 100% 140x140 - Singer S10 I STUDIO | Instruction Manual - Page 35
the exit X button to return to the editing window. t Exit X button z 100% q 140x140 w e x rt Mirror Imaging the Pattern You can flip the embroidery pattern horizontally. Step z Press the mirror image icon. The flip window will open. q Mirror image icon Step x Press the mirror image to the - Singer S10 I STUDIO | Instruction Manual - Page 36
or counterclockwise. Step z Press the rotate icon q. q Rotate icon Step x The rotate window will open. Press + or - icon w to rotate the selected embroidery pattern. The pattern will rotate 45 degrees clockwise or counterclockwise when pressing one of the icons. Step c Press the OK √ button e to - Singer S10 I STUDIO | Instruction Manual - Page 37
Combining Patterns z Step z Press the edit button q. q x w Step x Press the built-in design button w. 140x140 c Step c Select the pattern #7 e. e v 100% 140x140 Step v Press the pattern positioning button r to move the embroidery pattern to the right. r 37 - Singer S10 I STUDIO | Instruction Manual - Page 38
n Select the pattern #7 e. m ,. e 100% 140x140 y Step m Press the mirror image icon t. t Step , Press the mirror image to the right icon y to mirror image the embroidery pattern. ⁄0 i u 100% 140x140 Step . Press the OK √ button u. Step ⁄0 Press the pattern positioning button i to move the - Singer S10 I STUDIO | Instruction Manual - Page 39
Step ⁄1 Press the magnifier icon o and view the placement ⁄1 of the embroidery patterns. 100% 140x140 o ⁄2 Step ⁄2 Press the exit X button !0 to return to the editing window. !0 Exit X button !0 ⁄3 100% 140x140 !2 ⁄4 A AB CDE PQ RST C ⁄5 ⁄6 LEAF AB CDE - Singer S10 I STUDIO | Instruction Manual - Page 40
button !3 to move the letters down. !3 Pattern positioning buttons !3 ⁄8 ⁄9 100% 140x140 o !0 100% 140x140 u Step ⁄8 Confirm the layout of the embroidery by pressing the magnifier icon o. o Magnifier icon Step ⁄9 Press the exit X button !0 to return to the editing window. !0 Exit - Singer S10 I STUDIO | Instruction Manual - Page 41
embroidery design created in the editing mode can be saved as a file in the built-in memory or on 100% the USB memory stick. 140x140 Remember a file can only be saved in the edit screen. Saving in Machine again and you will return to the ready to sew screen. How to Name a File You can - Singer S10 I STUDIO | Instruction Manual - Page 42
vb 01 56 234 789 2/2 C r n U_2 r The same file name exists, overwrite it? rt Step v Enter "2". Step b Press the OK √ button r. Step n Press the OK √ button r to save the file under the new name. When you attempt to save a file when the name already exists, this confirmation message will - Singer S10 I STUDIO | Instruction Manual - Page 43
stick offers you more storage for edited designs. The USB memory stick must be formatted before storing designs on it. See page 20 for formatting instructions. Remember a file can only be saved in the edit screen. q Step z Insert the USB memory stick q into the USB socket w. q USB memory stick w USB - Singer S10 I STUDIO | Instruction Manual - Page 44
z EMBF 1 / 1 Creating a New Folder on the USB Memory Stick You can create your own folder and assign the desired name to it. q Step z Press the folder icon q. q Folder icon xc AB CDE PQ RST FG HIJ UV WXY KL MNO Z _ 1/2 C v e w ABC 1/1 EMBF Step x Enter the folder name. (Choose up - Singer S10 I STUDIO | Instruction Manual - Page 45
and the open file window will open. Step z q Press the internal machine memory button q. Step x File stored will be displayed. Press the icon w to open the file you wish to sew. Step c The screen will display the ready to sew window of the saved design. Lower the presser foot and start - Singer S10 I STUDIO | Instruction Manual - Page 46
. r Folder icon t v b 8 min 5 Colors 134x53mm 140x140 Step v The file list will be displayed. Press the icon t to open the file. t Icon Step b The ready to sew screen will display the design. 46 - Singer S10 I STUDIO | Instruction Manual - Page 47
Small Hoop Embroidery Your machine comes with two hoops - a large hoop and a small hoop. The small hoop allows you to embroider many projects for which the large hoop may be too big. Below is an example of how you could embroider a smaller project, such as a drawstring bag. How to Sew a Design on - Singer S10 I STUDIO | Instruction Manual - Page 48
√ button and you will return to the edit screen. !0 OK √ button Step ⁄2 Press the OK √ button once more to get back to the ready to sew screen. !0 OK √ button Step ⁄3 Attach the embroidery hoop on the carriage. Step ⁄4 Lower the presser foot and start - Singer S10 I STUDIO | Instruction Manual - Page 49
Knob w Stopper x Reattach the presser foot and needle plate. Align the needle plate guide pins with the guide holes on the needle plate and tighten the screw. e Needle plate guide pins NOTE After cleaning the machine, make sure the needle is inserted correctly and the presser foot is attached - Singer S10 I STUDIO | Instruction Manual - Page 50
Troubleshooting Problem Cause Reference The machine is noisy. 1. Threads have been caught in the carriage is bumping into something around the machine. 4. The embroidered fabric or garment is unable to move unrestricted by the embroidery machine as it stitches. 5. The needle thread - Singer S10 I STUDIO | Instruction Manual - Page 51
Problem Cause Pattern selection icons 1. Key position is not adjusted properly. do not work. 2. The control circuit is not working correctly. 3. The bobbin winder spindle is - Singer S10 I STUDIO | Instruction Manual - Page 52
DESIGN CHARTS 1 2 3 4 5 6 7 8 9 10 11 12 13 14 15 16 17 18 19 20 21 22 23 24 25 26 27 28 29 30 52 - Singer S10 I STUDIO | Instruction Manual - Page 53
31 32 33 34 35 36 37 38 39 40 41 42 43 44 45 46 47 48 49 50 51 52 53 54 55 53 - Singer S10 I STUDIO | Instruction Manual - Page 54
GOTHIC FONTS SCRIPT CHELTENHAM BORDER 1 2 DESIGNS 6 7 11 12 16 17 3 4 5 8 9 10 13 14 15 18 54 - Singer S10 I STUDIO | Instruction Manual - Page 55
Embroidery Quick Reference Guide PROJECT SINGER® Chromium #2001 Size 11 SINGER® Chromium #2001 Size 14 SINGER® Chromium #2000 Size 14 SINGER® Chromium #2001 Size 14 SINGER® Chromium #2000 Size 11 SINGER® Chromium #2000 Size 14 SINGER® Chromium #2000 Size 14 SINGER® Chromium #2000 Size 14 SINGER - Singer S10 I STUDIO | Instruction Manual - Page 56
856-800-382(E)
-
 1
1 -
 2
2 -
 3
3 -
 4
4 -
 5
5 -
 6
6 -
 7
7 -
8
-
9
-
10
-
11
-
12
-
13
-
14
-
15
-
16
-
17
-
18
-
19
-
20
-
21
-
22
-
23
-
24
-
25
-
26
-
27
-
28
-
29
-
30
-
31
-
32
-
33
-
34
-
35
-
36
-
37
-
38
-
39
-
40
-
41
-
42
-
43
-
44
-
45
-
46
-
47
-
48
-
49
-
50
-
51
-
52
-
53
-
54
-
55
-
56
 |
 |
INSTRUCTION MANUAL
S10
SINGER and STUDIO are trademarks of The Singer Company Limited S.à.r.l. or its Affiliates.
©2014 The Singer Company Limited S.à.r.l. or its Affiliates. All rights reserved.