Singer S10 I STUDIO Instruction Manual - Page 25
Attaching the Embroidery Hoop to the Machine
 |
View all Singer S10 I STUDIO manuals
Add to My Manuals
Save this manual to your list of manuals |
Page 25 highlights
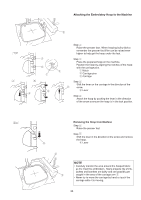
Attaching the Embroidery Hoop to the Machine e zx c w w q v w r Step z Raise the presser foot. When hooping bulky fabrics remember the presser foot lifter can be raised even higher to help get the hoop under the foot. Step x Place the prepared hoop on the machine. Position the hoop by aligning the notches of the hoop with the carriage pins. w q Notch w Carriage pins e Carriage Step c Shift the lever on the carriage in the direction of the r arrow. r Lever Step v Attach the hoop by pushing the lever in the direction of the arrow to ensure the hoop is in the lock position. bn Removing the Hoop from Machine Step b Raise the presser foot. Step n Shift the lever in the direction of the arrow and remove the hoop. r r Lever t e Note • Carefully monitor the area around the hooped fabric as the machine embroiders. Many projects like shirts, jackets and blankets are bulky and can possibly get caught in the area of the carriage arm t. • Never try to move the carriage by hand or touch the carriage while it is moving. 25
-
 1
1 -
2
-
3
-
4
-
5
-
6
-
7
-
8
-
9
-
10
-
11
-
12
-
13
-
14
-
15
-
16
-
17
-
18
-
19
-
 20
20 -
 21
21 -
 22
22 -
 23
23 -
 24
24 -
 25
25 -
 26
26 -
 27
27 -
 28
28 -
 29
29 -
 30
30 -
31
-
32
-
33
-
34
-
35
-
36
-
37
-
38
-
39
-
40
-
41
-
42
-
43
-
44
-
45
-
46
-
47
-
48
-
49
-
50
-
51
-
52
-
53
-
54
-
55
-
56
 |
 |
