Singer S10 I STUDIO Instruction Manual - Page 8
Winding & Inserting the Bobbin
 |
View all Singer S10 I STUDIO manuals
Add to My Manuals
Save this manual to your list of manuals |
Page 8 highlights
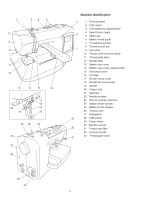
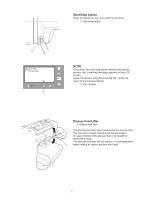
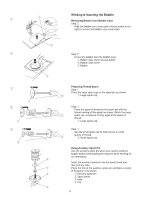
q z w x e z q x q c w r q w e Winding & Inserting the Bobbin Removing Bobbin from Bobbin Case Step z Slide the bobbin case cover plate release button to the right to remove the bobbin case cover plate. Step x Lift out the bobbin from the bobbin case. q Bobbin case cover release button w Bobbin case cover e Bobbin Preparing Thread Spool Step z Place the large spool cap on the spool pin as shown. q Large spool cap Step x Place the spool of thread on the spool pin with the thread coming off the spool as shown. Attach the large spool cap, and press it firmly against the spool of thread. q Large spool cap Step c Use the small spool cap to hold narrow or small spools of thread. w Small spool cap Using Auxillary Spool Pin Use the auxiliary spool pin when you need to wind the bobbin without unthreading the machine while working on an embroidery. Insert the auxiliary spool pin into the spool stand and then into the hole. Place the felt on the auxiliary spool pin and place a spool of thread on it as shown. q Auxiliary spool pin w Spool stand e Hole r Felt 8
-
 1
1 -
2
-
 3
3 -
 4
4 -
 5
5 -
 6
6 -
 7
7 -
 8
8 -
 9
9 -
 10
10 -
 11
11 -
 12
12 -
 13
13 -
14
-
15
-
16
-
17
-
18
-
19
-
20
-
21
-
22
-
23
-
24
-
25
-
26
-
27
-
28
-
29
-
30
-
31
-
32
-
33
-
34
-
35
-
36
-
37
-
38
-
39
-
40
-
41
-
42
-
43
-
44
-
45
-
46
-
47
-
48
-
49
-
50
-
51
-
52
-
53
-
54
-
55
-
56
 |
 |
