Sony HDR-AS15 Handbook - Page 10
Settings Search
 |
View all Sony HDR-AS15 manuals
Add to My Manuals
Save this manual to your list of manuals |
Page 10 highlights
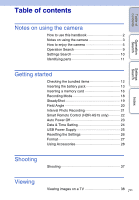
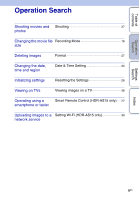
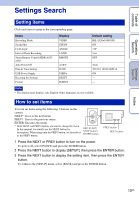
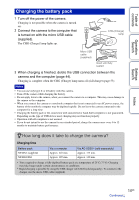
Table of contents Operation Search Settings Search Settings Search Setting items Click each item to jump to the corresponding page. Items Recording Mode SteadyShot Field Angle Interval Photo Recording Smart Remote Control (HDR-AS15 only) Auto Power Off Date & Time Setting USB Power Supply Resetting the Settings Format Display VIDEO STEDY ANGLE LAPSE RMOTE A.OFF DATE USBPw RESET FORMT Default setting HQ (1920×1080/30P) ON 120° 5sec OFF 10sec 2012/1/1 00:00 GMT+0 ON - - Note • The display panel displays only English. Other languages are not available. How to set items You can set items using the following 3 buttons on the camera. NEXT*: Goes to the next menu PREV*: Goes to the previous menu ENTER: Executes the menu * Both NEXT and PREV buttons are used to change the menu. In this manual, we usually use the NEXT button for description. When using only the PREV button, we describe it as the PREV button. REC START/ STOP button/ ENTER button PREV button NEXT button 1 Press the NEXT or PREV button to turn on the power. To power off, select [PwOFF] and press the ENTER button. 2 Press the NEXT button to display [SETUP], then press the ENTER button. 3 Press the NEXT button to display the setting item, then press the ENTER button. To return to the [SETUP] menu, select [BACK] and press the ENTER button. Index 10US
-
 1
1 -
2
-
3
-
4
-
 5
5 -
 6
6 -
 7
7 -
 8
8 -
 9
9 -
 10
10 -
 11
11 -
 12
12 -
 13
13 -
 14
14 -
 15
15 -
16
-
17
-
18
-
19
-
20
-
21
-
22
-
23
-
24
-
25
-
26
-
27
-
28
-
29
-
30
-
31
-
32
-
33
-
34
-
35
-
36
-
37
-
38
-
39
-
40
-
41
-
42
-
43
-
44
-
45
-
46
-
47
-
48
-
49
-
50
-
51
-
52
-
53
-
54
-
55
-
56
-
57
-
58
-
59
-
60
 |
 |