Sony HTCT500 Operating Instructions - Page 45
Connecting other components, To connect the DIGITAL MEDIA PORT adapter
 |
UPC - 027242757561
View all Sony HTCT500 manuals
Add to My Manuals
Save this manual to your list of manuals |
Page 45 highlights
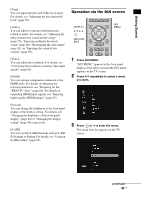
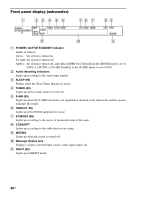
Getting Started Connecting other components To connect the DIGITAL MEDIA PORT adapter You can enjoy picture and sound from a component connected to the subwoofer using the DIGITAL MEDIA PORT adapter. Rear of the subwoofer FM AM EZW-T100 75 COAXIAL ANTENNA ONLY FOR SS-CT500 BD IN DVD IN SAT/CATV IN OPTICAL TV OUT HDMI COAXIAL L CENTER R SPEAKER TV IN VIDEO 2 IN VIDEO 3 IN VIDEO 3 IN DIGITAL VIDEO IN COMPONENT VIDEO IN Y ASSIGNABLE L L PB/ CB DC 5V ONLY FOR PR/ 0.7A MAX SS-CT500 CR DMPORT REMOTE CTRL R AUDIO IN TV R AUDIO IN VIDEO 1 VIDEO 2 VIDEO 3 : Signal flow DIGITAL MEDIA PORT adapter Notes • Do not connect or disconnect the DIGITAL MEDIA PORT adapter while the system is turned on. • When you connect the DIGITAL MEDIA PORT adapter, be sure the connector is inserted with the arrow mark facing toward the arrow mark on the DMPORT jack. To detach the DIGITAL MEDIA PORT adapter, press and hold A and then pull out the connector. A continued 45US
-
 1
1 -
2
-
3
-
4
-
5
-
6
-
7
-
8
-
9
-
10
-
11
-
12
-
13
-
14
-
15
-
16
-
17
-
18
-
19
-
20
-
21
-
22
-
23
-
24
-
25
-
26
-
27
-
28
-
29
-
30
-
31
-
32
-
33
-
34
-
35
-
36
-
37
-
38
-
39
-
 40
40 -
 41
41 -
 42
42 -
 43
43 -
 44
44 -
 45
45 -
 46
46 -
 47
47 -
 48
48 -
 49
49 -
 50
50 -
51
-
52
-
53
-
54
-
55
-
56
-
57
-
58
-
59
-
60
-
61
-
62
-
63
-
64
-
65
-
66
-
67
-
68
-
69
-
70
-
71
-
72
-
73
-
74
-
75
-
76
-
77
-
78
-
79
-
80
-
81
-
82
-
83
-
84
-
85
-
86
-
87
-
88
-
89
-
90
-
91
-
92
-
93
-
94
-
95
-
96
-
97
-
98
-
99
-
100
-
101
-
102
-
103
-
104
-
105
-
106
-
107
-
108
-
109
-
110
-
111
-
112
-
113
-
114
-
115
-
116
-
117
-
118
-
119
-
120
-
121
-
122
-
123
-
124
-
125
-
126
-
127
-
128
-
129
-
130
-
131
-
132
-
133
-
134
-
135
-
136
-
137
-
138
-
139
-
140
-
141
-
142
-
143
-
144
-
145
-
146
-
147
-
148
-
149
-
150
-
151
-
152
-
153
-
154
-
155
-
156
-
157
-
158
-
159
-
160
-
161
-
162
-
163
-
164
-
165
-
166
-
167
-
168
-
169
-
170
-
171
-
172
-
173
-
174
-
175
-
176
-
177
-
178
-
179
-
180
-
181
-
182
-
183
-
184
-
185
-
186
-
187
-
188
-
189
-
190
-
191
-
192
-
193
-
194
-
195
-
196
-
197
-
198
-
199
-
200
-
201
-
202
-
203
-
204
-
205
-
206
-
207
-
208
-
209
-
210
-
211
-
212
-
213
-
214
-
215
-
216
-
217
-
218
-
219
-
220
-
221
-
222
-
223
-
224
-
225
-
226
-
227
-
228
-
229
-
230
-
231
-
232
-
233
-
234
-
235
-
236
-
237
-
238
-
239
-
240
-
241
-
242
-
243
-
244
-
245
-
246
-
247
-
248
-
249
-
250
-
251
-
252
-
253
-
254
-
255
-
256
-
257
-
258
-
259
-
260
-
261
-
262
-
263
-
264
-
265
-
266
-
267
-
268
-
269
-
270
-
271
-
272
-
273
-
274
-
275
-
276
-
277
-
278
-
279
-
280
-
281
-
282
-
283
-
284
-
285
-
286
-
287
-
288
-
289
-
290
-
291
-
292
-
293
-
294
-
295
-
296
-
297
-
298
-
299
-
300
-
301
-
302
-
303
-
304
-
305
-
306
-
307
-
308
-
309
-
310
-
311
-
312
-
313
-
314
-
315
-
316
-
317
-
318
-
319
-
320
-
321
-
322
-
323
-
324
-
325
-
326
-
327
-
328
-
329
-
330
-
331
-
332
-
333
-
334
-
335
-
336
-
337
-
338
-
339
-
340
 |
 |
