Sony ICD-UX512 Operating Instructions - Page 42
To record using the, synchronized recording function, Scene Select menu, the SYNC REC is
 |
UPC - 027242807624
View all Sony ICD-UX512 manuals
Add to My Manuals
Save this manual to your list of manuals |
Page 42 highlights
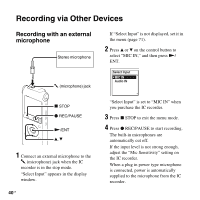
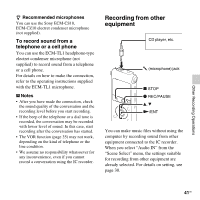
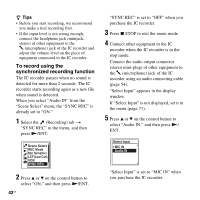
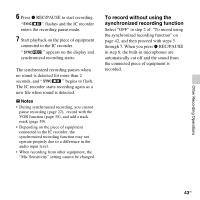
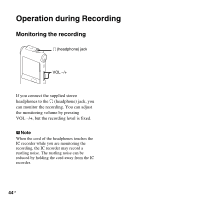
z Tips • Before you start recording, we recommend you make a trial recording first. • If the input level is not strong enough, connect the headphone jack (minijack, stereo) of other equipment to the m (microphone) jack of the IC recorder and adjust the volume level on the piece of equipment connected to the IC recorder. To record using the synchronized recording function The IC recorder pauses when no sound is detected for more than 2 seconds. The IC recorder starts recording again as a new file when sound is detected. When you select "Audio IN" from the "Scene Select" menu, the "SYNC REC" is already set to "ON." 1 Select the (Recording) tab t "SYNC REC" in the menu, and then press N/ENT. "SYNC REC" is set to "OFF" when you purchase the IC recorder. 3 Press x STOP to exit the menu mode. 4 Connect other equipment to the IC recorder when the IC recorder is in the stop mode. Connect the audio output connector (stereo mini-plug) of other equipment to the m (microphone) jack of the IC recorder using an audio connecting cable (page 54). "Select Input" appears in the display window. If "Select Input" is not displayed, set it in the menu (page 71). 5 Press v or V on the control button to select "Audio IN," and then press N/ ENT. 2 Press v or V on the control button to select "ON," and then press N/ENT. 42 GB "Select Input" is set to "MIC IN" when you purchase the IC recorder.
-
 1
1 -
2
-
3
-
4
-
5
-
6
-
7
-
8
-
9
-
10
-
11
-
12
-
13
-
14
-
15
-
16
-
17
-
18
-
19
-
20
-
21
-
22
-
23
-
24
-
25
-
26
-
27
-
28
-
29
-
30
-
31
-
32
-
33
-
34
-
35
-
36
-
 37
37 -
 38
38 -
 39
39 -
 40
40 -
 41
41 -
 42
42 -
 43
43 -
 44
44 -
 45
45 -
 46
46 -
 47
47 -
48
-
49
-
50
-
51
-
52
-
53
-
54
-
55
-
56
-
57
-
58
-
59
-
60
-
61
-
62
-
63
-
64
-
65
-
66
-
67
-
68
-
69
-
70
-
71
-
72
-
73
-
74
-
75
-
76
-
77
-
78
-
79
-
80
-
81
-
82
-
83
-
84
-
85
-
86
-
87
-
88
-
89
-
90
-
91
-
92
-
93
-
94
-
95
-
96
-
97
-
98
-
99
-
100
-
101
-
102
-
103
-
104
-
105
-
106
-
107
-
108
-
109
-
110
-
111
-
112
-
113
-
114
-
115
-
116
-
117
-
118
-
119
-
120
-
121
-
122
-
123
-
124
-
125
-
126
-
127
-
128
 |
 |
