Sony PCV-E314DS Reference Manual - Page 41
Replacing the Lithium Battery, Setup Options, Removing the Left Side Panel
 |
View all Sony PCV-E314DS manuals
Add to My Manuals
Save this manual to your list of manuals |
Page 41 highlights
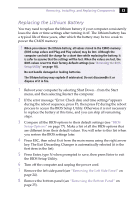
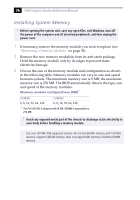
Removing, Installing, and Replacing Components 33 Replacing the Lithium Battery You may need to replace the lithium battery if your computer consistently loses the date or time settings after turning it off. The lithium battery has a typical life of three years, after which the battery may be too weak to power the CMOS memory. ! When you remove the lithium battery, all values stored in the CMOS memory (BIOS setup values and Plug and Play values) may be lost. Although the computer can hold the charge for a short time while replacing the battery, it is safer to assume that the settings will be lost. When the values are lost, the BIOS values revert to their factory-default settings (see "Accessing the BIOS Setup Utility" on page 18). Do not handle damaged or leaking batteries. The lithium battery may explode if mistreated. Do not disassemble it or dispose of it in fire. 1 Reboot your computer by selecting Shut Down... from the Start menu, and then selecting Restart the computer. 2 If the error message "Error: Check date and time settings"appears during the reboot sequence, press F3, then press F2 during the reboot process to access the BIOS Setup Utility. Otherwise it is not necessary to replace the battery at this time, and you can skip all remaining steps. 3 Compare all the BIOS options to their default settings (see "BIOS Setup Options" on page 77). Make a list of all the BIOS options that are different from their default values. You will refer to this list when you restore the BIOS settings later. 4 Press ESC, then select Exit from the main menu using the right arrow key. The Exit Discarding Changes is automatically selected (it is the first item in the list). 5 Press Enter, type N when prompted to save, then press Enter to exit the BIOS Setup Utility. 6 Turn off the computer and unplug the power cord. 7 Remove the left side panel (see "Removing the Left Side Panel" on page 24). 8 Remove the bottom panel (see "Removing the Bottom Panel" on page 25).
-
 1
1 -
2
-
3
-
4
-
5
-
6
-
7
-
8
-
9
-
10
-
11
-
12
-
13
-
14
-
15
-
16
-
17
-
18
-
19
-
20
-
21
-
22
-
23
-
24
-
25
-
26
-
27
-
28
-
29
-
30
-
31
-
32
-
33
-
34
-
35
-
 36
36 -
 37
37 -
 38
38 -
 39
39 -
 40
40 -
 41
41 -
 42
42 -
 43
43 -
 44
44 -
 45
45 -
 46
46 -
47
-
48
-
49
-
50
-
51
-
52
-
53
-
54
-
55
-
56
-
57
-
58
-
59
-
60
-
61
-
62
-
63
-
64
-
65
-
66
-
67
-
68
-
69
-
70
-
71
-
72
-
73
-
74
-
75
-
76
-
77
-
78
-
79
-
80
-
81
-
82
-
83
-
84
-
85
-
86
-
87
-
88
-
89
-
90
-
91
-
92
-
93
-
94
-
95
-
96
-
97
-
98
-
99
-
100
-
101
-
102
-
103
-
104
-
105
-
106
-
107
-
108
-
109
-
110
-
111
-
112
-
113
-
114
 |
 |