Sony PCV-E314DS Reference Manual - Page 54
Make sure the drive cable is connected securely to the motherboard.
 |
View all Sony PCV-E314DS manuals
Add to My Manuals
Save this manual to your list of manuals |
Page 54 highlights
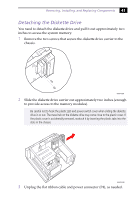
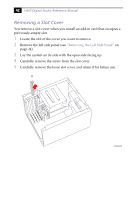
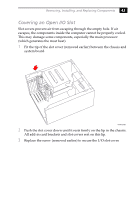
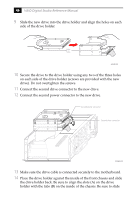
46 VAIO Digital Studio Reference Manual 9 Slide the new drive into the drive holder and align the holes on each side of the drive holder. Align holes KY0083.VSD 10 Secure the drive to the drive holder using any two of the three holes on each side of the drive holder (screws are provided with the new drive). Do not overtighten the screws. 11 Connect the second drive connector to the new drive. 12 Connect the second power connector to the new drive. Second power connector Second drive connector KY0085.VSD 13 Make sure the drive cable is connected securely to the motherboard. 14 Place the drive holder against the inside of the front chassis and slide the drive holder back. Be sure to align the slots (A) on the drive holder with the tabs (B) on the inside of the chassis. Be sure to slide
-
 1
1 -
2
-
3
-
4
-
5
-
6
-
7
-
8
-
9
-
10
-
11
-
12
-
13
-
14
-
15
-
16
-
17
-
18
-
19
-
20
-
21
-
22
-
23
-
24
-
25
-
26
-
27
-
28
-
29
-
30
-
31
-
32
-
33
-
34
-
35
-
36
-
37
-
38
-
39
-
40
-
41
-
42
-
43
-
44
-
45
-
46
-
47
-
48
-
 49
49 -
 50
50 -
 51
51 -
 52
52 -
 53
53 -
 54
54 -
 55
55 -
 56
56 -
 57
57 -
 58
58 -
 59
59 -
60
-
61
-
62
-
63
-
64
-
65
-
66
-
67
-
68
-
69
-
70
-
71
-
72
-
73
-
74
-
75
-
76
-
77
-
78
-
79
-
80
-
81
-
82
-
83
-
84
-
85
-
86
-
87
-
88
-
89
-
90
-
91
-
92
-
93
-
94
-
95
-
96
-
97
-
98
-
99
-
100
-
101
-
102
-
103
-
104
-
105
-
106
-
107
-
108
-
109
-
110
-
111
-
112
-
113
-
114
 |
 |
