Sony SLT-A35K Instruction Manual (Large File - 12.9 MB) - Page 85
Recording movies, Press the MOVIE button to start, recording.
 |
View all Sony SLT-A35K manuals
Add to My Manuals
Save this manual to your list of manuals |
Page 85 highlights
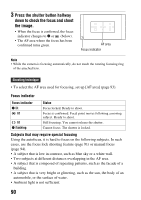
Recording movies 1 Press the MOVIE button to start recording. • Movie recording can be started from any exposure mode. • The shutter speed and aperture are adjusted automatically. • The camera continues to adjust the focus when it is in autofocus mode. 2 Press the MOVIE button again to stop recording. MOVIE button Shooting images Shooting techniques • The following settings that were set during still image shooting are used without change. - White Balance - Creative Style - Exposure compensation - AF area - Metering mode - Picture Effect • Exposure compensation can be used during movie recording. • Start recording after you adjust the focus. • When [AF area] is set to [Local], you can change the AF area during shooting. • If you want to adjust the blurring of the background, set the mode dial to "A" and set the camera to the manual focus mode. You can adjust the aperture using the control dial before shooting. Notes • The Face Detection function cannot be used. • When [Display Rec. Data] is set to [For viewfinder], the LCD monitor is switched to the recording information display at the moment movie recording starts. 85
-
 1
1 -
2
-
3
-
4
-
5
-
6
-
7
-
8
-
9
-
10
-
11
-
12
-
13
-
14
-
15
-
16
-
17
-
18
-
19
-
20
-
21
-
22
-
23
-
24
-
25
-
26
-
27
-
28
-
29
-
30
-
31
-
32
-
33
-
34
-
35
-
36
-
37
-
38
-
39
-
40
-
41
-
42
-
43
-
44
-
45
-
46
-
47
-
48
-
49
-
50
-
51
-
52
-
53
-
54
-
55
-
56
-
57
-
58
-
59
-
60
-
61
-
62
-
63
-
64
-
65
-
66
-
67
-
68
-
69
-
70
-
71
-
72
-
73
-
74
-
75
-
76
-
77
-
78
-
79
-
 80
80 -
 81
81 -
 82
82 -
 83
83 -
 84
84 -
 85
85 -
 86
86 -
 87
87 -
 88
88 -
 89
89 -
 90
90 -
91
-
92
-
93
-
94
-
95
-
96
-
97
-
98
-
99
-
100
-
101
-
102
-
103
-
104
-
105
-
106
-
107
-
108
-
109
-
110
-
111
-
112
-
113
-
114
-
115
-
116
-
117
-
118
-
119
-
120
-
121
-
122
-
123
-
124
-
125
-
126
-
127
-
128
-
129
-
130
-
131
-
132
-
133
-
134
-
135
-
136
-
137
-
138
-
139
-
140
-
141
-
142
-
143
-
144
-
145
-
146
-
147
-
148
-
149
-
150
-
151
-
152
-
153
-
154
-
155
-
156
-
157
-
158
-
159
-
160
-
161
-
162
-
163
-
164
-
165
-
166
-
167
-
168
-
169
-
170
-
171
-
172
-
173
-
174
-
175
-
176
-
177
-
178
-
179
-
180
-
181
-
182
-
183
-
184
-
185
-
186
-
187
-
188
-
189
-
190
-
191
-
192
-
193
-
194
-
195
-
196
-
197
-
198
-
199
-
200
-
201
-
202
 |
 |