Texas Instruments TINSPIRE Getting Started - Page 75
Removing classes, Adding students to classes
 |
View all Texas Instruments TINSPIRE manuals
Add to My Manuals
Save this manual to your list of manuals |
Page 75 highlights
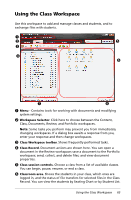
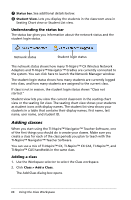
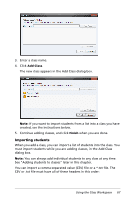
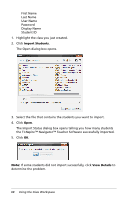
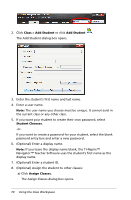
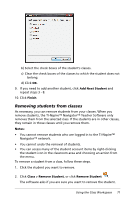
Removing classes If you have a class you no longer need, you can remove it from the TI-Nspire™ Navigator™ Teacher Software. When you remove a class, the software removes the class and removes the files on the hard drive that correspond to that class. If you have students who are not part of any other classes, the software removes those students as well. Note: You cannot undo the removal of a class. Removing a class 1. If you have a class session running, end it. 2. From the Class Session list, select the class you want to remove. 3. Click Class > Remove Class. The TI-Nspire™ Navigator™ Teacher Software asks if you are sure you want to remove the class. 4. Click Remove. Adding students to classes After you create your classes, you need to add students to the classes. You can add students to an active class session, or you can add students to any class at any time. If this is your first time using the TI-Nspire™ Navigator™ Teacher Software, the classroom area may be empty. The software prompts you to add a class, and to add students to the class. You can click the prompt in the classroom area to add students, or you can follow the steps below at any time. Note: The instructions below explain how to add students after you create a class. You can also add students when you create a class by importing them. 1. Select the class to which you want to add students. • If class is in session, the student will be added to the current class. You have the option of adding the student to other classes. • If class is not in session, use the Class Session controls to select the class to which you want to add the student. Using the Class Workspace 69
-
 1
1 -
2
-
3
-
4
-
5
-
6
-
7
-
8
-
9
-
10
-
11
-
12
-
13
-
14
-
15
-
16
-
17
-
18
-
19
-
20
-
21
-
22
-
23
-
24
-
25
-
26
-
27
-
28
-
29
-
30
-
31
-
32
-
33
-
34
-
35
-
36
-
37
-
38
-
39
-
40
-
41
-
42
-
43
-
44
-
45
-
46
-
47
-
48
-
49
-
50
-
51
-
52
-
53
-
54
-
55
-
56
-
57
-
58
-
59
-
60
-
61
-
62
-
63
-
64
-
65
-
66
-
67
-
68
-
69
-
 70
70 -
 71
71 -
 72
72 -
 73
73 -
 74
74 -
 75
75 -
 76
76 -
 77
77 -
 78
78 -
 79
79 -
 80
80 -
81
-
82
-
83
-
84
-
85
-
86
-
87
-
88
-
89
-
90
-
91
-
92
-
93
-
94
-
95
-
96
-
97
-
98
-
99
-
100
-
101
-
102
-
103
-
104
-
105
-
106
-
107
-
108
-
109
-
110
-
111
-
112
-
113
-
114
-
115
-
116
-
117
-
118
-
119
-
120
-
121
-
122
-
123
-
124
-
125
-
126
-
127
-
128
-
129
-
130
-
131
-
132
-
133
-
134
-
135
-
136
-
137
-
138
-
139
-
140
-
141
-
142
-
143
-
144
-
145
-
146
-
147
-
148
-
149
-
150
-
151
-
152
-
153
-
154
-
155
-
156
-
157
-
158
-
159
-
160
-
161
-
162
-
163
-
164
-
165
-
166
-
167
-
168
-
169
-
170
-
171
-
172
-
173
-
174
-
175
-
176
-
177
-
178
-
179
-
180
-
181
-
182
-
183
-
184
-
185
-
186
-
187
-
188
-
189
-
190
-
191
-
192
-
193
-
194
-
195
-
196
-
197
-
198
-
199
-
200
-
201
-
202
-
203
-
204
-
205
-
206
-
207
-
208
-
209
-
210
-
211
-
212
-
213
-
214
-
215
-
216
-
217
-
218
-
219
-
220
-
221
-
222
-
223
-
224
-
225
-
226
-
227
-
228
-
229
-
230
 |
 |
