Thermador VCIN36JP Installation Instructions - Page 17
Remote Control Installation
 |
View all Thermador VCIN36JP manuals
Add to My Manuals
Save this manual to your list of manuals |
Page 17 highlights
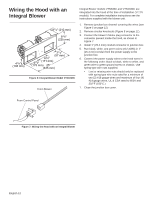
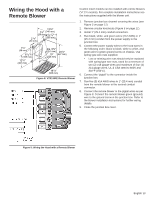
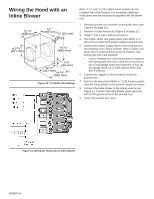
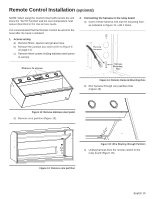
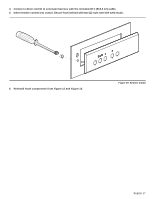
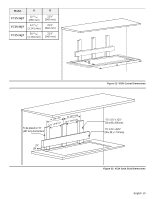
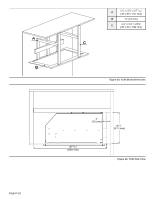
Remote Control Installation (optional) NOTE: When using the Custom Insert with remote the unit loses the "AUTO" function and the over-temperature heat sensor described in the Use & Care Guide. It is recommended that the Remote Control be wired to the hood after the hood is installed. 1. Access wiring a) Remove filters, spacers and grease trays. b) Remove the junction box cover (refer to Figure 5 on page 11). c) Remove three screws holding stainless steel panel to canopy. 2. Connecting the harness to the relay board a) Insert remote harness end into the mounting hole, as indicated in Figure 14, until it clicks. Remote Harness Remove 3x screws Harness Mounting Hole Figure 14: Remote Harness Mounting Hole b) Run harness through core partition hole (Figure 15). Figure 12: Remove stainless steel panel d) Remove core partition (Figure 13). Figure 15: Wire Routing through Partition c) Unplug harness from the remote control to the relay board (Figure 16). Figure 13: Remove core partition English 15
-
 1
1 -
2
-
3
-
4
-
5
-
6
-
7
-
8
-
9
-
10
-
11
-
 12
12 -
 13
13 -
 14
14 -
 15
15 -
 16
16 -
 17
17 -
 18
18 -
 19
19 -
 20
20 -
 21
21 -
 22
22 -
23
-
24
-
25
-
26
-
27
-
28
-
29
-
30
-
31
-
32
-
33
-
34
-
35
-
36
-
37
-
38
-
39
-
40
-
41
-
42
-
43
-
44
-
45
-
46
-
47
-
48
-
49
-
50
-
51
-
52
-
53
-
54
-
55
-
56
-
57
-
58
-
59
-
60
-
61
-
62
-
63
-
64
-
65
-
66
-
67
-
68
-
69
-
70
-
71
-
72
-
73
-
74
-
75
-
76
-
77
-
78
-
79
-
80
-
81
-
82
-
83
-
84
-
85
-
86
-
87
-
88
-
89
-
90
-
91
-
92
-
93
-
94
-
95
-
96
 |
 |
