Toshiba RDXS32 Owners Manual - Page 26
Before recording
 |
View all Toshiba RDXS32 manuals
Add to My Manuals
Save this manual to your list of manuals |
Page 26 highlights
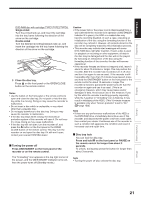
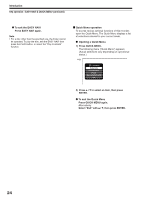
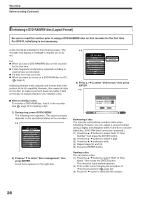
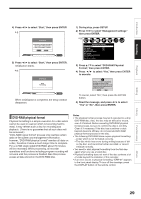
Recording Before recording Please be sure to read this critical background information prior to making a recording. This recorder is equipped with a built-in HDD. Conventional video cassette recorders have required tapes to record, while this recorder enables recording on the HDD whenever you want, without selecting an available tape or confirming its recording time or tape remaining. Further, the DVD-RAM drive on this recorder can record on a DVD-RAM/RW/R disc in the same way as a tape. You can also copy contents recorded on the HDD to a DVD-RAM/RW/R disc to create your own library. Is your recorder ready? Before recording a TV program on this recorder, insure that channels you want to record are correctly tuned in on this recorder. If not tuned in, read the separate "INSTALLATION GUIDE" volume again, and confirm all the necessary connections and settings have been done. Also, insure the clock is set precisely for program recording. Set the clock using the "Initial settings" menu ( page 31, INSTALLATION GUIDE). Disc initializing Whenever you use a new DVD-RAM/RW disc on this recorder, be sure to initialize the disc. For DVD-RAM disc, initialization is indispensable to the database system of this recorder. Normally, the HDD does not need to be formatted. If the HDD does not work normally due to a problem, format the HDD for possible recovery. Once you format the HDD, all the recorded titles and Library information are deleted. Before formatting, be sure to write library information to a DVD-RAM disc and check any titles to be deleted. DVD-RW discs can be emptied by initializing. DVD-R discs can be used on this recorder without initializing. For details of initialization of DVD-RAM/RW discs, see page 28. If an initialized DVD-RAM disc is still unusable, it may become usable by executing "DVD-RAM physical format" in the "Management settings" menu. For "DVD-RAM physical format", see page 29. Note on recording on a DVD-RAM disc Confirm disc compatibility and prepare an available DVD-RAM disc to record on ( page 6, 8). Some discs may need to be formatted for use on this recorder. A message will appear asking you to execute disc formatting. Follow the procedure displayed onscreen to format the DVD-RAM disc compatible with this recorder. Some DVD-RAM discs formatted on a PC may not be usable. Note • This recorder records on a DVD-RAM disc if it complies with DVD-RAM standard Version 2.0 or 2.1. However, you may not record on some DVD-RAM discs that have complicated contents (often, to protect the recorded data). When you select a DVD-RAM discs that has already been recorded, check that the disc is suitable for recording or the remaining time of the disc is displayed. It is recommended to use a new DVD-RAM disc for an important recording. Note on recording on a DVD-RW disc Confirm disc compatibility and prepare an available DVD-RW disc to record on ( page 6, 9). Some discs may need to be initialized for use on the recorder. A message will appear asking you to execute disc initializing. Follow the procedure displayed onscreen for initialize the DVD-RW disc compatible with this recorder. Some DVD-RW discs initialized on a PC may not be usable. To play a DVD-RW disc recorded on this recorder on other devices, finalize the DVD-RW disc on this recorder. ( page 132) The finalization disables the disc's rewritability. To rewrite a finalized DVD-RW disc, cancel the finalization ( page 135). • On DVD-RW discs recorded on other devices, you cannot execute DVD-Video finalize process or cancel the finalize process, or add recordings on this recorder. • You cannot rewrite or edit a DVD-RW disc if recorded in DVD-VR mode. • DVD-RW discs which are recorded on other devices and not finalized yet, cannot be read on this recorder. Do not rush to initialization. Check that the contents can be erased or not. 26
-
 1
1 -
2
-
3
-
4
-
5
-
6
-
7
-
8
-
9
-
10
-
11
-
12
-
13
-
14
-
15
-
16
-
17
-
18
-
19
-
20
-
 21
21 -
 22
22 -
 23
23 -
 24
24 -
 25
25 -
 26
26 -
 27
27 -
 28
28 -
 29
29 -
 30
30 -
 31
31 -
32
-
33
-
34
-
35
-
36
-
37
-
38
-
39
-
40
-
41
-
42
-
43
-
44
-
45
-
46
-
47
-
48
-
49
-
50
-
51
-
52
-
53
-
54
-
55
-
56
-
57
-
58
-
59
-
60
-
61
-
62
-
63
-
64
-
65
-
66
-
67
-
68
-
69
-
70
-
71
-
72
-
73
-
74
-
75
-
76
-
77
-
78
-
79
-
80
-
81
-
82
-
83
-
84
-
85
-
86
-
87
-
88
-
89
-
90
-
91
-
92
-
93
-
94
-
95
-
96
-
97
-
98
-
99
-
100
-
101
-
102
-
103
-
104
-
105
-
106
-
107
-
108
-
109
-
110
-
111
-
112
-
113
-
114
-
115
-
116
-
117
-
118
-
119
-
120
-
121
-
122
-
123
-
124
-
125
-
126
-
127
-
128
-
129
-
130
-
131
-
132
-
133
-
134
-
135
-
136
-
137
-
138
-
139
-
140
-
141
-
142
-
143
-
144
-
145
-
146
-
147
-
148
-
149
-
150
-
151
-
152
-
153
-
154
-
155
-
156
-
157
-
158
-
159
-
160
-
161
-
162
-
163
-
164
-
165
-
166
-
167
-
168
-
169
-
170
-
171
-
172
-
173
-
174
-
175
-
176
-
177
-
178
-
179
 |
 |
