Toshiba SD-V392 User Manual - Page 28
Tuner setting continued
 |
UPC - 022265411254
View all Toshiba SD-V392 manuals
Add to My Manuals
Save this manual to your list of manuals |
Page 28 highlights
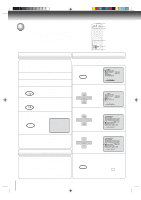
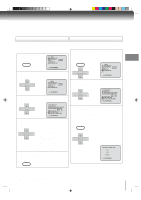
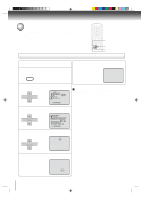
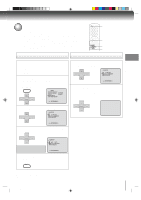
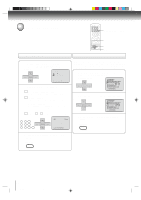
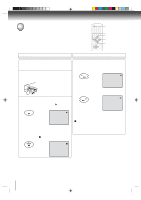
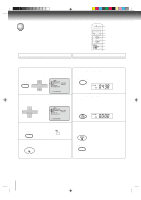
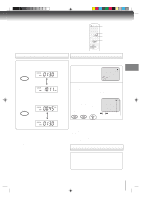
Basic setup Tuner setting (continued) NUMBER BUTTONS 3 1,2 1,2 To ADD/DELETE channels Noise elimination 1 Repeat the step 1 on page 27. Then press SET + or - to select the "ADD/DELETE" and press ENTER. CH - SET + ENTER CH + CH SETUP TV CATV AUTO CH MEMORY ADD/DELETE SET - á+/-/ENTER/MENU ñ 2 To Add or Delete desired channels 1 Press Number buttons or SET + or - to select a channel number you want to add or delete. 2 To add channels Press ENTER until "ADD" appears on the screen. To delete channels Press ENTER until "DELETE" appears on the screen. The channel number will blink. 3 Repeat 1 to 2 to add or delete other channel. SET + 123 456 CH - ENTER CH + 7890 SET - When you don't want to receive a weak signal broadcast, a Blue back screen can be obtained by selecting the NO NOISE BACKGROUND "ON". When the unit is shipped from the factory, the NO NOISE BACKGROUND is set to "ON". 1 Repeat the steps 1~2 on page 26 and press SET + or - to select "NO NOISE BACKGROUND". SET + CH - ENTER SET - CH + SYSTEM SETUP CLOCK SET LANGUAGE/IDIOMA/LANGUE NO NOISE BACKGROUND ON OFF AUTO CLOCK ON OFF STANDARD TIME DAYLIGHT SAVING TIME á+/-/ENTER/MENU ñ 2 Press ENTER to select "ON" or "OFF" position. CH - SET + ENTER SET - CH + SYSTEM SETUP CLOCK SET LANGUAGE/IDIOMA/LANGUE NO NOISE BACKGROUND ON OFF AUTO CLOCK ON OFF STANDARD TIME DAYLIGHT SAVING TIME á+/-/ENTER/MENU ñ 3 Press VCR MENU until the menu screen is cleared. VCR MENU SETUP 3 Press VCR MENU until the menu screen is cleared. VCR MENU SETUP 28 2C53301C (E)p26-31 28 21/4/04, 11:10
-
 1
1 -
2
-
3
-
4
-
5
-
6
-
7
-
8
-
9
-
10
-
11
-
12
-
13
-
14
-
15
-
16
-
17
-
18
-
19
-
20
-
21
-
22
-
 23
23 -
 24
24 -
 25
25 -
 26
26 -
 27
27 -
 28
28 -
 29
29 -
 30
30 -
 31
31 -
 32
32 -
 33
33 -
34
-
35
-
36
-
37
-
38
-
39
-
40
-
41
-
42
-
43
-
44
-
45
-
46
-
47
-
48
-
49
-
50
-
51
-
52
-
53
-
54
-
55
-
56
-
57
-
58
-
59
-
60
-
61
-
62
-
63
-
64
-
65
-
66
-
67
-
68
-
69
-
70
-
71
-
72
-
73
-
74
-
75
-
76
-
77
-
78
-
79
-
80
 |
 |
