Toshiba TDP-P75 User Manual - Page 23
Projection distance and size, Connection
 |
View all Toshiba TDP-P75 manuals
Add to My Manuals
Save this manual to your list of manuals |
Page 23 highlights
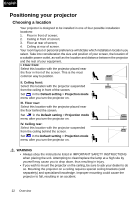
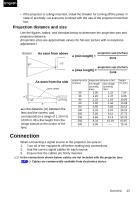
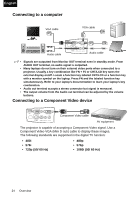
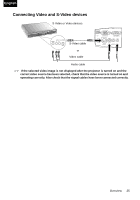
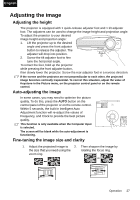
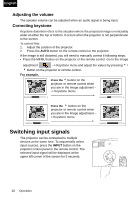
English • If the projector is ceiling-mounted, install the breaker for turning off the power in case of anomaly. Let everyone involved with the use of the projector know that fact. Projection distance and size Use the figures, tables, and formulas below to determine the projection size and projection distance. (Projection sizes are approximate values for full-size picture with no keystone adjustment.) Screen 90° As seen from above projection size (inches) a (min length) = 30.03 projection size (inches) a (max length) = 24.69 As seen from the side Lens center H 90° a a is the distance (m) between the lens and the screen, and corresponds to a range of 1.15 m to 10.00 m. H is the height from the image bottom to the center of the lens. projection size projection distance a (m) (inches) min length max length (zooming (zooming max) min) 30 1.00 1.22 36 1.20 1.47 40 1.33 1.63 60 2.00 2.44 80 2.66 3.26 100 3.33 4.07 150 5.00 6.11 200 6.66 8.14 250 8.33 10.18 300 9.99 --- height (H) (cm) 7.54 9.05 10.06 15.09 20.12 25.15 37.72 50.29 62.87 75.44 Connection When connecting a signal source to the projector, be sure to: 1. Turn all of the equipment off before making any connections. 2. Use the correct signal cables for each source. 3. Ensure that the cables are firmly inserted. In the connections shown below, cables are not included with the projector (see p.15 ). Cables are commercially available from electronics stores. Overview 23
-
 1
1 -
2
-
3
-
4
-
5
-
6
-
7
-
8
-
9
-
10
-
11
-
12
-
13
-
14
-
15
-
16
-
17
-
 18
18 -
 19
19 -
 20
20 -
 21
21 -
 22
22 -
 23
23 -
 24
24 -
 25
25 -
 26
26 -
 27
27 -
 28
28 -
29
-
30
-
31
-
32
-
33
-
34
-
35
-
36
-
37
-
38
-
39
-
40
-
41
-
42
-
43
-
44
-
45
 |
 |
