Troy-Bilt Pro-Line CRT Service Manual - Page 18
Troy-Bilt Pro-Line CRT Manual
 |
View all Troy-Bilt Pro-Line CRT manuals
Add to My Manuals
Save this manual to your list of manuals |
Page 18 highlights
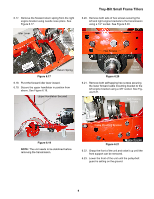
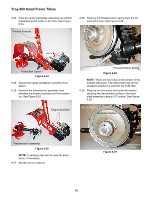
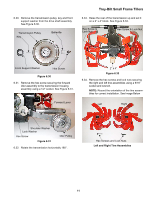
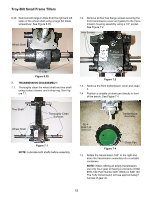
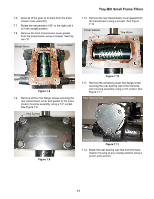
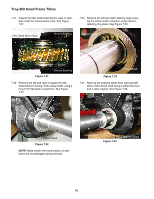
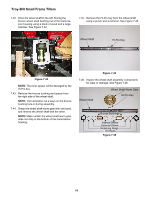
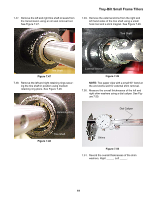
Troy-Bilt Small Frame Tillers 7.13. Remove the rear bearing cap from the transmission housing using a scraper. See Figure 7.13. Sealant 7.18. Measure the overall thickness of the rear bearing shims using a dial caliper. See Figure 7.18. Dial Caliper Transmission Housing Rear Bearing Cap Figure 7.13 7.14. Identify if there is a rear bearing cap gasket. NOTE: There are different thickness rear bearing cap gaskets available to take up the end-play for the drive shaft assembly. 7.15. Remove the sealant from the rear of the transmission housing. NOTE: Use gasket eliminator during assembly. 7.16. Remove the sealant and gasket (if used) from the rear bearing cap. NOTE: Use gasket eliminator during assembly. 7.17. Remove the rear bearing cap shims. See Figure 7.17. Shims Figure 7.18 7.19. Record the measurement _____. NOTE: This is for future reference. 7.20. Thoroughly clean the exposed portion (front) of the drive shaft. 7.21. Hold the support washer and front tapered roller bearing into the front race. 7.22. Slowly push the drive shaft assembly rearward and out of the transmission assembly. See Figure 7.22. Transmission Assembly Rear Bearing Cap Shims Figure 7.17 Race Tapered Roller Bearings Support Washer Rear Drive Shaft Assembly Figure 7.22 Front NOTE: If the front portion of the drive shaft will not pass through the roller bearing, a rubber mallet can be used for assistance. Do not us a hammer. 14
-
 1
1 -
2
-
3
-
4
-
5
-
6
-
7
-
8
-
9
-
10
-
11
-
12
-
 13
13 -
 14
14 -
 15
15 -
 16
16 -
 17
17 -
 18
18 -
 19
19 -
 20
20 -
 21
21 -
 22
22 -
 23
23 -
24
-
25
-
26
-
27
-
28
-
29
-
30
-
31
-
32
-
33
-
34
-
35
-
36
-
37
-
38
-
39
-
40
-
41
-
42
 |
 |
