Troy-Bilt Pro-Line CRT Service Manual - Page 39
Reverse Clutch Cable Adjustment, Reverse Drive Belt Replacement,
 |
View all Troy-Bilt Pro-Line CRT manuals
Add to My Manuals
Save this manual to your list of manuals |
Page 39 highlights
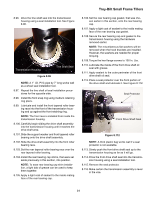
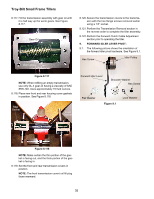
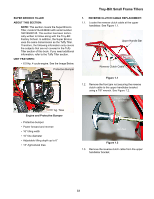
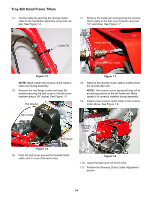
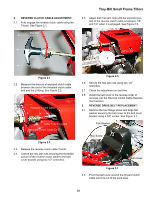
2. REVERSE CLUTCH CABLE ADJUSTMENT: 2.1. Fully engage the reverse clutch cable using the T-knob. See Figure 2.1. Pull Out Troy-Bilt Small Frame Tillers 2.5. Adjust both hex jam nuts until the exposed portion of the reverse clutch cable is between 1/8" and 1/4" when it is engaged. See Figure 2.5. 1/8" to 1/4" Pull Out Figure 2.1 2.2. Measure the amount of exposed clutch cable between the end of the threaded clutch cable end and the Z-fitting. See Figure 2.2. Hex Jam Nuts Exposed Clutch Cable Cable Fully Engaged Threaded Clutch Cable End Figure 2.2 2.3. Release the reverse clutch cable T-knob. 2.4. Loosen the hex jam nuts securing the threaded portion of the reverse clutch cable to the belt cover bracket using two 1/2" wrenches. Figure 2.5 2.6. Secure the hex jam nuts using two 1/2" wrenches. 2.7. Check the adjustment on last time. 2.8. Install the belt cover in the reverse order of removal, per the Reverse Clutch Cable Replacement section. 3. REVERSE DRIVE BELT REPLACEMENT: 3.1. Remove the hex flange screw and large flat washer securing the belt cover to the belt cover bracket using a 3/8" socket. See Figure 3.1. Flat Washer Hex Screw Belt Cover Figure 3.1 3.2. Pivot the belt cover around the forward clutch cable until it is out of the work area. 35
-
 1
1 -
2
-
3
-
4
-
5
-
6
-
7
-
8
-
9
-
10
-
11
-
12
-
13
-
14
-
15
-
16
-
17
-
18
-
19
-
20
-
21
-
22
-
23
-
24
-
25
-
26
-
27
-
28
-
29
-
30
-
31
-
32
-
33
-
 34
34 -
 35
35 -
 36
36 -
 37
37 -
 38
38 -
 39
39 -
 40
40 -
 41
41 -
 42
42
 |
 |
