Troy-Bilt Pro-Line CRT Service Manual - Page 32
Troy-Bilt Pro-Line CRT Manual
 |
View all Troy-Bilt Pro-Line CRT manuals
Add to My Manuals
Save this manual to your list of manuals |
Page 32 highlights
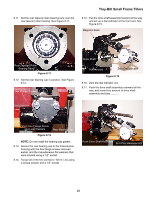
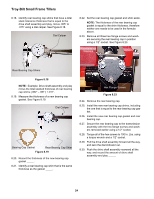
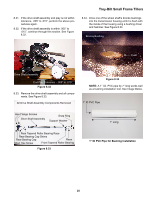
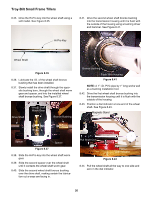
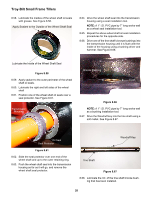
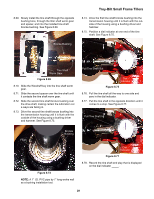
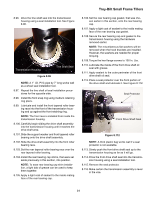
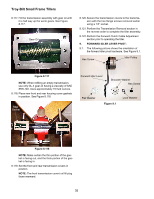
Troy-Bilt Small Frame Tillers 8.58. Lubricate the insides of the wheel shaft oil seals with grease. See Figure 8.58. Apply Sealant to the Outside of the Wheel Shaft Seal 8.64. Drive the wheel shaft seal into the transmission housing using a seal installation tool. NOTE: A 1" I.D. PVC pipe by 7" long works well as a wheel seal installation tool. 8.65. Repeat the above wheel shaft oil seal installation procedures for the opposite side. 8.66. Drive one of the tine shaft's bronze bushings into the transmission housing until it is flush with the inside of the housing using a bushing driver and hammer. See Figure 8.66. Lubricate the Inside of the Wheel Shaft Seal Figure 8.58 8.59. Apply sealant to the outer perimeter of the wheel shaft oil seals. 8.60. Lubricate the right and left sides of the wheel shaft 8.61. Position one of the wheel shaft oil seals over a seal protector. See Figure 8.61. Transmission Housing Bronze Bushing Flush Figure 8.66 NOTE: A 1" I.D. PVC pipe by 7" long works well as a bushing installation tool. 8.67. Drive the Woodruff key into the tine shaft using a soft mallet. See Figure 8.67. Oil Seal Seal Protector Figure 8.61 8.62. Slide the seal protector over one end of the wheel shaft and up to the outer retaining ring. 8.63. Push the wheel shaft seal into the transmission housing as far as it will go, and remove the wheel shaft seal protector. Woodruff Key Tine Shaft Figure 8.67 8.68. Lubricate the I.D. of the tine shaft bronze bushing that has been installed. 28
-
 1
1 -
2
-
3
-
4
-
5
-
6
-
7
-
8
-
9
-
10
-
11
-
12
-
13
-
14
-
15
-
16
-
17
-
18
-
19
-
20
-
21
-
22
-
23
-
24
-
25
-
26
-
 27
27 -
 28
28 -
 29
29 -
 30
30 -
 31
31 -
 32
32 -
 33
33 -
 34
34 -
 35
35 -
 36
36 -
 37
37 -
38
-
39
-
40
-
41
-
42
 |
 |
