Troy-Bilt Pro-Line CRT Service Manual - Page 34
Troy-Bilt Pro-Line CRT Manual
 |
View all Troy-Bilt Pro-Line CRT manuals
Add to My Manuals
Save this manual to your list of manuals |
Page 34 highlights
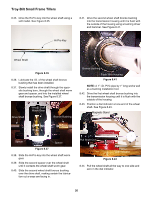
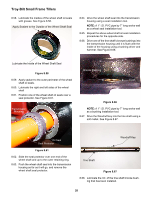
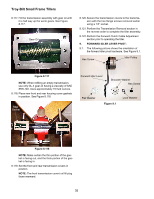
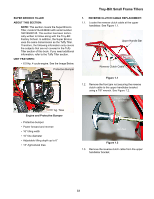
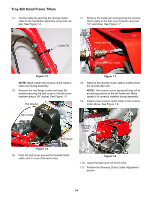
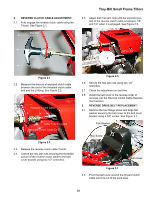
Troy-Bilt Small Frame Tillers 8.79. Split the recorded tine shaft end play, and install equal thickness external shims onto the wheel shaft. See Figure 8.79. External Shims 8.88. If the tine shaft end play is not within tolerance, perform the above procedures until it is correct. NOTE: Shims of multiple thicknesses are used "as required" to obtain .005 to .030" allowable end play for the drive shaft. 8.89. If the tine shaft end play is within tolerance, continue through this section. 8.90. Lubricate the insides of the tine shaft oil seals with grease. See Figure 8.90. Apply Sealant to the Outside of the Tine Shaft Seal Outer Snap Ring Figure 8.79 NOTE: Example: Wheel shaft end play .080" divided by two, .040" shims added to each side. 8.80. Install the outer snap rings onto the tine shaft using medium retaining ring pliers. 8.81. Check the tine shaft end play using the above procedures. 8.82. Record the second tine shaft end play measurement that is displayed on the dial indicator _____. 8.83. Subtract .005" to .030" from the second recorded tine shaft end play. NOTE: Shims of multiple thicknesses are used "as required" to obtain .005 to .030" allowable end play for the tine shaft. 8.84. Record the new tine shaft end play, less the .005" to .030" _____. 8.85. Remove the outer retaining rings using medium retaining ring pliers 8.86. Split the remaining tine shaft end play, and install equal thickness external shims onto the wheel shaft. NOTE: Example: (Second drive shaft end play .040", minus .005" to .030", equals remaining wheel shaft end play), divided by two. 8.87. Install the outer retaining rings onto the tine shaft using medium retaining ring pliers. Lubricate Inside of Tine Shaft Seal Figure 8.90 8.91. Apply sealant to the outer perimeter of the tine shaft oil seals. 8.92. Lubricate the right and left sides of the tine shaft 8.93. Position one of the tine shaft oil seals over a seal protector. 8.94. Slide the seal protector over one end of the tine shaft and up to the outer retaining ring. 8.95. Push the tine shaft seal into the transmission housing as far as it will go, and remove the tine shaft seal protector. 30
-
 1
1 -
2
-
3
-
4
-
5
-
6
-
7
-
8
-
9
-
10
-
11
-
12
-
13
-
14
-
15
-
16
-
17
-
18
-
19
-
20
-
21
-
22
-
23
-
24
-
25
-
26
-
27
-
28
-
 29
29 -
 30
30 -
 31
31 -
 32
32 -
 33
33 -
 34
34 -
 35
35 -
 36
36 -
 37
37 -
 38
38 -
 39
39 -
40
-
41
-
42
 |
 |
