Troy-Bilt Pro-Line CRT Service Manual - Page 7
Forward Clutch Cable Assembly, Replacement, - tillers
 |
View all Troy-Bilt Pro-Line CRT manuals
Add to My Manuals
Save this manual to your list of manuals |
Page 7 highlights
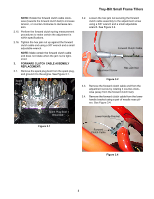
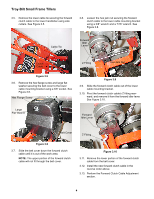
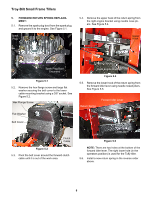
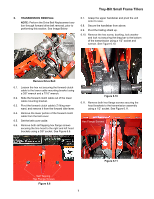
NOTE: Rotate the forward clutch cable clockwise (towards the forward clutch bail) to increase tension, or counter-clockwise to decrease tension. 2.15. Perform the forward clutch spring measurement procedures to make certain the adjustment is within specifications. 2.16. Tighten the hex jam nut up against the forward clutch cable end using a 3/8" wrench and a small adjustable wrench. NOTE: Make certain the forward clutch cable end does not rotate when the jam nut is tightened. 3. FORWARD CLUTCH CABLE ASSEMBLY REPLACEMENT: 3.1. Remove the spark plug boot from the spark plug, and ground it to the engine. See Figure 3.1. Spark Plug Troy-Bilt Small Frame Tillers 3.2. Loosen the hex jam nut securing the forward clutch cable assembly to the adjustment screw using a 3/8" wrench and a small adjustable wrench. See Figure 3.2. Forward Clutch Cable Adjustment Screw Hex Jam Nut Figure 3.2 3.3. Remove the forward clutch cable end from the adjustment screw by rotating it counter-clockwise (away from the forward clutch bail). 3.4. Remove the forward clutch cable from the lower handle bracket using a pair of needle nose pliers. See Figure 3.4. Spark Plug Boot Grounded Lower Handle Bracket Figure 3.1 Forward Clutch Cable Figure 3.4 3
-
 1
1 -
 2
2 -
 3
3 -
 4
4 -
 5
5 -
 6
6 -
 7
7 -
 8
8 -
 9
9 -
 10
10 -
 11
11 -
 12
12 -
13
-
14
-
15
-
16
-
17
-
18
-
19
-
20
-
21
-
22
-
23
-
24
-
25
-
26
-
27
-
28
-
29
-
30
-
31
-
32
-
33
-
34
-
35
-
36
-
37
-
38
-
39
-
40
-
41
-
42
 |
 |
