Troy-Bilt Pro-Line CRT Service Manual - Page 28
Troy-Bilt Pro-Line CRT Manual
 |
View all Troy-Bilt Pro-Line CRT manuals
Add to My Manuals
Save this manual to your list of manuals |
Page 28 highlights
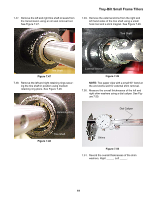
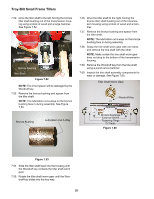
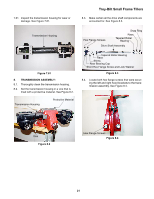
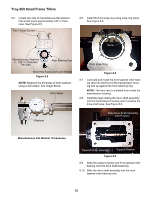
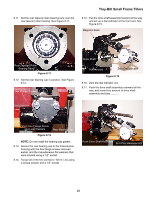
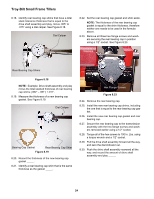
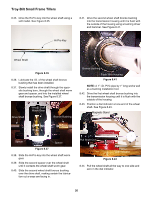
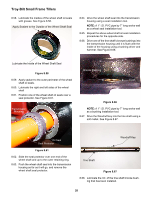
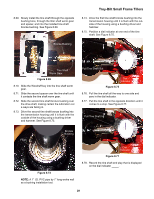
Troy-Bilt Small Frame Tillers 8.18. Identify rear bearing cap shims that have a total stack tolerance thickness that is equal to the drive shaft assembly end play, minus .005" to .015" using a dial caliper. See Figure 8.18. Dial Caliper 8.22. Set the rear bearing cap gasket and shim aside. NOTE: The thickness of the rear bearing cap gasket is equal to the shim thickness, therefore neither one needs to be used in the formula above. 8.23. Remove all three hex flange screws and washers securing the rear bearing cap in position using a 1/2" socket. See Figure 8.23. Miscellaneous Washers Rear Bearing Cap Shims Figure 8.18 NOTE: Example: Drive shaft assembly end play minus the total stacked thickness of rear bearing cap shims (.062" - .051") =.011". 8.19. Measure the thickness of a new bearing cap gasket. See Figure 8.19. Dial Caliper Bearing Cap Gasket Rear Bearing Cap Shim Figure 8.19 8.20. Record the thickness of the new bearing cap gasket _____. 8.21. Identify a rear bearing cap shim that is the same thickness as the gasket _____. Hex Flange Screws Figure 8.23 8.24. Remove the rear bearing cap. 8.25. Install the new rear bearing cap shims, including the one that is equal to the rear bearing cap gasket. 8.26. Install the new rear bearing cap gasket and rear bearing cap. 8.27. Secure the rear bearing cap to the transmission assembly with the hex flange screws and washers removed earlier using a 1/2" socket. 8.28. Torque all of the hex screws to 100 In. Lbs. using a torque wrench and a 1/2" socket. 8.29. Pull the drive shaft assembly forward all the way, and zero the dial indicator out. 8.30. Push the drive shaft assembly rearward all the way, and record the amount of drive shaft assembly end play _____. 24
-
 1
1 -
2
-
3
-
4
-
5
-
6
-
7
-
8
-
9
-
10
-
11
-
12
-
13
-
14
-
15
-
16
-
17
-
18
-
19
-
20
-
21
-
22
-
 23
23 -
 24
24 -
 25
25 -
 26
26 -
 27
27 -
 28
28 -
 29
29 -
 30
30 -
 31
31 -
 32
32 -
 33
33 -
34
-
35
-
36
-
37
-
38
-
39
-
40
-
41
-
42
 |
 |
