ViewSonic CD4220 User Guide - Page 21
Connecting to a Stereo Amplifier
 |
UPC - 766907278019
View all ViewSonic CD4220 manuals
Add to My Manuals
Save this manual to your list of manuals |
Page 21 highlights
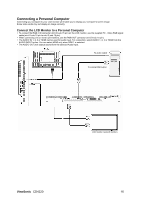
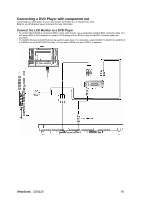
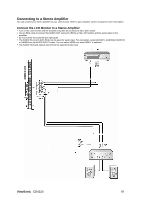
Connecting to a Stereo Amplifier You can connect your stereo amplifier to your LCD monitor. Refer to your amplifier owner's manual for more information. Connect the LCD Monitor to a Stereo Amplifier y Turn on the LCD monitor and the amplifier only after all connections have been made. y Use an RCA cable to connect the AUDIO OUT connector (RCA) on the LCD monitor and the audio input on the amplifier. y Do not reverse the audio left and right jacks. y The AUDIO IN 2 and 3 (both RCA) can be used for audio input. For connection, select [AUIDO1], [AUDIO2], [AUDIO3] or [HDMI] from the AUDIO INPUT button. You can select HDMI only when RGB 1 is selected. y The AUDIO OUT jack outputs sound from the selected Audio input. ViewSonic CD4220 19
-
 1
1 -
2
-
3
-
4
-
5
-
6
-
7
-
8
-
9
-
10
-
11
-
12
-
13
-
14
-
15
-
 16
16 -
 17
17 -
 18
18 -
 19
19 -
 20
20 -
 21
21 -
 22
22 -
 23
23 -
 24
24 -
 25
25 -
 26
26 -
27
-
28
-
29
-
30
-
31
-
32
-
33
-
34
-
35
-
36
-
37
-
38
-
39
-
40
-
41
-
42
-
43
-
44
-
45
-
46
-
47
-
48
-
49
-
50
-
51
-
52
-
53
-
54
-
55
-
56
-
57
-
58
 |
 |
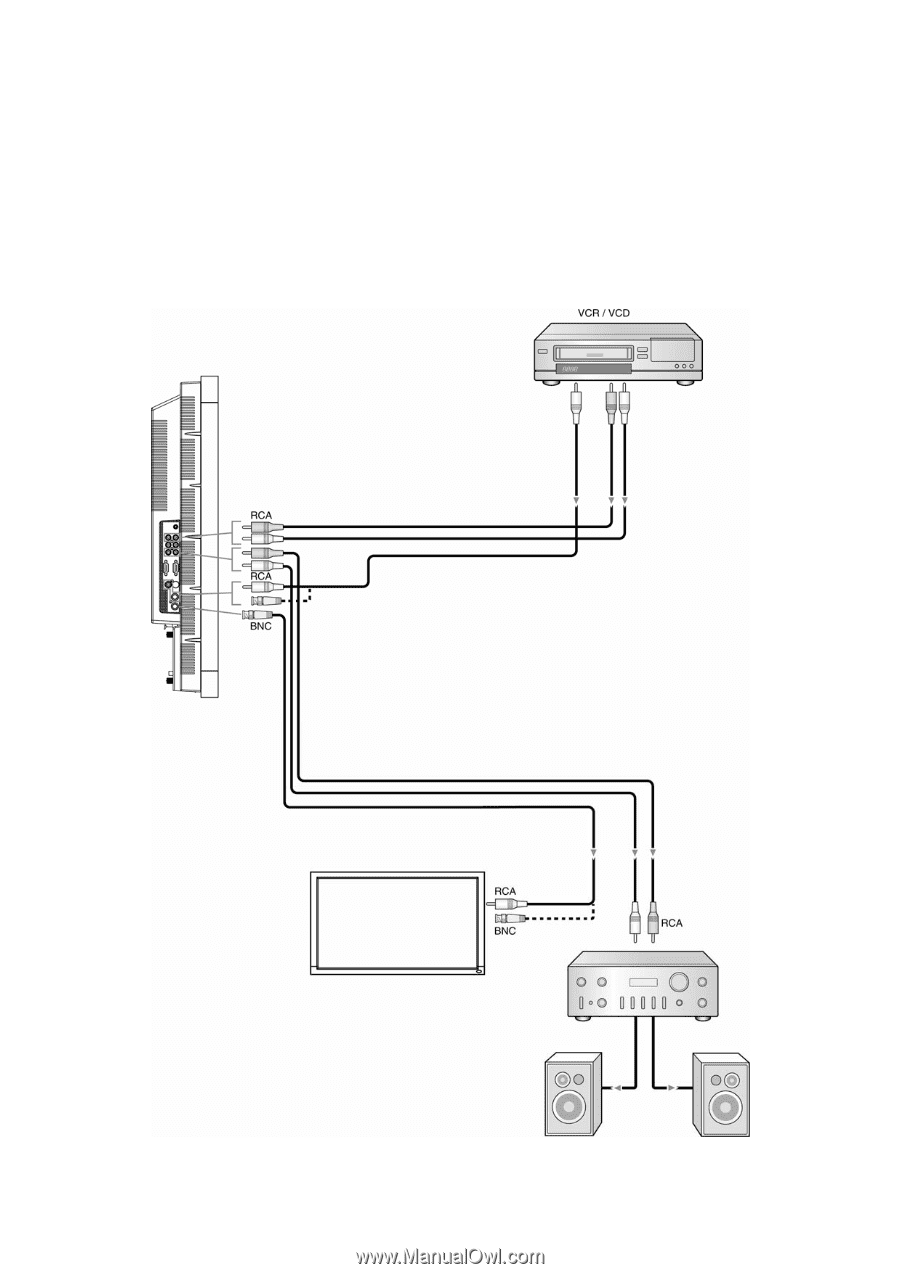
Connecting to a Stereo Amplifier
You can connect your stereo amplifier to your LCD monitor. Refer to your amplifier owner's manual for more information.
Connect the LCD Monitor to a Stereo Amplifier
y
Turn on the LCD monitor and the amplifier only after all connections have been made.
y
Use an RCA cable to connect the AUDIO OUT connector (RCA) on the LCD monitor and the audio input on the
amplifier.
y
Do not reverse the audio left and right jacks.
y
The AUDIO IN 2 and 3 (both RCA) can be used for audio input. For connection, select [AUIDO1], [AUDIO2], [AUDIO3]
or [HDMI] from the AUDIO INPUT button. You can select HDMI only when RGB 1 is selected.
y
The AUDIO OUT jack outputs sound from the selected Audio input.
ViewSonic
CD4220
19