ViewSonic CD4220 User Guide - Page 26
PICTURE, ViewSonic
 |
UPC - 766907278019
View all ViewSonic CD4220 manuals
Add to My Manuals
Save this manual to your list of manuals |
Page 26 highlights
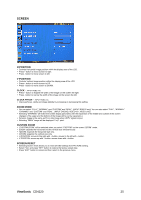
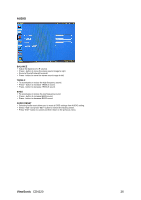
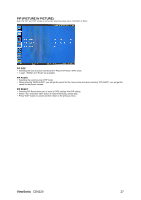
PICTURE BRIGHTNESS y Adjusts the image brightness in relation to the background. y Press + button to increase black level. y Press - button to decrease black level. CONTRAST y Adjusts the image brightness in relation to the input signal. y Press + button to increase contrast. y Press - button to decrease contrast. SHARPNESS y This function is digitally capable to keep crisp image at any timings. y It is adjustable to get a distinct image or a soft one as you prefer and set independently for each picture mode. y Press + button to increase sharpness. y Press - button to decrease sharpness. BLACK LEVEL y Adjusts the overall image and background screen brightness. y Press + button to increase brightness. y Press - button to decrease brightness. NOISE REDUCTION * : INPUT VIDEO, VIDEO only y Adjusts the noise reduction level. y Press + button to increase reduction level. y Press - button to decrease reduction level. TINT * : INPUT RGB1(HDMI INPUT MODE-HD), DVD/HD, VIDEO, VIDEO only y Adjust the tint of the screen. y Press + button the flesh tone color becomes greenish. y Press - button the flesh tone color becomes purplish. COLOR * : INPUT RGB1(HDMI INPUT MODE-HD), DVD/HD, VIDEO, VIDEO only y Adjust the color of the screen. y Press + button to increase color depth. y Press - button to decrease color depth. COLOR TEMPERATURE y Use to adjust the color temperature. y The image becomes reddish as the color temperature decreases, and it becomes bluish as the color temperature increases. COLOR CONTROL y The color levels of red, green, and blue are adjusted by the color bars. y R: Red, G: Green, B: Blue PICTURE RESET y Selecting Picture reset allows you to reset all OSD settings about PICTURE setting. y Select "Yes" and press "SET" button to restore to factory preset data. y Press "EXIT" button to cancel and then return to the previous menu. ViewSonic CD4220 24
-
 1
1 -
2
-
3
-
4
-
5
-
6
-
7
-
8
-
9
-
10
-
11
-
12
-
13
-
14
-
15
-
16
-
17
-
18
-
19
-
20
-
 21
21 -
 22
22 -
 23
23 -
 24
24 -
 25
25 -
 26
26 -
 27
27 -
 28
28 -
 29
29 -
 30
30 -
 31
31 -
32
-
33
-
34
-
35
-
36
-
37
-
38
-
39
-
40
-
41
-
42
-
43
-
44
-
45
-
46
-
47
-
48
-
49
-
50
-
51
-
52
-
53
-
54
-
55
-
56
-
57
-
58
 |
 |
