ViewSonic PJD6683ws PJD5126, PJD6223, PJD6253, PJD6553W, PJD5226, PJD5226W, PJ - Page 59
Audio, Settings, Closed, Caption, Presentation, Timer
 |
View all ViewSonic PJD6683ws manuals
Add to My Manuals
Save this manual to your list of manuals |
Page 59 highlights
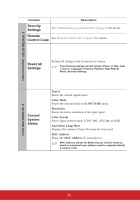
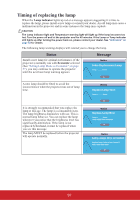
5. SYSTEM SETUP: Advanced menu Function Audio Settings Menu Settings Closed Caption Lamp Settings Presentation Timer Description The sound adjustments made as below will have an effect on the projector speaker. Be sure you have made a correct connection to the projector audio input/output jacks. See "Connection" on page 17 for more details. Mute Mutes the sound received from AUDIO IN 1 and AUDIO IN 2 (L/R). Volume Adjusts the sound level received from AUDIO IN 1 and AUDIO IN 2 (L/R). Menu Display Time Sets the length of time the OSD will remain active after your last key press. The range is from 5 to 30 seconds in 5-second increments. Menu Position Sets the On-Screen Display (OSD) menu position. Closed Caption Enable Activates the function by selecting On when the selected input signal carries closed captions. • Captions: An on-screen display of the dialogue, narration, and sound effects of TV programs and videos that are closed captioned (usually marked as "CC" in TV listings). This function is only available when a Composite video or S-Video input signal is selected and its system format is NTSC. Caption Version Selects a preferred closed captioning mode. To view captions, select CC1, CC2, CC3, or CC4 (CC1 displays captions in the primary language in your area). Lamp Mode See "Setting Lamp Mode as Economic" on page 57 for details. Reset Lamp Timer See "Resetting the lamp timer" on page 61 for details. Equivalent Lamp Hour See "Getting to know the lamp hour" on page 57 for details on how the total lamp hour is calculated. Reminds the presenter to finish the presentation within a certain time frame. See "Setting the presentation timer" on page 36 for details. 54
-
 1
1 -
2
-
3
-
4
-
5
-
6
-
7
-
8
-
9
-
10
-
11
-
12
-
13
-
14
-
15
-
16
-
17
-
18
-
19
-
20
-
21
-
22
-
23
-
24
-
25
-
26
-
27
-
28
-
29
-
30
-
31
-
32
-
33
-
34
-
35
-
36
-
37
-
38
-
39
-
40
-
41
-
42
-
43
-
44
-
45
-
46
-
47
-
48
-
49
-
50
-
51
-
52
-
53
-
 54
54 -
 55
55 -
 56
56 -
 57
57 -
 58
58 -
 59
59 -
 60
60 -
 61
61 -
 62
62 -
 63
63 -
 64
64 -
65
-
66
-
67
-
68
-
69
-
70
-
71
-
72
-
73
-
74
-
75
-
76
-
77
-
78
-
79
-
80
-
81
-
82
-
83
-
84
-
85
-
86
-
87
-
88
-
89
 |
 |
