Viking VUWC Installation Instructions
Viking VUWC Manual
 |
View all Viking VUWC manuals
Add to My Manuals
Save this manual to your list of manuals |
Viking VUWC manual content summary:
- Viking VUWC | Installation Instructions - Page 1
Install / Use & Care MANUAL 5 SERIES Undercounter Wine Cellar VUWC515G VUWC524G - Viking VUWC | Installation Instructions - Page 2
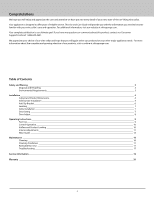
about this product, contact our Consumer Support Center at 1-888-845-4641. We Instructions 9 First Use 9 Control Operation 10 Airflow and Product Loading 10 Interior Adjustments 11 Wine Guide 13 Maintenance 16 Cleaning 16 Cleaning Condenser 17 Extended Non-Use 17 Troubleshooting 17 Service - Viking VUWC | Installation Instructions - Page 3
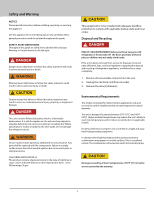
Warning NOTICE Please read all instructions before installing, operating, or servicing the appliance. Use this appliance for its intended purpose only and follow these general precautions with those listed throughout this guide: SAFETY ALERT DEFINITIONS Throughout this guide are safety items labeled - Viking VUWC | Installation Instructions - Page 4
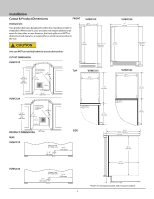
Installation Cutout & Product Dimensions FRONT VUWC515 PREPARE SITE Your product has been designed for either free-standing or built-in installation. When built-in, your unit does not require additional air space for top, sides, or rear. However, the front grille must NOT be obstructed, and - Viking VUWC | Installation Instructions - Page 5
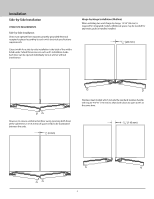
requirements. Cutout width for a side-by-side installation is the total of the widths listed under Cutout Dimensions in each unit's Installation Guide. Each door can be opened individually (one at a time) without interference. Hinge-by-Hinge Installation (Mullion) When installing two units hinge-by - Viking VUWC | Installation Instructions - Page 6
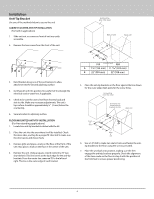
Installation Anti-Tip Bracket Use one of the methods below to secure the unit CABINET/COUNTER ANTI-TIP INSTALLATION (For built-in applications) 1. Slide unit out so screws on front of unit are easily accessible. 2. Remove the two screws from the front of the unit. 3. Bend bracket along one of the - Viking VUWC | Installation Instructions - Page 7
Installation LEVELING INFORMATION 1. Use a level to confirm the unit is level. Level should be placed along top edge and side edge as shown. 1 2. If the unit is not level, adjust the legs on the corners of the unit as necessary. Grille Installation REMOVING AND INSTALLING GRILLE ! WARNING - Viking VUWC | Installation Instructions - Page 8
Installation Door Adjustments DOOR ALIGNMENT AND ADJUSTMENT Align and adjust the door if it is not level or not sealing properly. If the door is not sealed, the unit may not cool properly, or excessive frost or condensation may form in the interior. NOTICE Properly aligned, the door's gasket should - Viking VUWC | Installation Instructions - Page 9
Operating Instructions First Use Initial startup requires no adjustments. When plugged in, the allowing the unit to reach set points before loading. Control Operation Hidden Button CONTROL FUNCTION GUIDE FUNCTION COMMAND NOTES ON/OFF Adjust Temperature Toggle between ºF / ºC Leave interior light - Viking VUWC | Installation Instructions - Page 10
Operating Instructions Airflow and Product Loading AIRFLOW External • Do not block the front grille - no additional clearance around sides, top or rear of unit is needed for - Viking VUWC | Installation Instructions - Page 11
Operating Instructions Interior Adjustments All 5 Series models feature side mounted rack supports with 19 adjustment unit with one side tilted slightly downward until back pin is between front and rear rail supports. 2. Firmly grasp both sides of rack and lift front end of rack slightly (about - Viking VUWC | Installation Instructions - Page 12
Operating Instructions Wine Storage Options WINE RACK BOTTLE POSITION Specially designed horizontal wine racks properly position the bottles so the wine remains in contact with the cork, - Viking VUWC | Installation Instructions - Page 13
Operating Instructions Wine Guide LOOKING BEHIND THE LABEL To most, wine is a delicious mystery. to make mistakes. Experiment, discover, but most of all, enjoy yourself and your new product. Guide To Common Styles Of Wine Red Wines Full-Bodied Dry Medium-Bodied Dry Light-Bodied Dry White Wines - Viking VUWC | Installation Instructions - Page 14
Operating Instructions Common Food and Wine Matches Foods Fish, Shell Fish, Crab, Oysters Beef, Venison Pork, Veal, Lamb and Poultry Fruit Wines Dry White Wines, Light Sparkling - Viking VUWC | Installation Instructions - Page 15
Operating Instructions Common Tasting Terms Terminology Acidity Balance Body Bouquet Complex Flabby Full-Bodied Lean Oaky Tannin Description A critical element of wine that is responsible for preserving - Viking VUWC | Installation Instructions - Page 16
Stainless Steel Polish and Cleaner or comparable product to prevent further problems. Using abrasive pads such as ScotchBrite™ will cause the graining the interior. DEFROSTING Under normal conditions this unit does not require manual defrosting. Minor frost on the rear wall or visible through the - Viking VUWC | Installation Instructions - Page 17
persists, read the NORMAL OPERATING SOUNDS and TROUBLESHOOTING GUIDE sections below to help you quickly identify common problems and possible causes and remedies. Most often, this will resolve the problem without the need to call for service. Condenser Extended Non-Use VACATION/HOLIDAY, PROLONGED - Viking VUWC | Installation Instructions - Page 18
GUIDE ! DANGER ELECTROCUTION HAZARD. Never attempt to repair or perform maintenance on the unit before disconnecting the main electrical power. Troubleshooting - What to check when problems occur: Problem Interior Light Does Not Illuminate Light Remains on When Door Is Closed. Unit - Viking VUWC | Installation Instructions - Page 19
the problem that you are having. If you are unable to obtain the name of an authorized service agency, or if you continue to have service problems, contact Viking Range, LLC at (888) 845-4641 or write to: VIKING RANGE, LLC PREFERRED SERVICE - Viking VUWC | Installation Instructions - Page 20
the United States, Canada, Mexico and the Caribbean (excluding Cuba, Dominican Republic, and Haiti). Products must be purchased in the country where service is requested. If the product or one of its component parts contains a defect or malfunction during the full warranty period after a reasonable - Viking VUWC | Installation Instructions - Page 21
MANUEL d'installation, d'utilisation et d'entretien SÉRIE 5 Refroidisseur à vin encastrable VUWC515G VUWC524G - Viking VUWC | Installation Instructions - Page 22
est conçu pour vous offrir des années de service infaillible. Ce guide d'utilisation et d'entretien vous fournira toutes les informations né espace d'installation et du produit 4 Installation côte à côte 5 Support antibasculement 6 Mise à niveau 7 Installation de la grille 7 Basculement - Viking VUWC | Installation Instructions - Page 23
éder à l'entretien sans consulter la section « Spécifications R600a » incluse dans le Guide de l'utilisateur. Ne pas endommager le circuit frigorifique. ! AVERTISSEMENT Tout entretien doit être effectué par un personnel de service autorisé par l'usine. Toutes les pièces doivent être remplacées par - Viking VUWC | Installation Instructions - Page 24
Installation Dimensions de l'espace d'installation et du produit DEVANT VUWC515 PRÉPARER L'EMPLACEMENT Cet appareil a été conçu pour une pose libre ou encastrable. Lorsqu'il est encastré, l'appareil n'a pas besoin d'espace d'air supplémentaire sur le dessus, les côtés ou l'arrière. Cependant, ne - Viking VUWC | Installation Instructions - Page 25
appareil. La largeur de l'espace d'installation côte à côte est la somme des largeurs indiquées sous Dimensions de l'espace d'installation dans le Guide d'installation de chaque unité. Chaque porte peut être ouverte séparément (une à la fois) sans interférence. Installation charnière à charnière - Viking VUWC | Installation Instructions - Page 26
ée pour le bord extérieur. Marquer les points pour les trous de vis. Superficie environnante (vue de dessus) Percez des trous et fixez les supports antibasculement au plancher. Paroi arrière Avant de l'unité A CL B A Arrière de l'unité 6. Utiliser une perceuse de 1/8 po pour faire deux trous et - Viking VUWC | Installation Instructions - Page 27
réglages nécessaires. La surface supérieure de l'unité doit se trouver à environ 3 mm (1⁄8 po) sous le plan de travail. 4. Installer le support antibasculement. 5. Retirer l'emballage intérieur et essuyer l'intérieur de l'appareil avec un chiffon propre imbibé d'eau. Acier inoxydable, noir et blanc - Viking VUWC | Installation Instructions - Page 28
Installation Ajustements de la porte ALIGNEMENT ET AJUSTEMENT DE LA PORTE Aligner et ajuster la porte si elle n'est pas mise à niveau ou si elle n'est pas fermée hermétiquement. Si la porte n'est pas fermée hermétiquement, il est possible que l'appareil ne refroidisse pas correctement ou que le - Viking VUWC | Installation Instructions - Page 29
Mode d'emploi Première utilisation La mise en service initiale ne nécessite aucun réglage. Une fois branché, l'appareil commencera réglage avant de le charger. Fonctionnement des commandes FONCTIONNEMENT DES COMMANDES GUIDE DES FONCTIONS DE COMMANDE FONCTION MARCHE/ARRÊT Ajuster la température - Viking VUWC | Installation Instructions - Page 30
Mode d'emploi Débit d'air et chargement de produits DÉBIT D'AIR Externe • Ne pas bloquer la grille avant : aucun dégagement supplémentaire sur les côtés, le dessus ou l'arrière de l'appareil n'est nécessaire pour la ventilation. • Ne pas installer derrière une porte fermée Interne • Lors du - Viking VUWC | Installation Instructions - Page 31
le porte-bouteilles vide dans l'appareil en inclinant légèrement un côté vers le bas jusqu'à ce que la goupille arrière soit placée entre les supports de rail avant et arrière. 2. Saisir fermement les deux côtés du porte-bouteilles, en soulever légèrement la partie frontale (environ¼ po) afin de - Viking VUWC | Installation Instructions - Page 32
Mode d'emploi Options de stockage du vin POSITION DU PORTE-BOUTEILLE Les porte-bouteilles horizontaux sont spécialement conçus pour permettre de placer correctement les bouteilles afin que le vin reste en contact avec le bouchon, ce qui évite son dessèchement. Les porte-bouteilles sont conçus pour - Viking VUWC | Installation Instructions - Page 33
propre palais. Ne craignez pas de faire des erreurs. Faites l'expérience, découvrez, mais surtout, prenez du plaisir et profitez de votre nouveau produit. Guide des vins courants Vins rouges Corsé et sec Moyennement corsé et sec Légèrement corsé et sec Vins blancs Corsé et sec Moyennement corsé et - Viking VUWC | Installation Instructions - Page 34
Mode d'emploi Accords mets et vins courants Aliment Poissons, crustacés, crabes, huîtres Bœuf, chevreuil Porc, veau, agneau et volaille Fruit Vins Vins blancs secs, mousseux légers ou champagne extra sec Vins rouges corsés Vins rouges légers Vins blancs doux et mousseux Portons un toast à la vé - Viking VUWC | Installation Instructions - Page 35
Mode d'emploi Lexique de la dégustation Terminologie Acidité Équilibre Corps Bouquet Complexe Plat Corsé Fin Boisé Tanin Description Un élément critique du vin responsable de la conservation de la fraîcheur du vin. L'excès d'acidité donne un vin trop acidulé et aigre. Un trait recherché où les - Viking VUWC | Installation Instructions - Page 36
Entretien Nettoyage Modèles en acier inoxydable Les panneaux de porte, les poignées et les cadres en acier inoxydable peuvent se décolorer lorsqu'ils sont exposés au chlore gazeux, aux produits chimiques pour piscines, à l'eau salée ou aux produits nettoyants à l'eau de Javel. Pour que votre - Viking VUWC | Installation Instructions - Page 37
me persiste, lisez les sections SONS NORMAUX DE FONCTIONNEMENT et GUIDE DE DÉPANNAGE ci-dessous pour vous aider à identifier dépannage ou si votre produit a besoin d'être réparé, communiquez directement avec le service Viking Preferred au (888) 845-4641. Lorsque vous appelez, vous aurez besoin des - Viking VUWC | Installation Instructions - Page 38
de récupération lorsque l'appareil est en cycle de dégivrage. GUIDE DE DÉPANNAGE ! DANGER RISQUE D'ÉLECTROCUTION. Ne jamais tenter de ré Éteindre l'interrupteur d'éclairage, s'il y a allumée lorsque la lieu. Ajuster le support de commande de porte est fermée. la lumière au bas de la porte. Du - Viking VUWC | Installation Instructions - Page 39
qui le produit a été acheté Décrivez avec précision le problème que vous rencontrez. Si vous ne parvenez pas à obtenir le nom d'une agence de service agréée, ou si vous continuez de rencontrer des problèmes, contactez Viking Range, LLC au +1 888 845-4641, ou écrivez à : VIKING RANGE, LLC PREFERRED - Viking VUWC | Installation Instructions - Page 40
numéro de série ainsi que la date d'achat d'origine ou la date de la nouvelle installation. Pour obtenir les coordonnées du centre de service Viking Range, LLC le plus proche de chez vous, appelez Viking Range, LLC. IMPORTANT : Conservez la preuve d'achat originale pour justifier de la période de - Viking VUWC | Installation Instructions - Page 41
MANUAL DE instalación, uso y mantenimiento SERIE 5 Bodega bajo encimera VUWC515G VUWC524G - Viking VUWC | Installation Instructions - Page 42
Enhorabuena Esperamos que disfrute y aprecie el cuidado y la atención que hemos puesto en cada detalle de su nuevo e innovador bodega bajo encimera Viking. El aparato está diseñado para ofrecer muchos años de vida útil. Esta Guía de uso y cuidado le brindará la información que necesita para - Viking VUWC | Installation Instructions - Page 43
Seguridad y advertencia AVISO Lea todas las instrucciones antes de instalar, utilizar o reparar el aparato. Úselo solo para el propósito previsto y siga estas precauciones generales que se enumeran en esta guía: DEFINICIONES DE ALERTAS DE SEGURIDAD A lo largo de esta guía hay elementos de seguridad - Viking VUWC | Installation Instructions - Page 44
Instalación Encastrado y dimensiones del producto PARTE FRONTAL VUWC515 PREPARACIÓN DEL SITIO 14 15⁄16" (379 mm) Su producto ha sido diseñado para una instalación independiente o incorporada. Cuando se instala de forma incorporada, su unidad no requiere espacio adicional para la parte - Viking VUWC | Installation Instructions - Page 45
Instalación Instalación de lado a lado OTROS REQUISITOS DEL SITIO Instalación de lado a lado Las unidades deben funcionar desde receptáculos eléctricos separados, debidamente conectados a tierra, de acuerdo con los requisitos de las especificaciones eléctricas de cada unidad. El ancho de encastrado - Viking VUWC | Installation Instructions - Page 46
Instalación Soporte antivuelco Utilice uno de los siguientes métodos para asegurar la unidad INSTALACIÓN ANTIVUELCO DEL MUEBLE/ENCIMERA (para aplicaciones incorporadas) 1. Deslice la unidad hacia afuera para que los tornillos en la parte frontal de la misma sean fácilmente accesibles. 2. Retire los - Viking VUWC | Installation Instructions - Page 47
Instalación INFORMACIÓN DE NIVELACIÓN Instalación de la rejilla 1. Use un nivel para confirmar que la unidad está nivelada. nivel debe colocarse lo largo del borde superior y el borde lateral como muestra. 1 RETIRO E INSTALACIÓN DE LA REJILLA El ! ADVERTENCIA a Desconecte el suministro elé - Viking VUWC | Installation Instructions - Page 48
Instalación Ajustes de la puerta ALINEACIÓN Y AJUSTE DE LA PUERTA Alinee y ajuste la puerta si no está nivelada o si no se sella correctamente. Si la puerta no está sellada, es posible que la unidad no se enfríe correctamente o que se forme escarcha o condensación excesiva en el interior. AVISO - Viking VUWC | Installation Instructions - Page 49
Instrucciones de funcionamiento Primer uso El primer inicio no requiere ajustes. Cuando se enchufa, la unidad comenzará a funcionar con la configuración predeterminada de fábrica. Si la unidad se apagó durante la instalación, simplemente presione y la unidad se encenderá inmediatamente. Para apagar - Viking VUWC | Installation Instructions - Page 50
Instrucciones de funcionamiento Flujo de aire y carga de productos FLUJO DE AIRE Externo • No bloquee la rejilla frontal: no se necesita espacio libre adicional alrededor de los lados, la parte superior o posterior de la unidad para la ventilación. • No lo instale detrás de una puerta cerrada. - Viking VUWC | Installation Instructions - Page 51
Instrucciones de funcionamiento Ajustes interiores Todos los modelos de la Serie 5 cuentan con soportes de botelleros montados a los laterales con 19 posiciones de ajuste. Todos los bodega bajo encimera se envían con 7 botelleros. Retire y vuelva a colocar según lo desee. AJUSTE DEL BOTELLERO Retiro - Viking VUWC | Installation Instructions - Page 52
Instrucciones de funcionamiento Opciones de almacenamiento de vino POSICIÓN DE LA BOTELLA EN EL BOTELLERO Los botelleros horizontales especialmente diseñados colocan las botellas de manera adecuada para que el vino permanezca en contacto con el corcho, lo que garantiza que el corcho no se seque. Los - Viking VUWC | Installation Instructions - Page 53
Instrucciones de funcionamiento Guía de vinos MIRAR DETRÁS DE LA ETIQUETA Para la mayoría, el vino es un delicioso misterio. Lo compramos, lo descorchamos y saboreamos su sabor y belleza. Pero hay mucho más en la verdadera apreciación del vino. Muchos secretos son simplemente demasiado buenos para - Viking VUWC | Installation Instructions - Page 54
Instrucciones de funcionamiento Maridaje común de comidas y vinos Alimentos Vinos Pescados, mariscos, cangrejo, ostras Vinos blancos secos, espumosos ligeros o champán extraseco Carne de res, venado Vinos tintos de cuerpo completo Cerdo, ternera, cordero y aves Vinos tintos de cuerpo ligero - Viking VUWC | Installation Instructions - Page 55
Instrucciones de funcionamiento Términos comunes de degustación Terminología Acidez Equilibrio Cuerpo Bouquet Complejo Blando De cuerpo completo Ligero Roble Tanino Descripción Un elemento crítico del vino que se encarga de preservar la frescura del vino. El exceso de acidez da como resultado un - Viking VUWC | Installation Instructions - Page 56
transferir sabor u olor a los productos interiores y dañar o decolorar el interior. DESCONGELACIÓN En condiciones normales, esta unidad no requiere descongelación manual. Una escarcha leve en la pared posterior o visible a través de la ventilación de la placa del evaporador es normal y se derretir - Viking VUWC | Installation Instructions - Page 57
SERVICIO TÉCNICO Si no comprende una solución de la resolución de problemas, o si su producto necesita servicio técnico, comuníquese con Viking Preferred Service directamente al (888) 845-4641. Cuando llame, necesitará el modelo de su producto y los números de serie. Esta información aparece en la - Viking VUWC | Installation Instructions - Page 58
Mantenimiento A continuación se enumeran los componentes de refrigeración comunes con una breve descripción de los sonidos normales de funcionamiento que hacen. NOTA: Su producto puede no contener todos los componentes enumerados. • Compresor: el compresor emite un zumbido o un sonido intermitente - Viking VUWC | Installation Instructions - Page 59
Range, LLC, llamando al (888) 845-4641, o escriba a: VIKING RANGE, LLC PREFERRED SERVICE 111 Front Street Greenwood, Mississippi 38930 USA Anote la información que se indica a continuación. La autorizadas para asegurar la cobertura de la garantía. Conserve este manual para su referencia futura. 19 - Viking VUWC | Installation Instructions - Page 60
GARANTÍA DEL BODEGA BAJO ENCIMERA GARANTÍA COMPLETA DE DOS AÑOS Los centros de bodega bajo encimera r y todos sus componentes, excepto como se detalla a continuación*†, se garantizan como exentos de defectos en materiales y fabricación con el uso residencial normal por un período de dos (2) años
-
 1
1 -
 2
2 -
 3
3 -
 4
4 -
 5
5 -
 6
6 -
 7
7 -
8
-
9
-
10
-
11
-
12
-
13
-
14
-
15
-
16
-
17
-
18
-
19
-
20
-
21
-
22
-
23
-
24
-
25
-
26
-
27
-
28
-
29
-
30
-
31
-
32
-
33
-
34
-
35
-
36
-
37
-
38
-
39
-
40
-
41
-
42
-
43
-
44
-
45
-
46
-
47
-
48
-
49
-
50
-
51
-
52
-
53
-
54
-
55
-
56
-
57
-
58
-
59
-
60
 |
 |
VUWC515G
VUWC524G
5 SERIES
Undercounter Wine Cellar
Install / Use & Care
MANUAL