Vizio M420NV M420NV User Manual - Page 37
Contrast, Color, Sharpness, Size & Position
 |
UPC - 845226003271
View all Vizio M420NV manuals
Add to My Manuals
Save this manual to your list of manuals |
Page 37 highlights
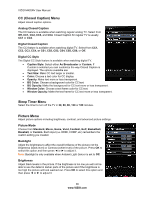
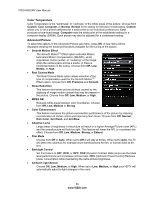
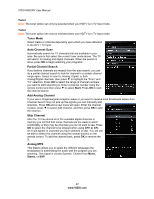
VIZIO M420NV User Manual Contrast Adjust the white levels in the picture. If the contrast is too low the picture will look washed out and if the contrast is too high you will not be able to see any detail in the bright parts of a picture. Press OK to select this option and then press ◄ or ► to adjust it. Color Adjust the amount of color in the picture. Press OK to select this option and then press ◄ or ► to adjust it. Tint Adjust the hue of the picture. The easiest way to set tint is to look at flesh tones and adjust for a realistic appearance. In most cases, the default middle position is correct. If people's faces look too orange try reducing the level of color first. Press OK to select this option and then press ◄ or ► to adjust it. Sharpness Adjust the sharpness of the edges of elements in the picture. It does not produce detail that otherwise does not exist. This adjustment is helpful when viewing Standard Definition sources. Press OK to select this option and then press ◄ or ► to adjust it. More Select More to adjust advanced options for fine tuning the picture. Size & Position To select the options in the Size & Position sub-menu, press OK. A new menu will be displayed showing the following Size & Position settings: • Horiz. Position Adjust the horizontal position of the picture. • Vertical Position Adjust the vertical position of the picture. • Horizontal Size Adjust the horizontal size of the picture. • Vertical Size Adjust the vertical size of the picture. Note: The Size & Position function is only available in Component, Composite, and RGB modes. In HDMI mode, only the Position function is only available. Version 2/23/2010 37 www.VIZIO.com
-
 1
1 -
2
-
3
-
4
-
5
-
6
-
7
-
8
-
9
-
10
-
11
-
12
-
13
-
14
-
15
-
16
-
17
-
18
-
19
-
20
-
21
-
22
-
23
-
24
-
25
-
26
-
27
-
28
-
29
-
30
-
31
-
 32
32 -
 33
33 -
 34
34 -
 35
35 -
 36
36 -
 37
37 -
 38
38 -
 39
39 -
 40
40 -
 41
41 -
 42
42 -
43
-
44
-
45
-
46
-
47
-
48
-
49
-
50
-
51
-
52
-
53
-
54
-
55
-
56
-
57
-
58
-
59
-
60
-
61
-
62
-
63
-
64
-
65
-
66
-
67
-
68
-
69
-
70
-
71
-
72
-
73
-
74
-
75
-
76
-
77
-
78
 |
 |
