Weider Club C 725 English Manual - Page 21
See inset drawing B. Identify the High Cable
 |
View all Weider Club C 725 manuals
Add to My Manuals
Save this manual to your list of manuals |
Page 21 highlights
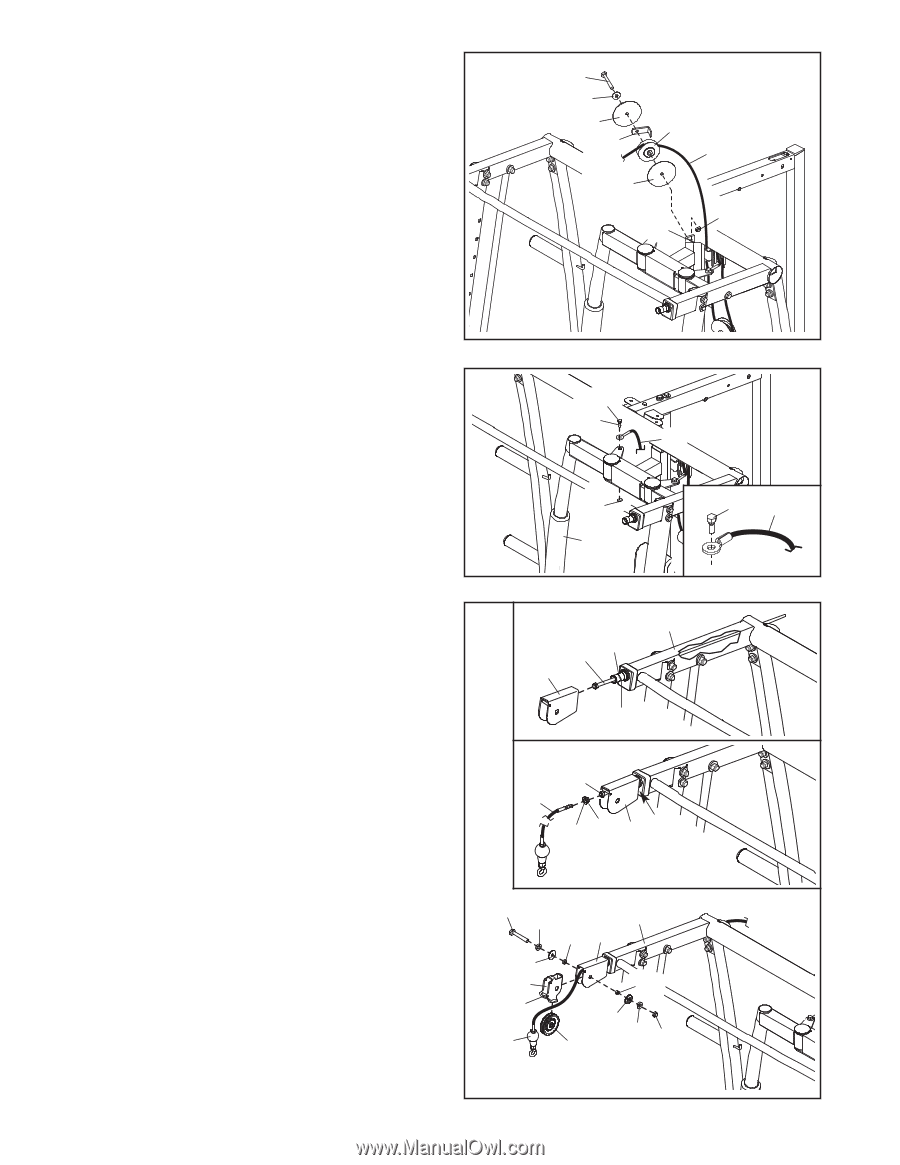
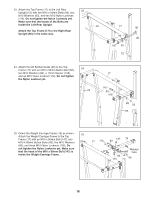
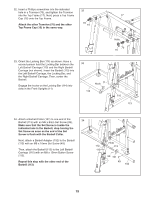
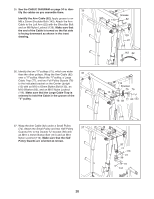
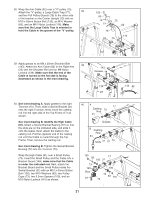
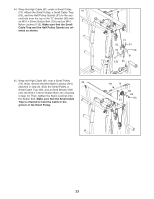
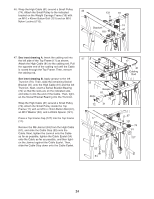
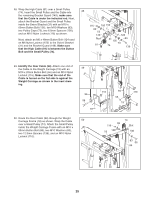
38. Wrap the Arm Cable (82) over a "V"-pulley (75). Attach the "V"-pulley, a Large Cable Trap (77), 38 and two Full Pulley Guards (76) to the other side of the bracket on the Center Upright (13) with an M10 x 63mm Button Bolt (133), an M10 Washer (83), and an M10 Nylon Locknut (116). Make sure that the Large Cable Trap is oriented to hold the Cable in the groove of the "V"-pulley. 133 83 76 77 75 82 76 116 13 39. Apply grease to an M8 x 25mm Shoulder Bolt (143). Attach the Arm Cable (82) to the Right Arm 39 (23) with the Shoulder Bolt and an M8 Nylon Locknut (139). Make sure that the end of the Cable is turned so the flat side is facing downward as shown in the inset drawing. 143 Grease 82 139 143 82 23 40. See inset drawing A. Apply grease to the right Trunnion (70). Then, slide a Swivel Bracket (31) onto the right Trunnion. Next, insert the cabling rod into the right side of the Top Frame (17) as shown. See inset drawing B. Identify the High Cable (81). Orient a Swivel Bracket Bearing (72) so that the slots are on the indicated side, and slide it onto the Cable. Next, attach the Cable to the cabling rod. Pull the opposite end of the cabling rod until the Cable is routed through the Top Frame. Then, remove the cabling rod. See inset drawing B. Tighten the Swivel Bracket Bearing (72) into the Trunnion (70). Wrap the High Cable (81) over a Small Pulley (74). Insert the Small Pulley and the Cable into a Bracket Guard (149); make sure that the Cable is under the indicated rod. Next, attach the Bracket Guard and the Small Pulley inside the Swivel Bracket (31) with an M10 x 60mm Button Bolt (136), two M10 Washers (83), two Pulley Caps (73), two 6.5mm Spacers (100), and an M10 Nylon Locknut (116) as shown. 40 A 17 Cabling 70 Rod 31 Grease B Cabling Rod 81 Slots 72 31 70 136 83 17 100 31 73 149 Rod 81 100 73 83 116 74 21
-
 1
1 -
2
-
3
-
4
-
5
-
6
-
7
-
8
-
9
-
10
-
11
-
12
-
13
-
14
-
15
-
 16
16 -
 17
17 -
 18
18 -
 19
19 -
 20
20 -
 21
21 -
 22
22 -
 23
23 -
 24
24 -
 25
25 -
 26
26 -
27
-
28
-
29
-
30
-
31
-
32
-
33
-
34
-
35
-
36
-
37
-
38
-
39
-
40
-
41
-
42
-
43
-
44
 |
 |