Weider Weevsy3426 Uk Manual - Page 10
Attach the Top Frame 4 between the Weight
 |
View all Weider Weevsy3426 manuals
Add to My Manuals
Save this manual to your list of manuals |
Page 10 highlights
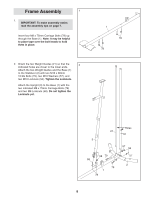
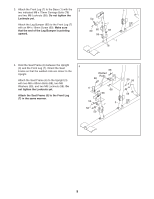
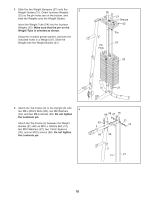
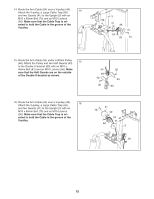
5. Slide the two Weight Bumpers (27) onto the Weight Guides (21). Orient fourteen Weights 5 (22) so the pin holes are on the bottom, and slide the Weights onto the Weight Guides. Insert the Weight Tube (24) into the fourteen Weights (22). Make sure that the pin on the Weight Tube is oriented as shown. Using the included grease packet, lubricate the indicated holes in a Weight (22). Slide the Weight onto the Weight Guides (21). Pin Hole 21 Grease 22 Pin 24 22 27 6. Attach the Top Frame (4) to the Upright (3) with two M8 x 80mm Bolts (68), two M8 Washers 6 (59), and two M8 Locknuts (58). Do not tighten the Locknuts yet. Attach the Top Frame (4) between the Weight Guides (21) with an M10 x 160mm Bolt (74), two M10 Washers (57), two 13mm Spacers (76), and an M10 Locknut (56). Do not tighten the Locknuts yet. 68 56 57 76 57 59 4 74 58 58 3 21 21 10
-
 1
1 -
2
-
3
-
4
-
 5
5 -
 6
6 -
 7
7 -
 8
8 -
 9
9 -
 10
10 -
 11
11 -
 12
12 -
 13
13 -
 14
14 -
 15
15 -
16
-
17
-
18
-
19
-
20
-
21
-
22
-
23
-
24
-
25
-
26
-
27
-
28
-
29
-
30
-
31
-
32
 |
 |
