Weider Weevsy3426 Uk Manual - Page 8
Frame Assembly
 |
View all Weider Weevsy3426 manuals
Add to My Manuals
Save this manual to your list of manuals |
Page 8 highlights
Frame Assembly 1 1. IMPORTANT: To make assembly easier, read the assembly tips on page 7. Insert four M8 x 75mm Carriage Bolts (78) up through the Base (1). Note: It may be helpful to place tape over the bolt heads to hold them in place. 2. Orient the two Weight Guides (21) so that the 2 indicated holes are closer to the lower ends. Attach the two Weight Guides and the Base (1) to the Stabilizer (2) with two M10 x 80mm 10.9G Bolts (79), two M10 Washers (57), and two M10 Locknuts (56). Tighten the Locknuts. Attach the Upright (3) to the Base (1) with the two indicated M8 x 75mm Carriage Bolts (78) and two M8 Locknuts (58). Do not tighten the Locknuts yet. 1 78 78 21 3 58 79 58 79 1 78 Holes 21 57 56 57 2 8
-
 1
1 -
2
-
 3
3 -
 4
4 -
 5
5 -
 6
6 -
 7
7 -
 8
8 -
 9
9 -
 10
10 -
 11
11 -
 12
12 -
 13
13 -
14
-
15
-
16
-
17
-
18
-
19
-
20
-
21
-
22
-
23
-
24
-
25
-
26
-
27
-
28
-
29
-
30
-
31
-
32
 |
 |

8
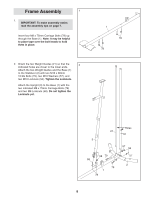
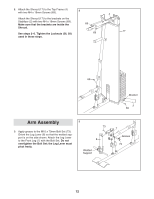
2.
Orient the two Weight Guides (21) so that the
indicated holes are closer to the lower ends.
Attach the two Weight Guides and the Base (1)
to the Stabilizer (2) with two M10 x 80mm
10.9G Bolts (79), two M10 Washers (57), and
two M10 Locknuts (56).
Tighten the Locknuts.
Attach the Upright (3) to the Base (1) with the
two indicated M8 x 75mm Carriage Bolts (78)
and two M8 Locknuts (58).
Do not tighten the
Locknuts yet.
1.
Insert four M8 x 75mm Carriage Bolts (78) up
through the Base (1).
Note: It may be helpful
to place tape over the bolt heads to hold
them in place.
Frame Assembly
1
1
78
78
2
78
56
58
3
1
58
79
79
2
57
57
21
Holes
21
IMPORTANT: To make assembly easier,
read the assembly tips on page 7.