Weider Weevsy3426 Uk Manual - Page 9
Attach the Seat Frame 6 to the Front Leg
 |
View all Weider Weevsy3426 manuals
Add to My Manuals
Save this manual to your list of manuals |
Page 9 highlights
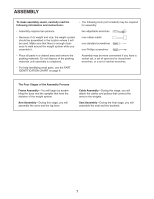
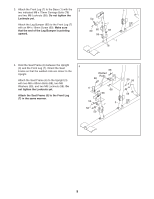
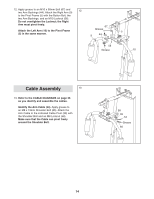
3. Attach the Front Leg (7) to the Base (1) with the 3 two indicated M8 x 75mm Carriage Bolts (78) and two M8 Locknuts (58). Do not tighten the Locknuts yet. Attach the Leg Bumper (60) to the Front Leg (7) with an M4 x 19mm Screw (69). Make sure that the end of the Leg Bumper is pointing upward. Up 69 60 58 7 58 1 78 4. Hold the Seat Frame (6) between the Upright (3) and the Front Leg (7). Orient the Seat Frame so that the welded rods are closer to the Upright. Attach the Seat Frame (6) to the Upright (3) with two M8 x 80mm Bolts (68), two M8 Washers (59), and two M8 Locknuts (58). Do not tighten the Locknuts yet. Attach the Seat Frame (6) to the Front Leg (7) in the same manner. 4 68 Welded Rods 68 6 68 68 59 7 3 58 59 59 58 59 9
-
 1
1 -
2
-
3
-
 4
4 -
 5
5 -
 6
6 -
 7
7 -
 8
8 -
 9
9 -
 10
10 -
 11
11 -
 12
12 -
 13
13 -
 14
14 -
15
-
16
-
17
-
18
-
19
-
20
-
21
-
22
-
23
-
24
-
25
-
26
-
27
-
28
-
29
-
30
-
31
-
32
 |
 |

9
3.
Attach the Front Leg (7) to the Base (1) with the
two indicated M8 x 75mm Carriage Bolts (78)
and two M8 Locknuts (58).
Do not tighten the
Locknuts yet.
Attach the Leg Bumper (60) to the Front Leg (7)
with an M4 x 19mm Screw (69).
Make sure
that the end of the Leg Bumper is pointing
upward.
4.
Hold the Seat Frame (6) between the Upright
(3) and the Front Leg (7). Orient the Seat
Frame so that the welded rods are closer to the
Upright.
Attach the Seat Frame (6) to the Upright (3)
with two M8 x 80mm Bolts (68), two M8
Washers (59), and two M8 Locknuts (58).
Do
not tighten the Locknuts yet.
Attach the Seat Frame (6) to the Front Leg
(7) in the same manner.
3
4
78
58
58
69
Up
60
7
1
6
68
Welded
Rods
68
68
59
59
59
59
3
7
58
58
68