Western Digital WD1200JB User Manual (pdf) - Page 16
Add the drive as a boot device, Custom, Partition, Delete, Add Partition, Erase, Caution - new
 |
UPC - 718037104522
View all Western Digital WD1200JB manuals
Add to My Manuals
Save this manual to your list of manuals |
Page 16 highlights
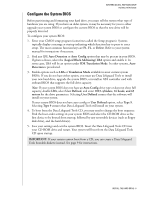
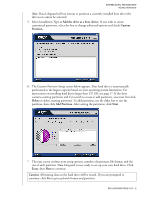
WESTERN DIGITAL EIDE HARD DRIVE INSTALLATION GUIDE Note: Data Lifeguard will not format or partition a currently installed boot drive (the drive icon cannot be selected). 5. Select Installation Type as Add the drive as a boot device. If you wish to create customized partitions, select the box to change advanced options and check Custom Partition. 6. The Custom Partition Setup screen below appears. Your hard drive is automatically partitioned to the largest capacity based on your operating system limitations. For instructions on installing hard drives larger than 137 GB, see page 17. If the drive contains existing partitions and if you wish to create or add partitions, you must first click Delete to delete existing partitions. To add partitions, use the slider bar to size the partition, then click Add Partition. After setting the partitions, click Next. 7. The next screen outlines your setup options, number of partitions, file format, and the size of each partition. Data Lifeguard is now ready to set up your new hard drive. Click Erase, then Next to continue. Caution: All existing data on the hard drive will be erased. If you are prompted to continue, click Yes to proceed with format and partition. DATA LIFEGUARD TOOLS V11.0 - 12
-
 1
1 -
2
-
3
-
4
-
5
-
6
-
7
-
8
-
9
-
10
-
 11
11 -
 12
12 -
 13
13 -
 14
14 -
 15
15 -
 16
16 -
 17
17 -
 18
18 -
 19
19 -
 20
20 -
 21
21 -
22
-
23
-
24
-
25
-
26
-
27
-
28
-
29
-
30
-
31
-
32
-
33
-
34
-
35
-
36
 |
 |
